ComfyUI upscale4k with controlnet tile
файл на civitaiстраница на civitai

Very effective.


Very effective.
A lot of people asking the same questions, that's why I decided to make a general tutorial, that will work with any of my "frames" Loras. So what is it and why do you may need them, and how make gifs with them?
The frames Lora represent a bunch of frames that supposedly follow one another like a frames from video/animation. They should be somewhat coherent and consistent, that prevent the flickering, that you'll obviously get if try to split a real video into frames and then process them through img2img. My way still get flickering, but much less, and with much much more flexible results, because you can control "the base" of the image. At least that is my experience.
So, for starters we will need to download any nsfw model, for example, here is my favorites:
*Basically any nsfw model should do, but sometimes it needs more or less weight of the Lora.
Then you'll need to download (or train) "frames" Lora. For example here is mine:
Some of my models is flexible enough to be mixed with other Loras, for example - character Loras. But because lots of people are struggling with the frames set - lastly I started to make them overfitting. Which is why it may cause artifacts if used with other Loras. If you want to use character Lora - use it after the base is done, when upscaling/finetuning the image. Just add to the prompt stuff, that will descibe your character - like hair, body type - etc.
The frames set could be received in following order:
We make "raw" image with needed frame set (2x2/3x3 for now);
Finetuning with img2img;
Making a gif;
Profit!
For example I'll use my POV bj Lora, and PerfectDeliberate model. I'll show how to use it on 2x2frame set. Here is my prompt parameters:
{Prompt:<lora:DDpovbj_1ot:0.75>
Negative prompt: 3d, sepia, painting, cartoons, sketch, (worst quality:2), (low quality:2), (normal quality:2), lowres, bad anatomy, bad hands, normal quality, (monochrome), ((grayscale)), (ugly:2.0), badhandv4, BBN, easynegative, poor quality
Steps: 25, Sampler: DPM++ 2M Karras, CFG scale: 7, Seed: 3329762245, Size: 512x512, Model hash: 6ac5833494, Model: perfectdeliberate_v20, Clip skip: 2}
!!!NO VAE!!! Some of the people had problems with vae. Don't know why. Just choose "none" in preferences.
Size have to (let me stress it out, it's not "should be" - IT'S HAVE TO) be exact 512x512 for 2x2frames set. For the 3x3frames set use 768x768 resolution - no more, no less.
Here is what I get:
For those who doesn't understood it yet - It's not 4 images it's one in 2x2frames set.
Adding details
Some of the models can be picky and refuse to give you a frame set. In that cases We will need to help it with this tags:
1girl (4girls if nothing helps, but that leads to different girls in raw picture, sometimes);
2x2frames;
a series of pictures of {action} (based on Lora tag).
Here is the new prompt parametrs (negative and other parametrs are the same):
{Prompt: 1girl, (2x2frames), a series of pictures of blowjob, <lora:DDpovbj_1ot:0.75>}
Now, let's add some details about girl:
{Prompt: 1girl, (2x2frames), a series of pictures of blowjob, <lora:DDpovbj_1ot:0.75>, long ((ginger)) hair, petite, perfect face, perfect eyes, masterpiece, best quality, high quality, 4k, ray tracing}
Here is what i get:
It's not perfect - I don't like fingers, most likely it'l cause more flickering, so let's try to find a better seed with the same prompt.
I liked this one (seed 173730505):
After that, we send this image to img2img tab, and upscale it.
Here are two ways to do that (there are not the only ones):
img2img with higher resolution;
Ultimate sd upscale.
img2img
The first one - if you have enough Vram you can just process this image with higher resolution. For example with 2048x2048. But we should lower the Lora weight to prevent artifacts and lower the denoising strength, to prevent the image from falling apart.
We may use different seed, and higher denosing strength if we want more variety. But let's stick as close as we can to the raw picture.
Here is the prompt:
{Prompt: 1girl, (2x2frames), a series of pictures of blowjob, <lora:DDpovbj_1ot:0.5>, long ((ginger)) hair, petite, perfect face, perfect eyes, masterpiece, best quality, high quality, 4k, ray tracing
Negative prompt: 3d, sepia, painting, cartoons, sketch, (worst quality:2), (low quality:2), (normal quality:2), lowres, bad anatomy, bad hands, normal quality, (monochrome), ((grayscale)), (ugly:2.0), badhandv4, BBN, easynegative, poor quality
Steps: 25, Sampler: DPM++ 2M Karras, CFG scale: 7, Seed: 173730505, Size: 2048x2048, Model hash: 6ac5833494, Model: perfectdeliberate_v20, Denoising strength: 0.4, Clip skip: 2, Mask blur: 4}
Still blurry, and have morbid fingers, but I'll take it for example.
Ultimate sd upscale
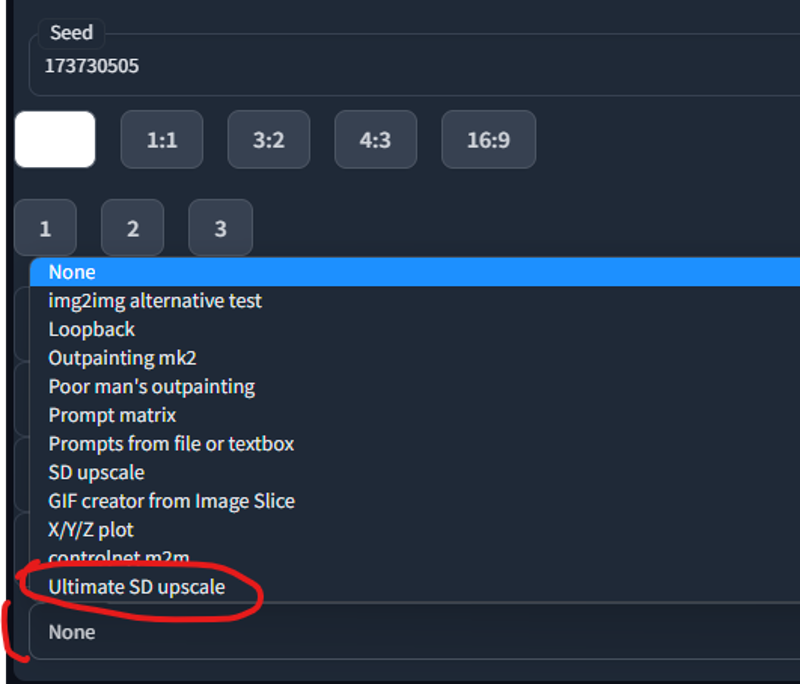
If you don't have enough Vram you can use Ultimate sd upscale. This extension could be downloaded and installed through extensions tab in your automatic1111 and reload your UI.
You can find it in the sripts dropdown:
Here is the prompt:
{Prompt: 1girl, (2x2frames), a series of pictures of blowjob, <lora:DDpovbj_1ot:0.5>, long ((ginger)) hair, petite, perfect face, perfect eyes, masterpiece, best quality, high quality, 4k, ray tracing
Negative prompt: 3d, sepia, painting, cartoons, sketch, (worst quality:2), (low quality:2), (normal quality:2), lowres, bad anatomy, bad hands, normal quality, (monochrome), ((grayscale)), (ugly:2.0), badhandv4, BBN, easynegative, poor quality
Steps: 25, Sampler: DPM++ 2M Karras, CFG scale: 7, Seed: 173730505, Size: 1024x1024, Model hash: 6ac5833494, Model: perfectdeliberate_v20, Denoising strength: 0.3, Clip skip: 2, Mask blur: 4, Ultimate SD upscale upscaler: 4x-UltraSharp, Ultimate SD upscale tile_width: 512, Ultimate SD upscale tile_height: 512, Ultimate SD upscale mask_blur: 8, Ultimate SD upscale padding: 32}
Here is the result:
And finaly we are going to the Gif making.
Again, there are lots of ways to do that, here is the "lazy" one.
DigitalDreamer (many thanks to him again) made a script that may help to make gifs inside AUTOMATIC1111 (it's the one that attached to that tutorial). Just place it inside the "scripts" folder and restart UI. You'll find it in the UI down bellow in "scripts" dropdown. Use 2 when you made 2x2frames, and 3 for 3x3frames. It will make a gif and put it in your outputs folder.
So let's send the last made picture to img2img, and set denoising strenth to 0.
Then we will change script "GIF creator by image slice", and set number of cut's to 2. Duration can be left untouched (for 3x3frames you may want to make it longer, because you'll get 9 pictures instead of 4).
The result will be in the attached files)
That's it)
Enjoy, and have a peacefull day and life)
Feel free to ask any questions here in comments, or in my discord channel.
Also I am making games with AI arts. They will be free in the future, but if you want to participate in making or have an early access - you can support me on patreon)
* There have been changes to the rules and methods for downloading the model. You can now specify the folder to download to and set the user-defined classification item as the download item for the model.
* If you set the user-defined classification item as the download item, you cannot create subfolders. The folder for the user-defined classification item specified by the user will be created in the model type base folder (e.g. model/lora) and downloaded.
* If you select "Create Model Name Folder," a folder will be created based on the model name in the model type base folder (e.g. model/lora), and you can create a subfolder with the desired name according to the version.
* Downloaded model files can be freely moved to any desired folder. This extension only facilitates the convenience of downloading files and does not manage downloaded files. You can move them comfortably without any problems.
* Image downloads are downloaded by default to outputs/download-images, and can be set in setting->download for extension->Download Images Folder. Depending on the system, permission settings may be required.
* Since the user-defined classification item is used as the folder name, it is recommended to change difficult-to-use characters for folder creation. The "-" character will be replaced when creating the folder.
* The display type of thumbnail images can be changed. You can set it in setting->Shortcut Browser and Information Images->Gallery Thumbnail Image Style.
* When registering a shortcut, you can set the number of images to download. You can set it in setting->Shortcut Browser and Information Images->Maximum number of download images per version, and when set to 0, all images will be downloaded.
Stable Diffusion Webui Extension for Civitai, to download civitai shortcut and models.
Stable Diffusion Webui's Extension tab, go to Install from url sub-tab. Copy this project's url into it, click install.
git clone https://github.com/sunnyark/civitai-shortcut
Install url : https://github.com/sunnyark/civitai-shortcut

The information in the Civitai model information tab is obtained in real-time from the Civitai website.
Download : downloads the model for the selected version. You can choose to create specific folders for each version. The downloaded model will be automatically saved in the appropriate location, and a preview image and info will be generated together with it.
The information in the Saved model information tab are composed of the information saved on the Civitai website when creating the shortcut.
Update Model Information : updates the information of an individual shortcut to the latest information. This function only works when the site is functioning normally.
Delete Shortcut : deletes the information of a registered shortcut.
Civitai User Gallery : The Civitai User Gallery allows users to view uploaded images.

Upload : This function creates a shortcut that can be used by the extension when you enter the Civitai site's model URL. It only works when the site is functioning properly. You can either click and drag the URL from the address bar or drag and drop saved internet shortcuts. You can also select multiple internet shortcuts and drop them at once.

Browsing : This function displays the registered shortcuts in thumbnail format, and when selected, displays their details on the right-hand side of the window. This function works independently of the Civitai site.

Scan New Version : This is a function that searches for the latest version of downloaded models on the Civitai site. It retrieves information from the site and only functions properly when the site is operational.

Classification : Function for managing shortcuts by classification.

Scan and Update Models
Scan Models for Civitai - Scan and register shortcut for models without model information that are currently held.
Update Shortcut - Move the shortcut update function from the Upload tab.
Update the model information for the shortcut - Update the information of registered shortcuts with the latest information.
Scan downloaded models for shortcut registration - Register new shortcuts for downloaded models that have been deleted or have missing model information.

Setting tab - Set the number of columns in the image gallery.
You can save the model URL of the Civitai site for future reference and storage.
This allows you to download the model when needed and check if the model has been updated to the latest version.
The downloaded models are saved to the designated storage location.
When using Civitai Shortcut, five items will be created:
sc_saves: a folder where registered model URLs are backed up and stored.
sc_thumb_images: a folder where thumbnails of registered URLs are stored.
sc_infos: a folder where model info and images are saved when registering a shortcut.
CivitaiShortCut.json: a JSON file that records and manages registered model URLs.
CivitaiShortCutClassification.json: a JSON file that records and manages registered classification.
CivitaiShortCutSetting.json: a JSON file that records setting.
v 1.3c
* Add "Scan and Update Models" and "Settings" tabs to the Manage tab.
* Scan and Update Models tab
Scan Models for Civitai - Scan and register shortcut for models without model information that are currently held.
Update Shortcut - Move the shortcut update function from the Upload tab.
Update the model information for the shortcut - Update the information of registered shortcuts with the latest information.
Scan downloaded models for shortcut registration - Register new shortcuts for downloaded models that have been deleted or have missing model information.
* Setting tab - Set the number of columns in the image gallery.
* The name of the model info file that records information about the model has been changed.
As a result, even models with a normal model info file may be moved to a new folder when scanning models for Civitai.
To prevent this, uncheck the "Create a model folder corresponding to the model type" option.
v 1.3a
* A new feature has been added that allows you to manage and classify items.
You can add, delete, and update classification items in the "manage" -> "classification" tab.
To add a shortcut, select the desired classification item in the center top and click on the list on the left to register the desired shortcut. When you click, the registered shortcut appears in the center of the screen, and you can remove it by clicking on the registered shortcut.
Click the "update" button to complete the registration.
In the "civitai shortcut" -> "information" tab, a "model classification" item has been added on the right side, and you can perform registration and deletion of shortcuts for the model corresponding to the desired classification item.
After modification, click the "update" button to complete the task.
* In the browsing "search" feature, you can check the items registered in the classification.
When you select a classification item from the dropdown list, the selected item appears in the list and works in conjunction with the "filter model type" and "search" features.
The "search" feature works by entering items such as tags, classification, and search keywords.
The tags, classification, and search keywords are applied with "and" operation, and each item is applied with "or" operation. Each item is separated by ",".
Although only one item can be selected from the classification dropdown list, you can enter multiple items by using the "@" prefix.
v 1.2a
* The Downloaded Model tab, which duplicated the functionality of the Saved Model Information tab, has been removed
* The application method for generating image information has been internally modified to include information from Civitai's 'information' field in addition to the image. As a result, there have been changes to the naming convention for saved images. Please update the images using 'Update Shortcut's Model Information' accordingly.
v 1.2
* A Civitai User Gallery tab has been added where users can view the information and images of the models in the gallery. If there are no images available for a particular model, the tab may appear empty. There may also be a delay in the data provided by the API.
* An "Update Downloaded Model Information" button has been added below the "Upload" button on the left-hand side. This button updates the internal information when users rename folders during Stable Diffusion operation.
* The option to download additional networks by selecting them from a list has been removed. This feature was deemed unnecessary as users can simply specify the desired folder in Settings -> Additional Networks. Personally, I use the "models/Lora" folder for this purpose.
* Users can now specify the folder name when downloading a model to an individual folder. The default format is "model name-version name", but users can input their preferred value. If a folder with the same version of the model already exists within the model's folder, that folder name will be displayed.
* Minor design changes have been made.
* Bug: There are several bugs, but when viewing the gallery images at full size, the image control and browsing controls overlap.
v 1.1c
* Measures have been taken to alleviate bottleneck issues during information loading.
* The search function now includes a #tag search feature.
Search terms are separated by commas (,) and are connected with an "or" operation within the search terms and within the tags. There is an "and" operation between the search terms and tags.
* The shortcut storage table has been changed to add the #tag search function.
Existing shortcuts require an "update shortcut model information" for tag searches.
v 1.1
* When registering a shortcut, model information and images are saved in a separate folder.
* This allows users to access model information from "Saved Model Information" Tab even if there is no connection to the Civitai site.
* "Thumbnail Update" button is removed and replaced with an "Update Shortcut's Model Information" button to keep the model information and images up to date.
* "Download images Only" button is removed from "Civitai Model Information" Tab that can be accessed live, and "Delete shortcut" button is moved to "Saved Model Information" Tab.
* "Delete shortcut" button removes the model information and images stored in sc_infos in one go.
* "Update Model Information" button is added to "Saved Model Information" Tab for individual updating of model information, in addition to "Update Shortcut's Model Information" that updates all model information.
ComfyUI is an advanced node based UI utilizing Stable Diffusion. It allows you to create customized workflows such as image post processing, or conversions.
ASCII is deprecated. The new preferred method of text node output is TEXT. This is a change from ASCII so that it is more clear what data is being passed.
The was_suite_config.json will automatically set use_legacy_ascii_text to true for a transition period. You can enable TEXT output by setting use_legacy_ascii_text to false
Video Nodes - There are two new video nodes, Write to Video and Create Video from Path. These are experimental nodes.
BLIP Analyze Image: Get a text caption from a image, or interrogate the image with a question.
Model will download automatically from default URL, but you can point the download to another location/caption model in was_suite_config
Models will be stored in ComfyUI/models/blip/checkpoints/
SAM Model Loader: Load a SAM Segmentation model
SAM Parameters: Define your SAM parameters for segmentation of a image
SAM Parameters Combine: Combine SAM parameters
SAM Image Mask: SAM image masking
Image Bounds: Bounds a image
Inset Image Bounds: Inset a image bounds
Bounded Image Blend: Blend bounds image
Bounded Image Blend with Mask: Blend a bounds image by mask
Bounded Image Crop: Crop a bounds image
Bounded Image Crop with Mask: Crop a bounds image by mask
Cache Node: Cache Latnet, Tensor Batches (Image), and Conditioning to disk to use later.
CLIPTextEncode (NSP): Parse noodle soups from the NSP pantry, or parse wildcards from a directory containing A1111 style wildacrds.
Wildcards are in the style of __filename__, which also includes subdirectories like __appearance/haircolour__ (if you noodle_key is set to __)
You can set a custom wildcards path in was_suite_config.json file with key:
"wildcards_path": "E:\\python\\automatic\\webui3\\stable-diffusion-webui\\extensions\\sd-dynamic-prompts\\wildcards"
If no path is set the wildcards dir is located at the root of WAS Node Suite as /wildcards
Combine Masks: Combine 2 or more masks into one mask.
Conditioning Input Switch: Switch between two conditioning inputs.
Constant Number
Create Grid Image: Create a image grid from images at a destination with customizable glob pattern. Optional border size and color.
Create Morph Image: Create a GIF/APNG animation from two images, fading between them.
Create Morph Image by Path: Create a GIF/APNG animation from a path to a directory containing images, with optional pattern.
Create Video from Path: Create video from images from a specified path.
Dictionary to Console: Print a dictionary input to the console
Image Analyze
Black White Levels
RGB Levels
Depends on matplotlib, will attempt to install on first run
Image Blank: Create a blank image in any color
Image Blend by Mask: Blend two images by a mask
Image Blend: Blend two images by opacity
Image Blending Mode: Blend two images by various blending modes
Image Bloom Filter: Apply a high-pass based bloom filter
Image Canny Filter: Apply a canny filter to a image
Image Chromatic Aberration: Apply chromatic aberration lens effect to a image like in sci-fi films, movie theaters, and video games
Image Color Palette
Generate a color palette based on the input image.
Depends on scikit-learn, will attempt to install on first run.
Supports color range of 8-256
Utilizes font in ./res/ unless unavailable, then it will utilize internal better then nothing font.
Image Crop Face: Crop a face out of a image
Limitations:
Sometimes no faces are found in badly generated images, or faces at angles
Sometimes face crop is black, this is because the padding is too large and intersected with the image edge. Use a smaller padding size.
face_recognition mode sometimes finds random things as faces. It also requires a [CUDA] GPU.
Only detects one face. This is a design choice to make it's use easy.
Notes:
Detection runs in succession. If nothing is found with the selected detection cascades, it will try the next available cascades file.
Image Crop Location: Crop a image to specified location in top, left, right, and bottom locations relating to the pixel dimensions of the image in X and Y coordinats.
Image Paste Face Crop: Paste face crop back on a image at it's original location and size
Features a better blending funciton than GFPGAN/CodeFormer so there shouldn't be visible seams, and coupled with Diffusion Result, looks better than GFPGAN/CodeFormer.
Image Paste Crop: Paste a crop (such as from Image Crop Location) at it's original location and size utilizing the crop_data node input. This uses a different blending algorithm then Image Paste Face Crop, which may be desired in certain instances.
Samplers can resize/crop odd sized images
Image Paste Crop by Location: Paste a crop top a custom location. This uses the same blending algorithm as Image Paste Crop.
Samplers can resize/crop odd sized images
Image Dragan Photography Filter: Apply a Andrzej Dragan photography style to a image
Image Edge Detection Filter: Detect edges in a image
Image Film Grain: Apply film grain to a image
Image Filter Adjustments: Apply various image adjustments to a image
Image Flip: Flip a image horizontal, or vertical
Image Gradient Map: Apply a gradient map to a image
Image Generate Gradient: Generate a gradient map with desired stops and colors
Image High Pass Filter: Apply a high frequency pass to the image returning the details
Image History Loader: Load images from history based on the Load Image Batch node. Can define max history in config file. (requires restart to show last sessions files at this time)
Image Input Switch: Switch between two image inputs
Image Levels Adjustment: Adjust the levels of a image
Image Load: Load a image from any path on the system, or a url starting with http
Image Median Filter: Apply a median filter to a image, such as to smooth out details in surfaces
Image Mix RGB Channels: Mix together RGB channels into a single iamge
Image Monitor Effects Filter: Apply various monitor effects to a image
Digital Distortion
A digital breakup distortion effect
Signal Distortion
A analog signal distortion effect on vertical bands like a CRT monitor
TV Distortion
A TV scanline and bleed distortion effect
Image Nova Filter: A image that uses a sinus frequency to break apart a image into RGB frequencies
Image Perlin Noise Filter
Create perlin noise with pythonperlin module. Trust me, better then my implementations that took minutes...
Image Remove Background (Alpha): Remove the background from a image by threshold and tolerance.
Image Remove Color: Remove a color from a image and replace it with another
Image Resize
Image Rotate: Rotate an image
Image Save: A save image node with format support and path support. (Bug: Doesn't display image
Image Seamless Texture: Create a seamless texture out of a image with optional tiling
Image Select Channel: Select a single channel of an RGB image
Image Select Color: Return the select image only on a black canvas
Image Shadows and Highlights: Adjust the shadows and highlights of an image
Image Size to Number: Get the width and height of an input image to use with Number nodes.
Image Stitch: Stitch images together on different sides with optional feathering blending between them.
Image Style Filter: Style a image with Pilgram instragram-like filters
Depends on pilgram module
Image Threshold: Return the desired threshold range of a image
Image Transpose
Image fDOF Filter: Apply a fake depth of field effect to an image
Image to Latent Mask: Convert a image into a latent mask
Image Voronoi Noise Filter
A custom implementation of the worley voronoi noise diagram
Input Switch (Disable until * wildcard fix)
KSampler (WAS): A sampler that accepts a seed as a node inpu
Load Cache: Load cached Latent, Tensor Batch (image), and Conditioning files.
Load Text File
Now supports outputting a dictionary named after the file, or custom input.
The dictionary contains a list of all lines in the file.
Load Batch Images
Increment images in a folder, or fetch a single image out of a batch.
Will reset it's place if the path, or pattern is changed.
pattern is a glob that allows you to do things like **/* to get all files in the directory and subdirectory or things like *.jpg to select only JPEG images in the directory specified.
Mask to Image: Convert MASK to IMAGE
Mask Dominant Region: Return the dominant region in a mask (the largest area)
Mask Minority Region: Return the smallest region in a mask (the smallest area)
Mask Arbitrary Region: Return a region that most closely matches the size input (size is not a direct representation of pixels, but approximate)
Mask Smooth Region: Smooth the boundaries of a mask
Mask Erode Region: Erode the boundaries of a mask
Mask Dilate Region: Dilate the boundaries of a mask
Mask Fill Region: Fill holes within the masks regions
ComfyUI Loaders: A set of ComfyUI loaders that also output a string that contains the name of the model being loaded.
Latent Noise Injection: Inject latent noise into a latent image
Latent Size to Number: Latent sizes in tensor width/height
Latent Upscale by Factor: Upscale a latent image by a factor
Latent Input Switch: Switch between two latent inputs
Logic Boolean: A simple 1 or 0 output to use with logic
MiDaS Depth Approximation: Produce a depth approximation of a single image input
MiDaS Mask Image: Mask a input image using MiDaS with a desired color
Number Operation
Number to Seed
Number to Float
Number Input Switch: Switch between two number inputs
Number Input Condition: Compare between two inputs or against the A input
Number to Int
Number to String
Number to Text
Random Number
Save Text File: Save a text string to a file
Seed: Return a seed
Tensor Batch to Image: Select a single image out of a latent batch for post processing with filters
Text Add Tokens: Add custom tokens to parse in filenames or other text.
Text Add Token by Input: Add custom token by inputs representing single single line name and value of the token
Text Compare: Compare two strings. Returns a boolean if they are the same, a score of similarity, and the similarity or difference text.
Text Concatenate: Merge two strings
Text Dictionary Update: Merge two dictionaries
Text File History: Show previously opened text files (requires restart to show last sessions files at this time)
Text Find and Replace: Find and replace a substring in a string
Text Find and Replace by Dictionary: Replace substrings in a ASCII text input with a dictionary.
The dictionary keys are used as the key to replace, and the list of lines it contains chosen at random based on the seed.
Text Input Switch: Switch between two text inputs
Text Multiline: Write a multiline text string
Text Parse A1111 Embeddings: Convert embeddings filenames in your prompts to embedding:[filename]] format based on your /ComfyUI/models/embeddings/ files.
Text Parse Noodle Soup Prompts: Parse NSP in a text input
Text Parse Tokens: Parse custom tokens in text.
Text Random Line: Select a random line from a text input string
Text String: Write a single line text string value
Text to Conditioning: Convert a text string to conditioning.
True Random.org Number Generator: Generate a truly random number online from atmospheric noise with Random.org
Write to Morph GIF: Write a new frame to an existing GIF (or create new one) with interpolation between frames.
Write to Video: Write a frame as you generate to a video (Best used with FFV1 for lossless images)
CLIPTextEncode (BlenderNeko Advanced + NSP): Only available if you have BlenderNeko's Advanced CLIP Text Encode. Allows for NSP and Wildcard use with their advanced CLIPTextEncode.
You can use codecs that are available to your ffmpeg binaries by adding their fourcc ID (in one string), and appropriate container extension to the was_suite_config.json
Example H264 Codecs (Defaults)
    "ffmpeg_extra_codecs": {
        "avc1": ".mp4",
        "h264": ".mkv"
    }
For now I am only supporting Windows installations for video nodes.
I do not have access to Mac or a stand-alone linux distro. If you get them working and want to PR a patch/directions, feel free.
Video nodes require FFMPEG. You should download the proper FFMPEG binaries for you system and set the FFMPEG path in the config file.
Additionally, if you want to use H264 codec need to download OpenH264 1.8.0 and place it in the root of ComfyUI (Example: C:\ComfyUI_windows_portable).
FFV1 will complain about invalid container. You can ignore this. The resulting MKV file is readable. I have not figured out what this issue is about. Documentaion tells me to use MKV, but it's telling me it's unsupported.
If you know how to resolve this, I'd love a PR
Write to Video node should use a lossless video codec or when it copies frames, and reapplies compression, it will start expontentially ruining the starting frames run to run.
Text tokens can be used in the Save Text File and Save Image nodes. You can also add your own custom tokens with the Text Add Tokens node.
The token name can be anything excluding the : character to define your token. It can also be simple Regular Expressions.
[time]
The current system microtime
[time(format_code)]
The current system time in human readable format. Utilizing datetime formatting
Example: [hostname]_[time]__[time(%Y-%m-%d__%I-%M%p)] would output: SKYNET-MASTER_1680897261__2023-04-07__07-54PM
[hostname]
The hostname of the system executing ComfyUI
[user]
The user that is executing ComfyUI
When using the latest builds of WAS Node Suite a was_suite_config.json file will be generated (if it doesn't exist). In this file you can setup a A1111 styles import.
Run ComfyUI to generate the new /custom-nodes/was-node-suite-comfyui/was_Suite_config.json file.
Open the was_suite_config.json file with a text editor.
Replace the webui_styles value from None to the path of your A1111 styles file called styles.csv. Be sure to use double backslashes for Windows paths.
Example C:\\python\\stable-diffusion-webui\\styles.csv
Restart ComfyUI
Select a style with the Prompt Styles Node.
The first ASCII output is your positive prompt, and the second ASCII output is your negative prompt.
You can set webui_styles_persistent_update to true to update the WAS Node Suite styles from WebUI every start of ComfyUI
If you're running on Linux, or non-admin account on windows you'll want to ensure /ComfyUI/custom_nodes, was-node-suite-comfyui, and WAS_Node_Suite.py has write permissions.
Navigate to your /ComfyUI/custom_nodes/ folder
Run git clone https://github.com/WASasquatch/was-node-suite-comfyui/
Navigate to your was-node-suite-comfyui folder
Portable/venv:
Run path/to/ComfUI/python_embeded/python.exe -m pip install -r requirements.txt
With system python
Run pip install -r requirements.txt
Start ComfyUI
WAS Suite should uninstall legacy nodes automatically for you.
Tools will be located in the WAS Suite menu.
If you're running on Linux, or non-admin account on windows you'll want to ensure /ComfyUI/custom_nodes, and WAS_Node_Suite.py has write permissions.
Download WAS_Node_Suite.py
Move the file to your /ComfyUI/custom_nodes/ folder
WAS Node Suite will attempt install dependencies on it's own, but you may need to manually do so. The dependencies required are in the requirements.txt on this repo. See installation steps above.
Start, or Restart ComfyUI
WAS Suite should uninstall legacy nodes automatically for you.
Tools will be located in the WAS Suite menu.
This method will not install the resources required for Image Crop Face node, and you'll have to download the ./res/ folder yourself.
Create a new cell and add the following code, then run the cell. You may need to edit the path to your custom_nodes folder. You can also use the colab hosted here
!git clone https://github.com/WASasquatch/was-node-suite-comfyui /content/ComfyUI/custom_nodes/was-node-suite-comfyui
Restart Colab Runtime (don't disconnect)
Tools will be located in the WAS Suite menu.
First i recommend reading the Part 1. It explains the extension and settings. Remember to leave some ⭐(~ ̄▽ ̄)~
I have planned to expand more on multidiffusion tutorials:
Workflow on multidiffusion + controlnet tiling
Maybe inpaint workflow tutorial
If you have something you would like to see tutorial on let me know in the discussion.
Please leave feedback and images you manage to create with the tutorial :)
Updates:
05/07
V1.0 of Region prompt control
Tutorial focused on Region prompt control.
05/01
V1.0 of Multidiffusion IMG2IMG Workflow
Tutorial more focused on scaling in IMG2IMG
04/29
V1.2 of Multidiffusion upscaler how to use + workflow
Clarified few things in the tutorial
04/25
V1.1 of Multidiffusion upscaler how to use + workflow
Fixed some typos, uncompressed images, wording
04/24
V1.0 of Multidiffusion upscaler how to use + workflow
This is information i have gathered experimenting with the extension. I might get something wrong and if you spot something wrong with guide, please leave comment. Any feedback is welcome.
I am not native English speaker and write such text. I can't do anything about that. :)
I am not the creator of this extension and i am not in any way related to them. They can be found from Gitgub . Please show some love for them if you have time :).
The zip file contains all the original images in the tutorial along with the generation data.
Please follow the installation instructions for each. ControlNet and the various models are easy to install.
Automatic1111 (you already have this, but you may want to update)
https://github.com/AUTOMATIC1111/stable-diffusion-webui
ControlNet 1.1+ (official A1111 release coming soon)
https://github.com/Mikubill/sd-webui-controlnet
Tile Model version v11f1e
https://huggingface.co/lllyasviel/ControlNet-v1-1/blob/main/control_v11f1e_sd15_tile.pth
Install Path: ...\stable-diffusion-webui\extensions\sd-webui-controlnet\models\
Ultimate SD Upscale
https://github.com/Coyote-A/ultimate-upscale-for-automatic1111
Install Path: You should load as an extension with the github url, but you can also copy the .py file into your scripts directory ...\stable-diffusion-webui\scripts\
A-Zovya Photoreal [7d3bdbad51] - Stable Diffusion Model
https://civitai.com/models/57319/a-zovya-photoreal
Install Path: ...\stable-diffusion-webui\models\Stable-diffusion\
EasyNegative [C74B4E810B] - Embedding
https://civitai.com/models/7808/easynegative
Install Path: ...\stable-diffusion-webui\embeddings\
Image Sharpener [FE5A4DFC4A] - Embedding
https://civitai.com/models/43286/image-sharpener
Install Path: ...\stable-diffusion-webui\embeddings\
4x UltraSharp - Upscaler
https://upscale.wiki/wiki/Model_Database#Universal_Models
Install Path: ...\stable-diffusion-webui\models\ESRGAN\
--xformers
Not required, this will also cause my final outputs to be slightly different than yours.
Install: webui-user.bat edit "set COMMANDLINE_ARGS=--xformers"
Note: Only for newer GPU, if your are missing requirements can build from here (not personally tested).
https://github.com/AUTOMATIC1111/stable-diffusion-webui/wiki/Xformers
We will generate a base image of 512x512. Note, you will get a better result upscaling 512 to 4096 than you will from 256 to 2048.
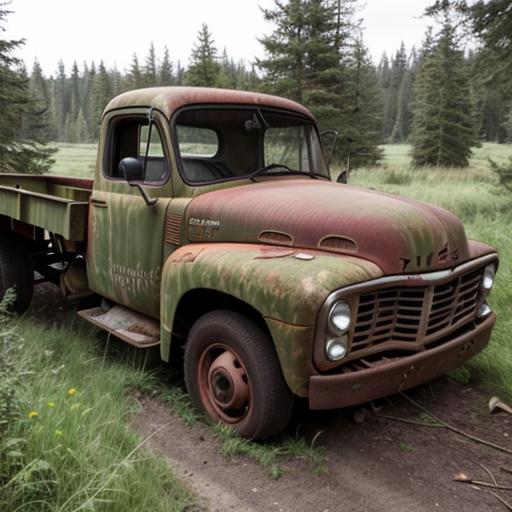
Our generation data:
Abandoned truck in the forest
Negative prompt: lr, easynegative,
Steps: 32, Sampler: DPM++ 2S a Karras, CFG scale: 7, Seed: 979998160, Size: 512x512, Model hash: 7d3bdbad51, Model: aZovyaPhotoreal_v1, Clip Skip 1
Note: The two negative embeddings are not required for good results, only to recreate my example. Image Sharpener (lr) will most always provide a higher quality generated Image. EasyNegative (easynegative) will most always provide better composition.
Send to img2img as shown in the screenshot below:
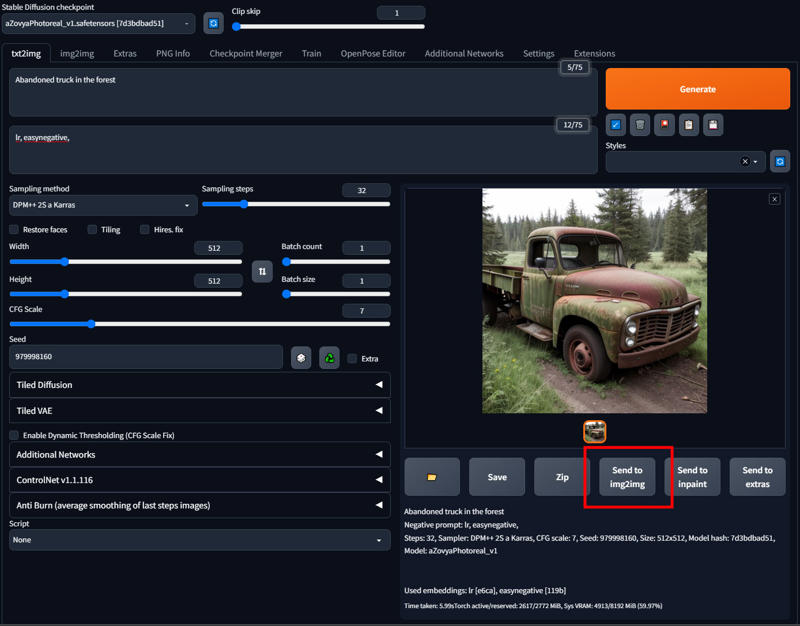
Here you can leave everything pretty much as is. For our demo I will use a high denoising (0.75) to showcase controlnet and how well it can handle the tiling. You can go as low as 0.2, but lower than 0.35 will start to give noticeable smoothing on 4 to 8x upscales. Make sure you select your sampler of choice, mine is DPM++ 2S a Karras which is probably the best (imho) and one of the slowest.
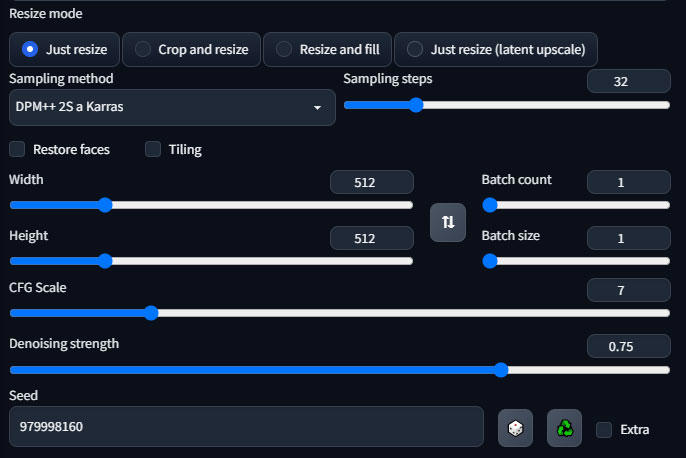
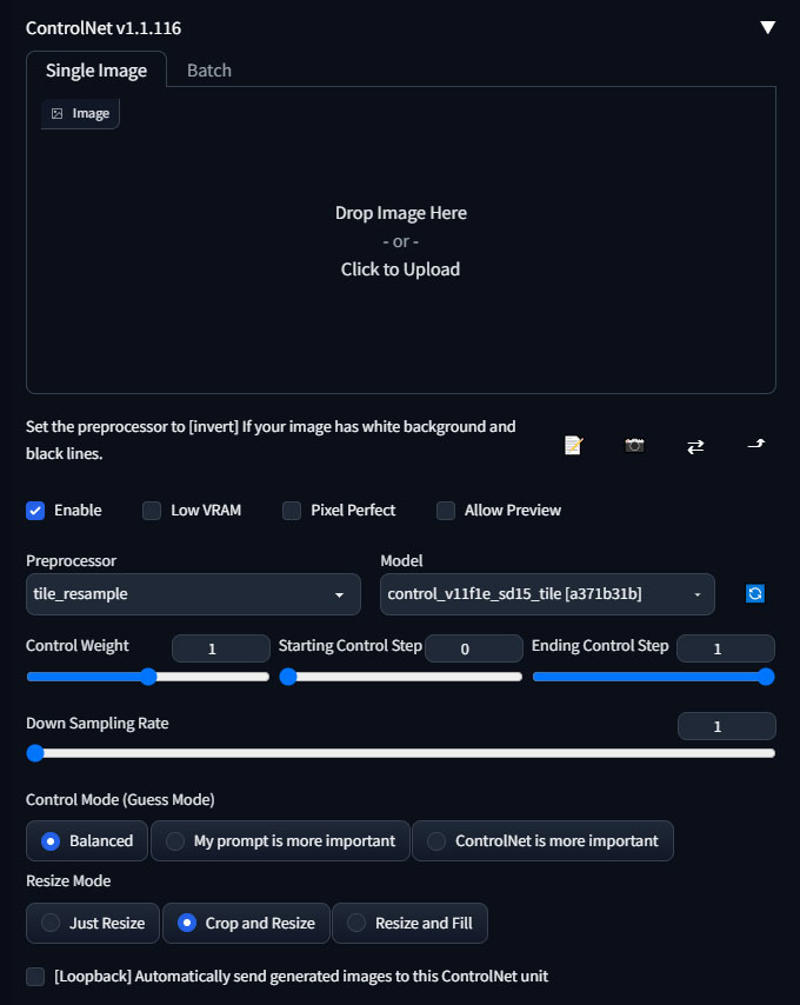
Scroll down to the ControlNet panel, open the tab, and check the Enable checkbox. Select tile_resampler as the Preprocessor and control_v11f1e_sd15_tile as the model.
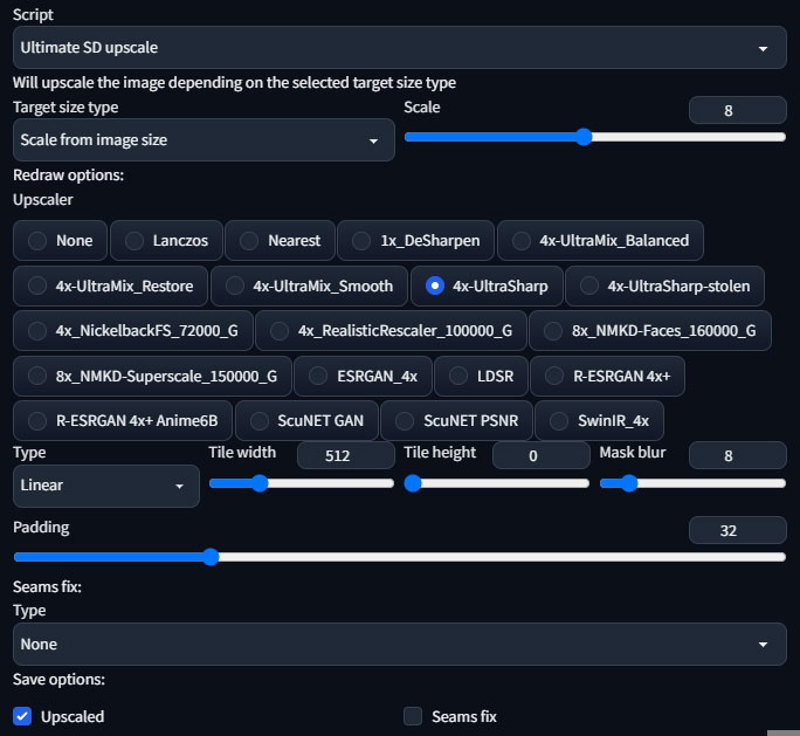
This is honestly the more confusing part. Assuming you have installed the script properly, scroll down to the scripts selection at the bottom, choose Ultimate SD Upscale.
Settings:
Target size type: set to Scale from image size, select 8 (4k) or 4 (2k)
Upscaler: Select 4x-UltraSharp, or your preferred upscaler.
Type: Linear, use chess if you noticing seams, this can help (but takes longer).
Tile width/height: Leave at 512 for now, but higher tile size will result in a overall better image. See example of 512 tile and 1024 tile.
Seams fix: none. The example does not use seams fix. I would only recommend experimenting with seams fix if chess redraw type did not help. You can see in our example there are no obvious seams (though they are there).
Our Generation Data:
Abandoned truck in the forest
Negative prompt: lr, easynegative,
Steps: 32, Sampler: DPM++ 2S a Karras, CFG scale: 7, Seed: 979998160, Size: 4096x4096, Model hash: 7d3bdbad51, Model: aZovyaPhotoreal_v1, Denoising strength: 0.75, Ultimate SD upscale upscaler: 4x-UltraSharp, Ultimate SD upscale tile_width: 512, Ultimate SD upscale tile_height: 512, Ultimate SD upscale mask_blur: 8, Ultimate SD upscale padding: 32, ControlNet Enabled: True, ControlNet Preprocessor: tile_resample, ControlNet Model: control_v11f1e_sd15_tile [a371b31b], ControlNet Weight: 1, ControlNet Starting Step: 0, ControlNet Ending Step: 1, ControlNet Resize Mode: Crop and Resize, ControlNet Pixel Perfect: False, ControlNet Control Mode: Balanced, ControlNet Preprocessor Parameters: "(512, 1, 64)", Clip Skip 1,
Resulting 4k image (please see gallery images for full resolution)
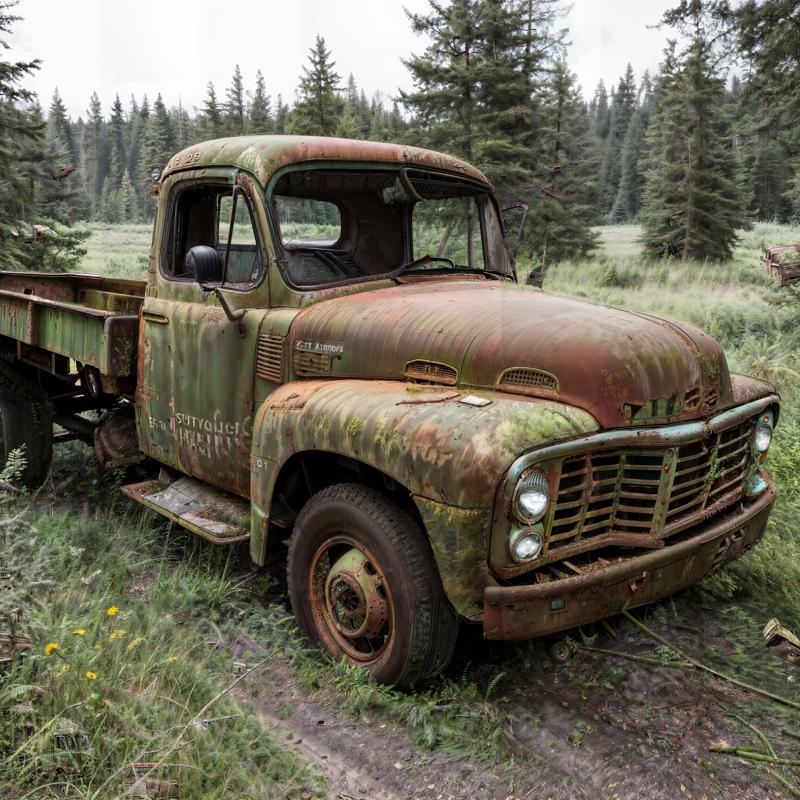
Resulting 2k image
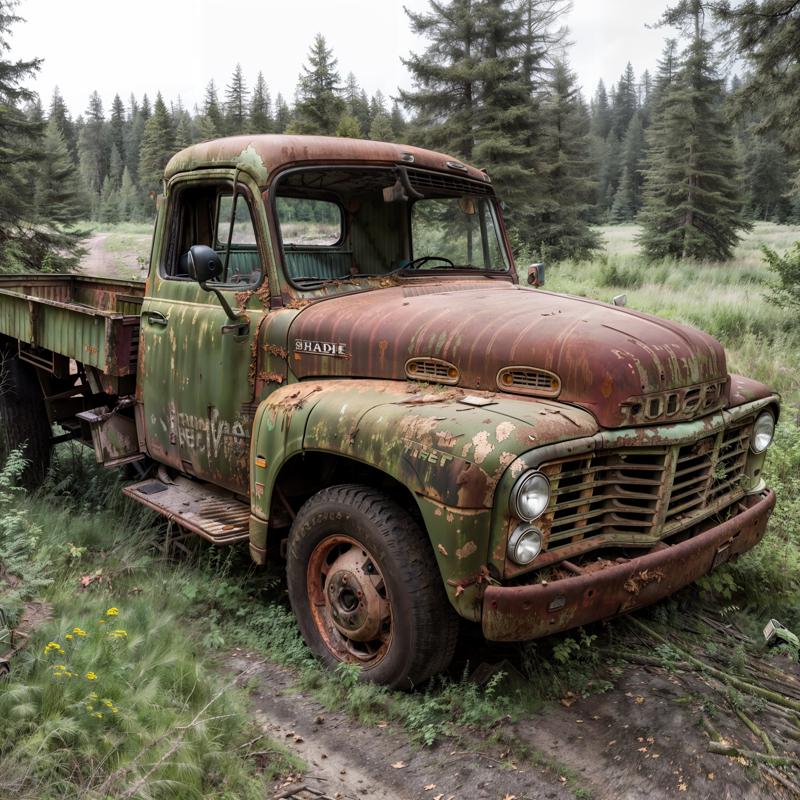
Resulting 1k image
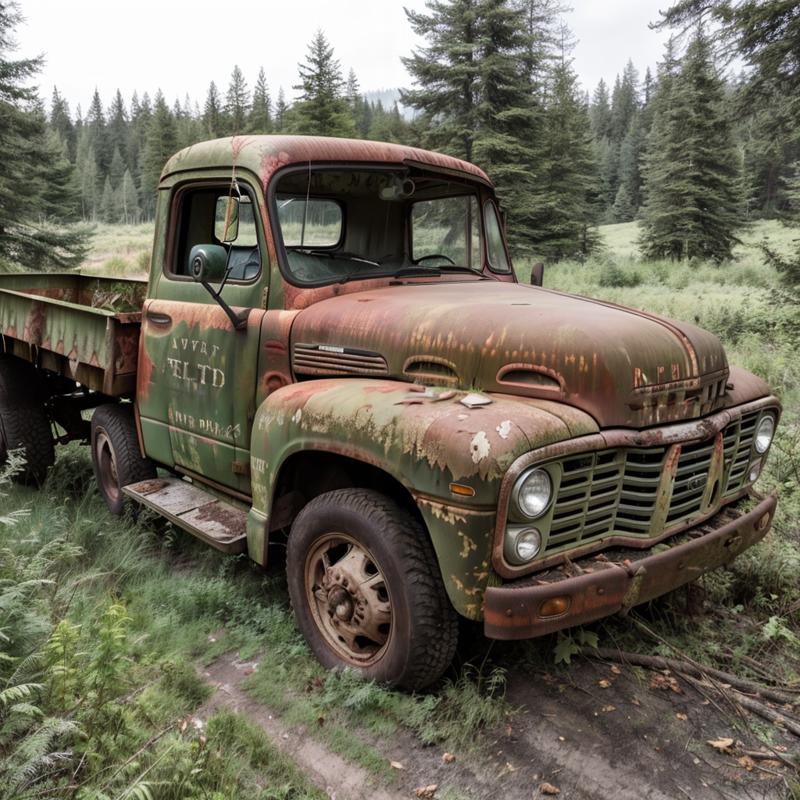
Origina 512

512 to 4096 at 512 tile will make 64 tiles. That is a lot of tiles.
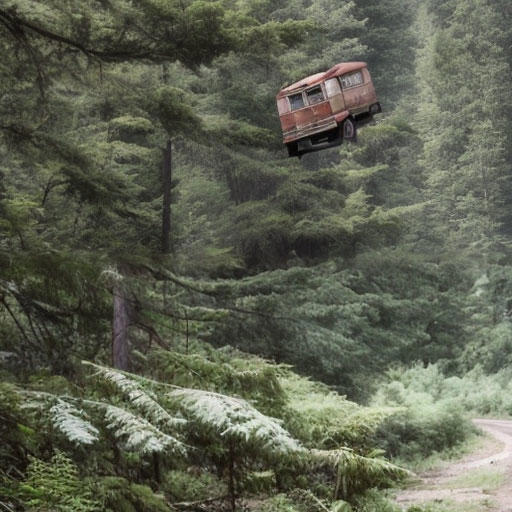
When you have this many tiles it is possible that you will get ghosting. In our 4k example above you can find an "abandoned truck" hidden within various tiles. Below is a crop where two have generated.
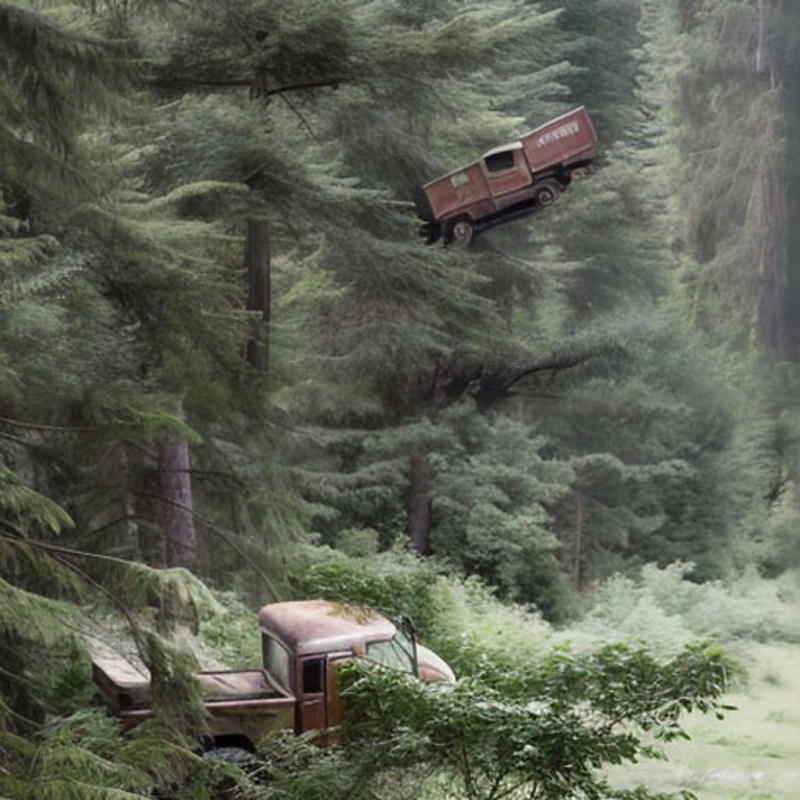
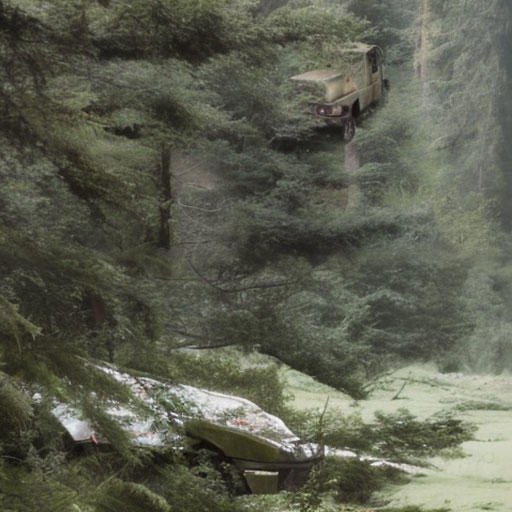
Denoise Fix: You can reduce this with a lower denoise, but you will still have the issue. Lower denoise will decrease the effect, but also at the loss of detail (smoothing). Below is .35 denoise, you can see it is less noticeable now and also a bit smoother.
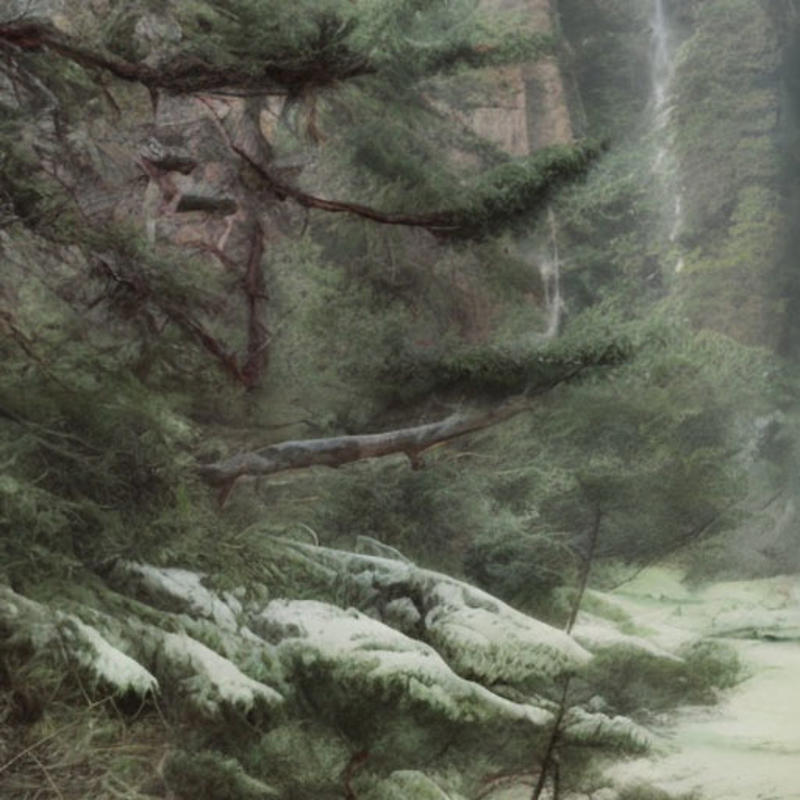
Prompt Fix: You can resolve this another way with a high denoise, and that is to simply clear your prompt. Without the prompt set it will not attempt to redraw the scene within every tile. However, the downside is that you will have considerably less details even at .75 denoise. Here you can see that the ghosting abandoned truck effect is removed entirely.
But, as I mentioned you have much less details without prompt. Here you can see the difference clearly.
4k with prompt
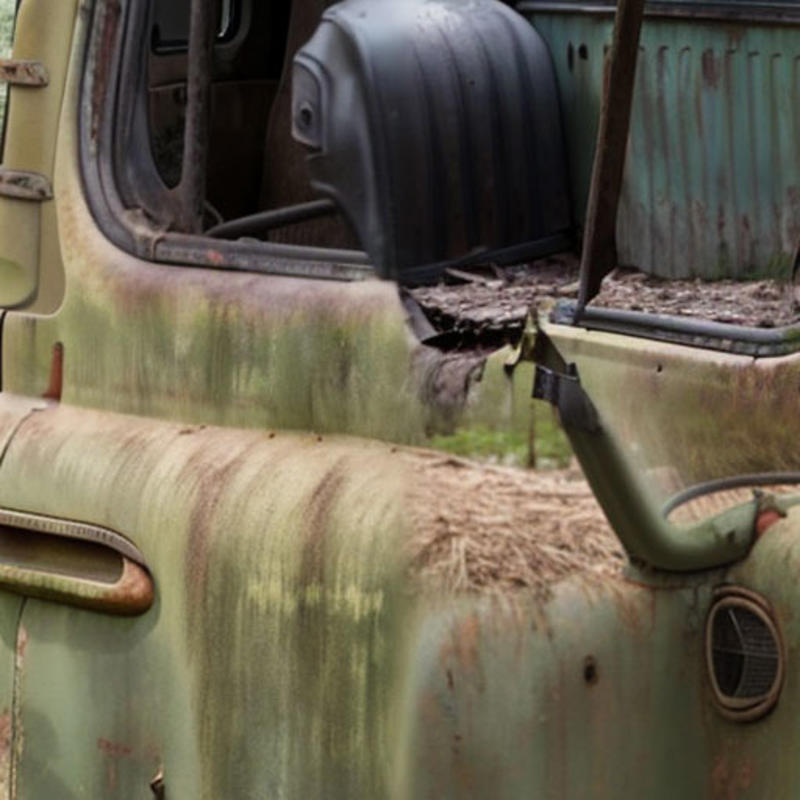
4k without prompt
Negative embeddings not used on example below, but you can include lr to increase details. You can also used words like sharp, detailed, etc, to help, but if you said rusty metal it would start adding rust to the trees and stuff. So you have to be thoughtful about how you modify the prompt.
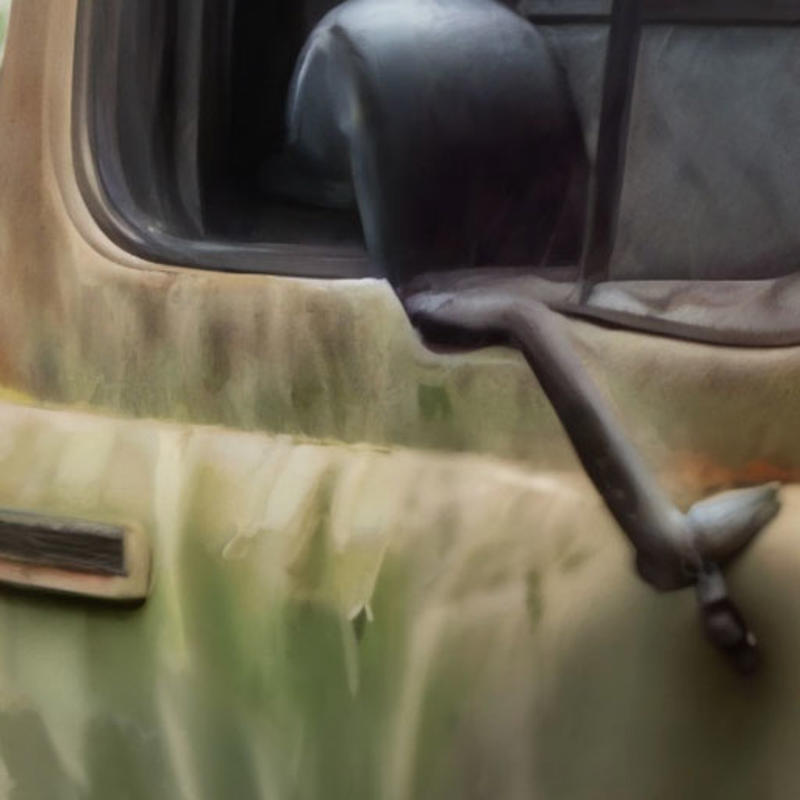
Larger Tiles Fix: At 1024 tile size (16 tiles) with the prompt set and a high denoise, the problem will be reduced dramatically. The overall detail will also be better with higher tile sizes, but the problem will still persist. You can see that in the crop below it has removed one truck, but made the other more detailed. Overall the final image has probably half as many hidden trucks throughout the tiles, but they are still there. The problem is when you are on a tile that isn't a part of the subject (abandoned truck) it attempts to inject one. At this point you can paint them out, or use a combination of lower denoise and higher tile size along with prompt modification to achieve best results.
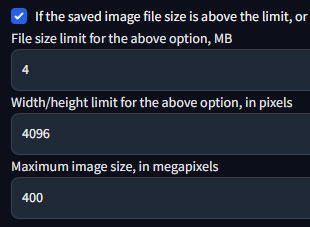
In order to render 4096 you will need to enable higher image sizes within your settings.
Settings > Saving images/grids
Width/height limit - 4096 (or 8192 if your crazy)
Maximum megapixels - 400 (not entirely sure how this is measured)
With the checkbox option enabled (save image as downscaled jpg) you can still save the image as png.
Please ensure you have downloaded the right tile model, a version was released previously for ControlNet 1.1 that did not work and so it has been removed. If you downloaded at 1.1 release you will need to update your model. Please verify the version number of your model, this is critical.
If you are having problems please update your GPU drivers, your libraries, A1111 etc.
Reboot your computer.
Try another model or another size.
If you enable Seams Fix in Ultimate SD Upscale please be aware it will produce two images, one with and one without the fix. Inspect both images for comparison.
Try and recreate from my example rather than your own, this way you will know if you have done something wrong.
The further away your generation data is from the ControlNet image the more your image will be smoothed out.
I have also seen tutorials where people upscale 512 to 2048, then take the 2048 and upscale to 4096. I would not do that, and I don't think it is necessary. This will also take much much longer (three to four times as long) than to simply upscale from 512 to 4096. Technically you may get better details this way, however it is not optimal.
If you notice your image is too smoothed out you can run a final detail pass over the 4k render just as you did earlier with a high denoise but set the scale down to 1.
You may want to save various versions of the render with different settings, seams, etc and then mask them together in Photoshop (or whatever).
The zip file contains all the original images in the tutorial along with the generation data.