Others

Feed Tab - Stable Diffusion Webui Extension

файл на civitaiстраница на civitai

https://github.com/todhm/sd_feed.git

Introduction

You can upload your masterpiece on the Feed Tap.

Sharing

r/StableDiffusion - Stable Diffusion Webui Feed Extension launched!

Upload your image right after generation!

Feed

r/StableDiffusion - Stable Diffusion Webui Feed Extension launched!

Browse People's images!

there are four feeds

- newest :

- popular

- favorite : pics that you pushed like button

- my pics : pics that you uploaded

Tweak!

r/StableDiffusion - Stable Diffusion Webui Feed Extension launched!

Check the parameters and generate your own!

You can easily send to t2i,i2i or Copy the Generation data and also communicate!

Pics Of The Day!

r/StableDiffusion - Stable Diffusion Webui Feed Extension launched!

you can be the king of the day!

most popular pic of the day will be exhibited on generation tab!

r/StableDiffusion - Stable Diffusion Webui Feed Extension launched!

install!

ps. after 'apply and restart ui' you have to restart stable difussion🥲 im fixing on it

SHA256: 028FC3553DB150ACC5B99BC06DAA49B6F7DB3524B399AD24739466F809E6D8E7

ComfyUI comfyui comfy_Translation

файл на civitaiстраница на civitai

The plugin mainly supports direct input Chinese for comfyui ai painting
Gratitude model:https://civitai.com/models/10415/3-guofeng3
gitHub:https://github.com/laojingwei/comfy_Translation.git

comfy_Translation

install

1. Download the compressed package directly

2. Use git clone to download and connect as follows:

git clone https://github.com/laojingwei/comfy_Translation.git

Usage method

1. If the package is compressed, decompress it first and put comfy_Translation.py into ComfyUI\custom_nodes

2, if cloned, also put comfy_Translation.py into ComfyUI\custom_nodes

3. Restart ComfyUI

4. Input ZH_CN2EN and other keywords directly in clip Text encode, and then you can input Chinese keywords freely according to your own play. After the project is built, click render, and then the Chinese will be automatically converted into English and sent to ai for drawing

Translation starts with keyword interpretation

1. ZH_CN2EN

Whether Chinese and English are mixed or not, all translated into English (recommended)

2. ZH_CN2EN1

The same as ZH_CN2EN is also converted to English, whether it is mixed with English or not, but there is a log output in the console to see the converted content (recommended).

3. ZH_AUTO

Automatic, depending on the mood of the translation api to determine whether to switch to English or Chinese (not recommended)

4. ZH_AUTO1

Automatic, look at the mood of translation api to determine whether to turn to English or Chinese, but more log output printing (not recommended)

SHA256: DDE97726A748FD09DD9DF3EB57DABFD86B5821C8E47F0598CA230B813B915EC0

questionnaire Please comment./Vtuber アンケート コメントしてください。

файл на civitaiстраница на civitai
questionnaire
Please comment.

アンケート
コメントしてください。

I translate and read and write English, so there may be mistakes.
If you can speak Japanese, it would be helpful if you could use Japanese if possible.

英語は翻訳して読み書きしているので間違って居るかもしれません。
日本語出来る方は出来れば日本語を使っていただけると助かります。
Тэги: vtubervtuber charactervote
SHA256: C05A168549B54C39AEB5C759655E445A3BF68768B4B9B25EBEB1AEFF5B3700BD

Tutorial for multidiffusion upscaler for automatic1111, detail to the max

файл на civitaiстраница на civitai

Please leave review from right pressing the "see reviews" button :) -->

You can either read from below or download pdf :) As it seems like the PDF is quite popular i decided to make it slightly better. Please leave feedback and post images if you like the tutorial :).

multidiffusion upscaler for automatic1111

Content

  1. Multidiffusion workflow example, added at V0.2.

  2. Example resolutions and settings, added at V0.35.

  3. Multidiffusion and Hires. fix compare, added at V0.1.

  4. Region prompt control, added at V.0.3.

  5. Tiled VAE, Coming soon...

  6. Inpainting, Coming soon...

  7. Using Multidiffusion with other extensions, Coming soon...

Disclaimer

This is information i have gathered with little over month of using this extension. I might get something wrong and if you spot something wrong with guide, please leave comment. Any feedback is welcome.

I am not native English speaker and write such text. I can't do anything about that. :)

I am not the creator of this extension and i am not in any way related to them. They can be found from Gitgub . Please show some love for them if you have time :).

Intro

This is tutorial for multidiffusion upscaler for automatic1111 . The extension is extremely powerful tool for enhancing the quality of images with less ram usage. Sounds too good to be true? The extension uses tiling, which means it generates the image in parts. In simple terms for example 512 x 512 generated with 64 x 64 tiling will do 8 x 8 amount of tiles for the image (It is a bit more complicated than that but general idea is the same). And thanks to tiling it will use less ram, and generating huge images is possible.

Please leave results below and comment if you have time for it :) Thanks.

Updates:

V0.1:

V0.2:

V0.3:

V0.35:

Planned information for tutorial:

List of possible settings to start with.

VAE tiling

Inpainting

Using multidiffusion with other extensions

Downloading

You can either download it from the github or download it straight from stable diffusion webui -> extensions tab -> available -> press load -> and search for multidiffusion (i recommend doing this way).

IMPORTANT: AFTER INSTALLING AND RELOADING, CLOSE THE WEBUI CMD COMPLETELY, NOT JUST RELOAD. Otherwise it might have some issues.

1. Multidiffusion workflow example.

The extension adds a lot of stuff that might look overwhelming at the first sight, but i can guarantee it is pretty simple to use and straightforward once you learn the knobs.

1.1 Tiled diffusion

First we will look into the tiled diffusion settings. Settings are simple once you get hang of them.

Important things to remember:

It is good idea to keep checking the command prompt. If there is too few tiles it will not generate the image with tiled diffusion. This can be fixed by reducing size of Latent tile width or/and Latent tile height. Keeping the height/width divided by 8-10 usually works well. 712 x 712 ->

If you get strange results, like 5 persons on the screen, many heads, many hands etc. Don't add more negatives. Fiddle with tile sizes and tile overlap. Usually means you need higher overlap or higher either width/height tile. It is easier to start getting used to the extension when the resolution is not too high apart. Examples 712 x 712, 712 x 840... etc.. It is easier to get better results.

Enable: Enables the tiled diffusion

overwrite image size: With this setting you can do images larger than the webui normally allows. You can go up to 16384 x 16384

Method: There is 2 methods. Multidiffusion and mixture of diffusers. I generally use multidiffusion as it is faster. The give slightly different results. Test both and feel which works better for you.

Latent tile width and height: With this settings you change the tile width and height for the image. Usually i have something along the lines of image resolution divided by around 8.5-10. In the picture i have 112 width and 144 height. The image i will do with these settings is 984 x 1096. Which goes somewhere around divided by 8.5~.

Latent tile overlap: How much the tiles overlap with each other. This increases the tile amounts and generation time. I usually set this around half of the average of width/height to remove the possibility of getting strange stuff. Smaller amount works too. Rising it higher makes the generate time longer, but reduces inconsistency in the image.

Latent tile batch size: This will increase how many of the tiles will be generated at the same time. If you have enough VRAM on your GPU i recommend keeping it at 8. This does not affect the quality of image, but affects the time heavily.

1.2 Text2image

First we will be doing our image in text to image. We will be using tiled diffusion and no hires. fix. Tiled diffusion works with hires. fix. I personally do not use it, as i always scale in img2img.

Prompt

I will be using simple prompt for the example.

Positive: girl dancing in field full of flowers,summer dress, detailed blue eyes, smiling, (grainy:0.8), extremely detailed, (afternoon:1.1), photorealistic, warm atmosphere, natural lighting, (solo:1.3)

Negative: (low quality, worst quality:1.3), (verybadimagenegative_v1.2-6400:1.0), (Unspeakable-Horrors-Composition-4v:1.0),

i use 2 textual inversions which i found after heavy testing pretty compatible with each other without changing the image itself. Both can be found from civitai. This is my personal opinion and should be taken as such.

https://civitai.com/models/4499/unspeakable-horrors-negative-prompt

https://civitai.com/models/11772/verybadimagenegative

For the model i use A-Zovya RPG Artist Tools, which can be found from civitai

https://civitai.com/models/8124/a-zovya-rpg-artist-tools

For vae i used clearvae varian. It can also be found from civitai. This is my personal favorite and should be taken as such

https://civitai.com/models/22354/clearvae

Settings

These are the text2image settings i had.

Next we jump into img2img

Now in img2img. I am using same seed, different seeds work too, but can give some inconsistency in images. Test it out. Prompt can be changed to get more detail out of image, at this workflow i am going to use same to keep it simple. Sampler should be same as in t2i. unless denoising strength is low, then sampler can be other.

I use denoising mostly between 0.3-0.6, depending on the results. More denoise seems to give more detailed end results.

Settings i had in img2img. Tiled diffusion settings are mostly same for t2i and i2i. Upscaler is not automatically selected, so that must be selected every time. I scaled the tile width and height accordingly to resolution it will scale to.

For the i2i upscale i need to use the tiled VAE or i run out of VRAM. These were the tiled VAE settings i had:

I would not recommend using Fast Encoder, as it messes colors sometimes. Decoder seems fine.

End result of image. Sadly the hand decided to go haywire :)

Image

You can scale images made with hires or without multidiffusioned t2i images. Test and experiment, that is the best way to learn :)

This is what i am currently running. End results may differ.

python: 3.10.6  •  torch: 1.13.1+cu117  •  xformers: 0.0.17.dev464  •  gradio: 3.23.0  •  commit: 22bcc7be

3. Multidiffusion and Hires. fix compare

For comparing purposes i will use exactly same sizes and same settings mostly. With the multidiffusion you can go beyond in resolution and detail than what can be done without. I will share higher resolution images without compare.

Compare of the final result: https://imgsli.com/MTY4MTQ3

3.1 The prompt

I will be using this simple prompt for the showcasing.

3.2 Text to image settings for normal

For text2image settings for both are going to be a bit different but overly same. For normal there will be hires resize and for tiled diffusion resize will be done in img2img.

As for upscaler i use 4x- UltraSharp. It can be found from google with search words like: upscale wiki model database

I am not going to go into deeper details on the normal hires settings as that should be generally known by most. For normal without tiled diffusion settings are as follow

3.3 Text2image settings for tiled diffusion

For tiled diffusion i am not going to use hires fix. It can be used, but from my experience you will get better results from img2img resize with tiled diffusion.

Text2image tiled diffusion settings are as follow

3.4 IMG2IMG settings normal

Settings for IMG2IMG with normal, nothing new here

3.5 IMG2IMG settings tiled diffusion

This is where the scaling happens for multidiffusion.

Most of the settings are pretty much same as in the text2image. As the image will be scaled to higher resolution, rising the tile width and height is good idea.

4 Region prompt control

Region prompt control is extremely useful tool if you want to have more control over your picture.

4.1 Settings

The settings for prompt control are simple and easy to use.

Enable: Enables region prompt control for tiled diffusion, tiled diffusion must be enabled for it to work.

Draw full canvas background: According to the github "If you want to add objects to a specific position, use regional prompt control and enable draw full canvas background". How i understand is, if you don't use background in region prompt control and only use foreground to add object to your image use this.

Create txt2img canvas: Clicking this will create the empty canvas area that is the size of the image you are about to generate. Every time you change your width and height you have to press this again. Otherwise the generation results are not accurate.

The canvas area that is created shows the enabled regions. You can move/resize them from the region Z/Y/W/H sliders or from the canvas with mouse.

Type background and foreground: Background acts as an background, usually region that fills the whole canvas. Foreground gives new setting called feather. Feather in other words is blending/smoothing. With 0 the foreground region will not be feathered at all and 100 the image will be completely feathered to background

Rest should be pretty easy to understand.

4.2 Example

I am going to show example with very minimalistic prompts to show the idea behind the region prompt control.

Main prompt:

In main prompt i am only writing things that affect the quality, lighting etc... For this tutorial i am only going to add negatives to the main prompt. According to the github "your prompt will be appended to the prompt at the top of the page"

Settings:

Nothing new here. :)

Region control:

Canvas: Red is region 1 and yellowish is region 2

Region 1 will play as an background. Simple forest with some nice sunshine.

Region 2 will play as foreground. At this time it will be our character walking in the forest.

The prompt

The result:

Very simple tool to give you impressive results once you play around with it. Have fun! :)

More technical information on the github page

5 Tiled VAE

6 Inpainting

Тэги: tutorialguideupscaletiled diffusionupscalermultidiffusion
SHA256: 5AB0DE9B7DB2C3746075872801D7907CE4AE0308742BE0000FBC0596A59D3939

Super Easy AI Installer Tool

файл на civitaiстраница на civitai

"Super Easy AI Installer Tool" is a user-friendly application that simplifies the installation process of AI-related repositories for users. The tool is designed to provide an easy-to-use solution for accessing and installing AI repositories with minimal technical hassle to none the tool will automatically handle the installation process, making it easier for users to access and use AI tools.
For Windows 10+ and Nvidia GPU-based cards

Don't forget to leave a like/star.

For more Info:
https://github.com/diStyApps/seait

READ BEFORE YOU DOWNLOAD

False Positive Virustotal Antivirus Programs.

Please note that Virustotal and other antivirus programs may give a false positive when running this app. This is due the use Pyinstaller to convert the python file EXE, which can sometimes trigger false positives even for the simpler scripts which is a known issue

Unfortunately, I don't have the time to handle these false positives. However, please rest assured that the code is transparent on https://github.com/diStyApps/seait

I would rather add features and more AI tools at this stage of development.

Download the "Super Easy AI Installer Tool" at your own discretion.

Roadmap


Support
https://www.patreon.com/distyx
https://coindrop.to/disty

Тэги: stable diffusionaicontrolnetcomfyuidreamboothinstallinstall toolstable-diffusion-webuiautomatic1111installationartificial intelligenceinstaller
SHA256: 103C6AA182AE2497C186F018BCDF25A1F94B8E991BA976D7AE494BB7C11EDFBA

Civitai shortcut

файл на civitaiстраница на civitai

Civitai Shortcut

Stable Diffusion Webui Extension for Civitai, to download civitai shortcut and models.

Install

Stable Diffusion Webui's Extension tab, go to Install from url sub-tab. Copy this project's url into it, click install.

git clone https://github.com/sunnyark/civitai-shortcut

Features

You can save the model URL of the Civitai site for future reference and storage.

This allows you to download the model when needed and check if the model has been updated to the latest version.

The downloaded models are saved to the designated storage location.

Notice

When using Civitai Shortcut, three items will be created:

Screenshot

SHA256: 32D3C684399E0312E204AC13BC60CE73AB6ED4C9B7CADB291EC448855623B660

DPM++ 2M alt Karras [ Sampler ]

файл на civitaiстраница на civitai

This is alternative version of DPM++ 2M Karras sampler.

I don't claim that this sampler ultimate or best, but I use it on a regular basis, cause I realy like the cleanliness and soft colors of the images that this sampler generates.

The results may not be obvious at first glance, examine the details in full resolution to see the difference (especially in dark areas, backgrounds and eyes).

I have nothing to do with the creation or modification of this sampler. All material and info was taken from Reddit.
All credits go to hallatore.
Original github page.

More examples:

IMPORTANT! Before installing, back up the original file.

To install this sampler, download the file, unzip it and put it in a folder stable-diffusion-webui/modules/ and rename to sd_samplers_kdiffusion.py if necessary.

Then you should reload (whole SD not only UI) and you will see this:

Тэги: toolsampler: dpm++ 2m karras
SHA256: D5C62B9A8C781238E67D560FD18717F365E306BF749EE5BEA76AE1927C935277

Stable Diffusion Prompt Reader

файл на civitaiстраница на civitai

Stable Diffusion Prompt Reader

Github Repo:

https://github.com/receyuki/stable-diffusion-prompt-reader

A simple standalone viewer for reading prompts from Stable Diffusion generated image outside the webui.

There are many great prompt reading tools out there now, but for people like me who just want a simple tool, I built this one.

No additional environment or command line or browser required to run it, just open the app and drag and drop the image in.

Features

Supported Formats

If you are using a tool or format that is not on this list, please help me to support your format by uploading the original file generated by your tool as a zip file to the issues, thx.

Download

For macOS and Windows users

Download executable from above or from the GitHub Releases

For Linux users (not regularly tested)

Тэги: promptutilityguitoolstoolkitmetadatalinuxmacoswindows
SHA256: A3B97534FB84482CA94289BAFED5889247FBAA5FED85E1756508DDCB8F73DA8B

安安

файл на civitaiстраница на civitai

醫生

SHA256: B821C924818506332F760E3E26BD6F99B048FF06B888FF54AA79CD684B1BFEAF

ComfyUI Multiple Subject Workflows

файл на civitaiстраница на civitai

This is a collection of custom workflows for ComfyUI

They can generate multiple subjects. Each subject has its own prompt.

These require some custom nodes to function properly, mostly to automate out or simplify some of the tediousness that comes with setting up these things. You can find the requirements listed in each download's description

There are three methods for multiple subjects included so far:

Latent Couple

Limits the areas affected by each prompt to just a portion of the image

Includes ControlNet and unCLIP (enabled by switching node connections)

From my testing, this generally does better than Noisy Latent Compositon

Noisy Latent Composition

Generates each prompt on a separate image for a few steps (eg. 4/20) so that only rough outlines of major elements get created, then combines them together and does the remaining steps with Latent Couple

Character Interaction

This is an """attempt""" at generating 2 characters interacting with each other, while retaining a high degree of control over their looks, without using ControlNets. As you may expect, it's quite unreliable.

We do this by generating the first few steps (eg. 6/30) on a single prompt encompassing the whole image that describes what sort of interaction we want to achieve (+background and perspective, common features of both characters help too).

Then, for the remaining steps in the second KSampler, we add two more prompts, one for each character, limited to the area where we "expect" (guess) they'll appear, so mostly just the left half/right half of the image with some overlap.

I'm not gonna lie, the results and consistency aren't great. If you want to try it, some settings to fiddle around with would be at which step the KSampler should change, the amount of overlap between character prompts and prompt strengths. From my testing, the closest interaction I've been able to get out of this was a kiss, I've tried to go for a hug but with no luck.

The higher the step that you switch KSamplers the more consistently you'll get the desired interaction, but you'll lose out on the character prompts (I've been going between 20-35% of total steps). You may be able to offset this a bit by increasing character prompt strengths

Тэги: multiple peoplemulti-charactercomfyuiworkflow
SHA256: 4CEC34C3D6EB3C2FFE53E5B5F20D5318C477A6E7F4022E9A17B09C61D9437B5C

10 hand's depth images 手部深度图

файл на civitaiстраница на civitai

分享一些自用的手部深度图,使用方法:拖到“深度图编辑器depth lib”这个插件里就行了。

插件url安装地址:

https://github.com/jexom/sd-webui-depth-lib.git

Share some self-use hand depth images, how to use them: just drag them into the "depth lib" plugin.

Plugin url installation address:

https://github.com/jexom/sd-webui-depth-lib.git

Тэги: toolsdepth maptooldepthdepth image
Токены: 1
SHA256: C8BC320A9E98943D27D2C5457C471C58F0D5688C69249A8FC30768A9A181F026

WAS's Comprehensive Node Suite - ComfyUI

файл на civitaiстраница на civitai

WAS's Comprehensive Node Suite - ComfyUI - WAS#0263

ComfyUI is an advanced node based UI utilizing Stable Diffusion. It allows you to create customized workflows such as image post processing, or conversions.


Latest Version Download

A node suite for ComfyUI with many new nodes, such as image processing, text processing, and more.

Share Workflows to the /workflows/ directory. Preferably embedded PNGs with workflows, but JSON is OK too. You can use this tool to add a workflow to a PNG file easily

Important Updates

Current Nodes:


Text Tokens

Text tokens can be used in the Save Text File and Save Image nodes. You can also add your own custom tokens with the Text Add Tokens node.

The token name can be anything excluding the : character to define your token. It can also be simple Regular Expressions.

Built-in Tokens

Other Features

Import AUTOMATIC1111 WebUI Styles

When using the latest builds of WAS Node Suite a was_suite_config.json file will be generated (if it doesn't exist). In this file you can setup a A1111 styles import.

You can set webui_styles_persistent_update to true to update the WAS Node Suite styles from WebUI every start of ComfyUI

Recommended Installation:

If you're running on Linux, or non-admin account on windows you'll want to ensure /ComfyUI/custom_nodes, was-node-suite-comfyui, and WAS_Node_Suite.py has write permissions.

Alternate Installation:

If you're running on Linux, or non-admin account on windows you'll want to ensure /ComfyUI/custom_nodes, and WAS_Node_Suite.py has write permissions.

Installing on Colab

Create a new cell and add the following code, then run the cell. You may need to edit the path to your custom_nodes folder.

Dependencies:

WAS Node Suite is designed to download dependencies on it's own as needed, but what it depends on can be installed manually before use to prevent any script issues. The dependencies which are not required by ComfyUI are as follows:

Github Repository: https://github.com/WASasquatch/was-node-suite-comfyui

❤ Hearts and 🖼️ Reviews let me know you want moarr! :3

Тэги: depth of fieldcustom nodecomfyuiwildcardsdepth mapmidasnodescustom nodesimage filterscannynoodle soup promptsnspimage combineedgesedge detectionimage stylesimage blending
SHA256: 79947A9ADA428CFC720F51BA608D557DD91B2E25B349CA19C2A35116EA04A02B

Oobabooga Text Chat Prompt Helper - Me!

файл на civitaiстраница на civitai

A Character based on me, for Oobabooga!


Just unzip into the Characters folder and select me from the Characters Gallery menu in the UI.

Yes, it's pretty hokey. Sometimes it embellishes the information I provided in the Character backstory; no, I don't go to MIT, work at NASA, or enjoy long hikes with my dog. Yes, I did have an OnlyFans.

It's cool though, and until I can train a LoRA with every piece of text I've written in the past N years, it'll do, for fun.

I've mostly tested it on the Vicuna model,

Тэги: characterwomanoobaboogatheallyllm
SHA256: C64D044867F44A5EC3F4C7DE52F49697CBA5F4E80A5F919FCFEFBECFA650BA60

ComfyUI Impact Pack

файл на civitaiстраница на civitai

This custom node provides face detection and detailer features. Using this, the DDetailer extension of the WebUI can be implemented in ComfyUI. Currently, this is the main feature and additional feature will be added in the future.

Please refer to the GitHub page for more detailed information.

https://github.com/ltdrdata/ComfyUI-Impact-Pack

Install guide:

Updates:

v1.4

v1.3

v1.2

v1.1

Тэги: comfyuiddetailerdetectiondetailersam
SHA256: 825483A7E5ADD50254E4737FC6D7D57B28ADE9B4F511AC4CC147E0A78BB14A8D

ImagesGrid: Comfy plugin (X/Y Plot)

файл на civitaiстраница на civitai

ImagesGrid (X/Y Plot): Comfy plugin

A simple ComfyUI plugin for images grid (X/Y Plot)

Preview

Simple grid of images

Image

XYZPlot, like in auto1111, but with more settings

Image

Workflows: https://github.com/LEv145/images-grid-comfy-plugin/tree/main/workflows

How to use

  1. Download the latest stable release: https://github.com/LEv145/images-grid-comfy-plugin/archive/refs/heads/main.zip

  2. Unpack the node to custom_nodes, for example in a folder custom_nodes/ImagesGrid/

Source

https://github.com/LEv145/images-grid-comfy-plugin

Тэги: comfyuicomfy
SHA256: 02D85B7209D5EB4D465358AB405EE859D5D1B5ADE4CE2E6C2482356658B1067A

Oobabooga Character - Cl4P-TP aka. Claptrap

файл на civitaiстраница на civitai

简介 / Intro

我为Oobabooga-webui制作了一个角色预设,是来自《无主之地》系列中的Cl4P-TP机器人,或者也被叫做“小吵闹”。这个角色是通过先和chatGPT(模型:GPT-4)进行几轮角色扮演,然后将对话文本放入example_dialogue中所创建的。

我已经使用了RWKV-4-Raven-7B模型进行了测试,效果相当不错(隔着屏幕就感觉到挺吵的)。当然,你也可以使用其他模型来查看是否按预期运作。

请注意,这个机器人非常烦人。这就是他的个性。如果你被烦的不行了,就把它关掉吧 :)。

Inspired by this post

I haven't found a better place to share this, so I thought that maybe Civit is a good place. But if it is inappropreate the mods can take any action they see fit.

I made a character preset for Oobabooga-webui that depict the Cl4P-TP unit, or better known as Claptrap, from Borderlands franchise. This character was made by roleplaying with chatGPT(model: GPT-4), and use the text in example_dialogue.

I have tested with RWKV-4-7B model and it works fairly well. You can of course use other model and see if it works as intended.

Just a heads up, the robot is really annoying. It's his persona. If it bothers you just shut him down :).

使用方法 / How to use?

注意:目前我只制作了英文对话,中文会在之后更新。

首先你需要安装Oobabooga-webui 并下载任意一个大语言模型。根据你的显存大小去选择模型的size。16G及以上显存推荐下载7B模型。

You need to have Oobabooga-webui installed and working. Also you need at least a language model installed.

Github repo for Oobabooga-webui

中文用户:如果因为网络连接问题无法顺利使用Oobabooga-webui一键安装程序,请参考这里

然后,下载本页面提供的文件,解压并将两个文件(Cl4p-TP.yaml and Cl4p-TP.png)放在如下路径中:

.\oobabooga-windows\text-generation-webui\characters

启动webui之后,角色卡应该就会出现在界面下方的Gallary内。

Download the file, extract it, paste the two file (the Cl4p-TP.yaml and Cl4p-TP.png) into

.\oobabooga-windows\text-generation-webui\characters

then you should be able to see the character card in the webui.

Тэги: characterchatgptllmpreset
SHA256: CA21C713A9F41C1E69D5230FE019D4256B9F717C575C91E86093B58F099B07FD

Ultra Sharp High Contrast Tutorial +vae&upscaler

файл на civitaiстраница на civitai

If you found this useful, please click the :heart: and post your own image using the technique with a rating. Thanks!

To help with some confusion on how I get my preview images for my models, I created this tutorial. It's a really great technique for creating very sharp details and high contrast in any image with any model. Without having to upscale it even larger. (see a side by side comparison in the model images)


Step 1:
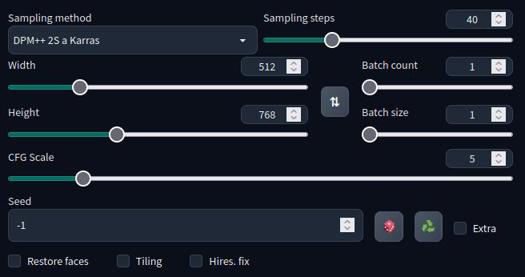
I start with a good prompt and create a batch of images. When using a Stable Diffusion (SD) 1.5 model, ALWAYS ALWAYS ALWAYS use a low initial generation resolution. The model's latent space is 512x512. If you gen higher resolutions than this, it will tile the latent space. That's why you sometimes get long necks, or double heads. However, depending on newer models, their training, and your subject matter, you can get away with 768 in some cases. But if you get strange generations and don't know what's wrong, bring your resolution withing the 512x512 zone. To get the higher resolution images, you use hires fix, explained in Step 2.
In this tutorial, I use the very superior and legendary A-Zovya RPG Artist Tools version 2 model. It's quite capable of 768 resolutions so my favorite is 512x768. Posting on civitai really does beg for portrait aspect ratios. In the image below, you see my sampler, sample steps, cfg scale, and resolution.

Additionally, I'm using the vae-ft-mse-840000-ema-pruned.ckpt for VAE and the 4x_foolhardy_Remacri.pth for my upscaler. Any upscaler should work fine, but the default latent upscalers are very soft, and the opposite of this tutorial. The vae and upscaler is included in the files of this tutorial for you to download. The VAE goes in your /stable-diffusion-webui/models/VAE folder and the upscaler goes in your /stable-diffusion-webui/models/ESRGAN folder.

Step 2:
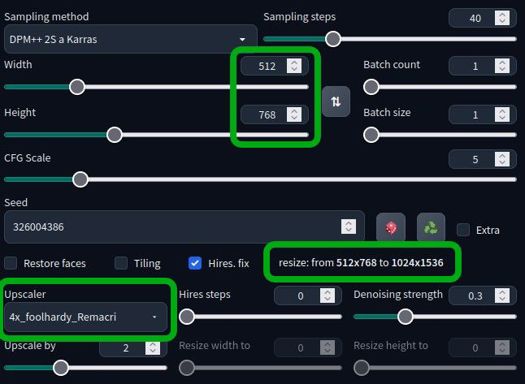
Once I find the image I like, I put the seed number in the seed box. Like in the picture below, I leave everything the same including the initial resolution.

When you click the Hires. fix checkbox, you get more options. I choose my upscaler and upscale by 2. You can see the resize dialogue shows it will gen a 512x768 image, but then regen over that initial image to the higher resolution of 1024x1536. This gives it better details and a chance to fix things it couldn't do in smaller resolutions, like faces and eyes.
Then I select a denoising strength. The range is from 0 to 1. The smaller the number, the closer it will stay with the original generation. A higher number will allow it to make up more details which can fix things, and sometimes break things. So adjust the slider to your preference. I usually go from 0.25 to as high as 0.5. Any higher than that, I probably didn't like the original generation to begin with and now I'm going to get something wildly different.

Step 3:
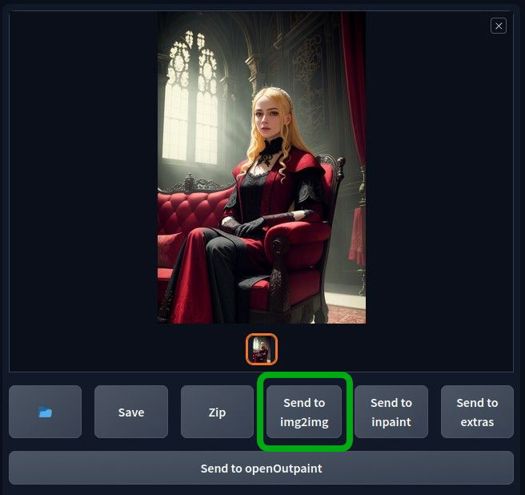
Your image will show up in the box to the right as usual. Click on the "send to img2img" box as shown below.

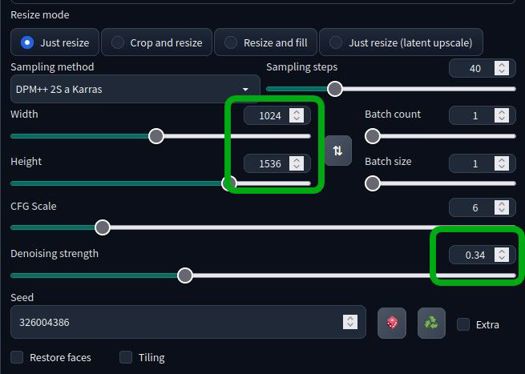
Once you're on the img2img page, make sure your prompt is exactly the same. Make sure all other settings are exactly the same also. It will sometimes give you a different sampler and CFG scale.

Make sure you have selected "just resize", the same settings from the previous image including the seed number. The ONLY difference here will be the resolution, it should be the larger size you hires fixed to, and the denoising strength. Most video cards can handle this in img2img. If you get vram errors, try using --xformers and/or --no-half in your startup script. For extreme cases, you could also use --medvram. Otherwise, a weaker card will just take more time than a more powerful one, but at this point, you're giving final polish to a good cherry-picked image.
Denoising strength: the higher this number, the more contrast and sharpness will be added. Too low and you'll see no difference. To high and it will shred the image into confetti. This number will vary from image, subject matter, details and even the model you use. For my use, I get good results from 0.12 to 0.35.

And that's it, PLEASE PLEASE PLEASE post some ultra sharp images you made and rank this tutorial. Feedback and encouragement is what fuels creators to make more and post their stuff. Support those that you like.

Obligatory donation chant:
Do you have requests? I've been putting in many more hours lately with this. That's my problem, not yours. But if you'd like to tip me, buy me a beer. Beer encourages me to ignore work and make AI models instead. Tip and make a request. I'll give it a shot if I can. Here at Ko-Fi

Тэги: sharp focusimg2imgtutorialhigh contrastupscalesharp
SHA256: FBAAAF6EA0D0AF792780D802B5351D94983EAA9FA7EC801B7B09CE721B6838B3

NodeGPT

файл на civitaiстраница на civitai

ComfyUI Extension Nodes for Automated Text Generation.

https://github.com/xXAdonesXx/NodeGPT

Тэги: promptcomfyuicomfytext generation
SHA256: B37517190475F1C036FD8D1C64E414AC8AACACC219071B0B55286BB3A16931E8

Vid2vid Node Suite for ComfyUI

файл на civitaiстраница на civitai

Vid2vid Node Suite for ComfyUI

A node suite for ComfyUI that allows you to load image sequence and generate new image sequence with different styles or content.

Refer to Github Repository for installation and usage methods: https://github.com/sylym/comfy_vid2vid

Тэги: custom nodenodecomfyuinodescustom nodesbatchimage sequencevid2vidvideocomfy
SHA256: F65C3CB028821185526CECEA918BF79B7BAB6FEDF7970594499CC1A0A7789717

wyrde's ComfyUI Workflows

файл на civitaiстраница на civitai

wyrde's workflows for various things

More examples and help documents on github: https://github.com/wyrde/wyrde-comfyui-workflows

The recent changes to civit's UI make sharing these on civit a painful process.

Expand the About this Version box to the right → to see more.

Тэги: comfyuiworkflowwyrde
SHA256: A290BAF17B418445BD4E63DDB4299D608196A8CD007DB3FFA4D448A391B3B729

LoRA to Gif Script

файл на civitaiстраница на civitai

Custom Script to create Gif from LoRa for 0 to strength you like

Unzip in (stable-diffusion-webui)\scripts

You output gif is in stable-diffusion-webui\outputs\txt2img-images\txt2gif

Examples:

Тэги: scriptlora
SHA256: 539FC0F79D0BA23CC12997CF38634622BAF7BBB4B63C4A97CE03CFA229AEFC47

Efficiency Nodes for ComfyUI

файл на civitaiстраница на civitai

A collection of ComfyUI custom nodes to help streamline workflows and reduce total node count.


Github Repo: https://github.com/LucianoCirino/efficiency-nodes-comfyui


Currently Available Nodes:

Ksampler (Efficient)

note: when using multiple instances of this node, each instance must have a unique ID for the "Hold" state to function properly.

Efficient Loader

Image Overlay

Evaluate Integers

Evaluate Strings

Тэги: comfyuicomfyefficiency
SHA256: 23D52BF00EDAFC73C091BB9B1D04B911A0F248649B15BF5B40C984A84AE2815D

ComfyUI "Quality of life Suit:V2" (auto Update,Chat GPT , DallE-2 ,Math, ... and more )

файл на civitaiстраница на civitai

If you like my work Kindly like,rate and comment XD


These nodes are for : ComfyUI

ComfyUI:

ComfyUI is an advanced node based UI utilizing Stable Diffusion. It allows you to create customized workflows such as image post-processing, or conversions.

Auto Update:

-when you run comfyUI, the suit will generate a config file

The file looks like this :
{

"autoUpdate": true,

"branch": "main",

"openAI_API_Key": "sk-#################################"

}

this file is used to control Auto update, and to manage any other settings the tool requires

File Description:
"autoUpdate": can be (true) or (false),
"branch": default is ("main")

other options for branch:

"openAI_API_Key": if you want to use the ChatGPT or Dall-E2 features, you need to add your open-AI API key, you can get it from (Account API Keys - OpenAI API)

How to use

As this version relies heavily on the new feature of comfyUI : the ability to switch inputs to be widgets and widgets to be inputs

Kindly be notified that you can load the images in the downloaded ZIP/workflows in comfyUI to load the workflow that was used to generate it

Current Nodes:

//7/4/2023 -----------------------------------------------------------------

// 22/3/2023 -----------------------------------------------------------------

OpenAI Nodes

OpenAI ChatGPT and DALLE-2 API as nodes, so you can use them to enhance your workflow
ChatGPT-Advanced

Advanced ChatGPT nodes

in this workflow, I used ChatGPT to create the prompt,

  1. at start, I send 2 messages to ChatGPT

  2. first message is to tell ChatGPT how to behave and what is the prompt format that I need from him

  3. in the second message I send what I want in this case young girl dancing (I added young, so her clothes become decent XD don't misunderstand me please )

  4. after that I feed the messages to the completion node “it is called like that in their API sorry”

  5. and congrats, you have a nice input for your image

DallE-2 Image nodes

this is a full workflow where

1- use ChatGPT to generate a prompt

2- send that prompt to DALLE-2

3- give the generated image to Stable Diffusion to paint over it

4- use DALLE-2 to create variations from the output

ChatGPT-simple

This node harnesses the power of chatGPT, an advanced language model that can generate detailed image descriptions from a small input.

I have made it a separate file, so that the API key doesn't get embedded in the generated images.

<you can load this image in comfyUI to load the workflow>

String Suit

add multiple nodes to support string manipulation also a tool to generate image from text

in this example I used depth filter but if you are using WAS nodes you can convert the text to canny using WAS canny filter it will give much better results with the canny controlNet

Other tools


there are also many brilliant nodes in this package
WAS's Comprehensive Node Suite - ComfyUI | Stable Diffusion Other | Civitai

thanks for reading my message, I hope that my tools will help you.

Discord: Omar92#3374

Githup: omar92 (omar abdelzaher sleam) (github.com)

Тэги: utilitytoolstextcomfyuinoodle soup promptsfontnoodle soupmathematical equationdalle2chatgptqualityoflifeopenaimath
SHA256: 6D9625D2E0DD537BAE0A66EADF97D0F6F7CAB295BF24C34E3A1D6631155287C2

Oobabooga SD Character Prompter for

файл на civitaiстраница на civitai

files are free please sub to my channel if you like the content or consider supporting me

This If_ai SD prompt assistant help you to make good prompts to use directly in Oobabooga like shown here youtu.be/15KQnmll0zo The prompt assistant was configured to produce prompts that work well and produce varied results suitable for most subjects + to use you just give the input a name of the character or subject and a location or situation like (Harry Potter, cast a spell) if you get out of that pattern the ai starts to act normally and forget it is a prompt generator Tested and works well with the smallest Alpaca Native 4bit 7B and the llama 30b 4bit 128g

Тэги: characteroobaboogallamaalpaca
SHA256: 03404A8CE94A703502419C63104CC4A740A03C2754E5D0E9DA70BFD13F257F15

ComfyUI VAE Encode image cropping problem fix workflow

файл на civitaiстраница на civitai

i have having issues with an image that is not the tipical power of 8 resolution, the vae encoder would crop the image but that was simly not acceptable by me so i figures something out. use the images and drop it in comfy ui.

i just padded the origenal images turned it into latent so it only cropped black area then i did what i want with the latent and then cropped back the image to its origenal size.

PS this is not the image i i needed not cropped but that was NSFW so i used this to post.

SHA256: 2371FEF92A6ADC938D7D7197D4AF67B6149B189F4973D795AF35C32677A9B731

GPT node ComfyUI

файл на civitaiстраница на civitai

Waiting to be supplemented, comfyUI nodes built around openai and gpt

Тэги: comfyui
SHA256: 58EB3C894942D6E75EF9C1B192D6DFF4957763562DA1F518F9003DCEE5D2D353

[GUIDE] A Japanese guide to using, creating, and posting LoRA/LoRAを使い、作り、投稿する為の日本語ガイド

файл на civitaiстраница на civitai

Loraを使い、作り、投稿の作業フロー 2023/04/13 16:40 更新

AI素人です
知識はそんなに深くないので難しい事はあまり書かないです

ダウンロード数が増えるとたぬきが喜びます ハートが増えるとたぬきのHPが回復します

そもそもLoRAって何?の説明

ざっくりとした説明

 stablediffuisonというソフトで使われている学習済モデル(pretraind model 5GBくらい)そのままでは新しい絵が出せないので追加で学習させたい。

 でもデータ全体が変更される学習方法だとすごく大変なのでLoRAっていう限定的な学習方法で現実的なコスト(データ量・計算時間)で出来るようになったよ!

新しい絵を学習させて、それが使えるようになるという理解。

https://qiita.com/ps010/items/ea4e8ddeff4de62d1ab1

Stable Diffusionの特徴は、次の3つです。

https://dosuex.com/entry/2023/03/30/115101

LLMの課題

近年、LLM(大規模言語モデル)が多くの自然言語処理タスクで顕著な成果を上げています。一般的に、これらのモデルは非常に多くのパラメータを持っており、特定のドメインやタスクへの適応を行う際には、大量のデータと計算リソースが必要となることが課題となっています。また、モデルのサイズが大きくなることで、デバイスのメモリや計算能力が制約される環境での使用が困難になる場合もあります。

LoRAの目的

LoRA(Low-Rank Adaptation)は、この課題に取り組むためにMicrosoftによって開発されました。LoRAの目標は、LLMのパラメータを低ランク行列で近似することにより、適応の際に必要な計算量とメモリ使用量を大幅に削減し、タスクやドメイン固有のデータで迅速かつ効率的にモデルを微調整することができるようにすることです。これにより、LLMをより実用的で効果的なツールに進化させることが期待されています。

元々LLMの学習コストを下げる為に考えられた方法をstablediffusionに応用したという感じ?

------------------------------------------------------------------------------------------------------

閑話休題

学習する為のPCの推奨

 OS Win11

 CPU 最近のならなんでもよい

 RAM 32GBくらいあれば動くはず

 SSD 読み書きが早くなります

 GPU GeforceRTX VRAM8GBが最低ライン、6GBは設定を突き詰めれば?、12GB以上あると安心?

 Webブラウザ firefoxとchromeとEdgeの最新バージョン

前提となる環境/ソフトウェアの導入 Win11/Geforce

Geforce Experience導入(共通)

https://www.nvidia.com/ja-jp/geforce/geforce-experience/

webui automatic1111導入(windowsローカル編)

  git

   https://gitforwindows.org/

   ダウンロードして実行してインストール

   設定は弄らずにそのままでいけた筈

   インストール後

   パワーシェルで

   git

   インストールされているのを確認

  python

   https://www.python.org/

   python3.10.6をインストール

   https://www.python.org/downloads/windows/

   最近のWin11機であれば64bitだと思います。32bitで動かしているのは知らないです。

   anaconda3やminicondaはインストールしない想定で書いています。

   Windowsストアからもアプリ版のpythonが入れられるようですが確認していません。

   解説サイトでも扱いが無いのであまりおすすめ出来ないです。

   インストール後、Windowsの検索からpowershellを検索し実行

   パワーシェルで

    python -V

   を実行、バージョンが表示されていればインストールされています。

   インストールしてもpythonが見つからない場合はパスの設定がおかしいです。

   この場合はPython 3.10.10が入っていますが特に問題無く動いています。

   バージョンがだいたいあっていればだいたい動くし動かない事もある

   webuiでもsd-scriptでも3.10.6バージョンが安定しているようです。

PyTorch のインストール(Windows 上)※1引用

コマンドプロンプトとパワーシェルは別環境なので、パワーシェルに読み替えて下さい。

  1. Windows で,コマンドプロンプト管理者として実行

    コマンドプロンプトを管理者として実行:

  2. PyTorch のページを確認

    PyTorch のページ: https://pytorch.org/index.html

  3. 次のようなコマンドを実行(実行するコマンドは,PyTorch のページの表示されるコマンドを使う).

    次のコマンドは, PyTorch 2.0 (NVIDIA CUDA 11.8 用) をインストールする.

    事前に NVIDIA CUDA のバージョンを確認しておくこと(ここでは,NVIDIA CUDA ツールキット 11.8 が前もってインストール済みであるとする).

    https://developer.nvidia.com/cuda-11-8-0-download-archive

    Windows x86_64 11 exe(local)を選択、赤矢印にダウンロードリンクが出るので落とす

    そして実行する

    一行ずつ実行していってね!

    pip install torch torchvision torchaudio --index-url https://download.pytorch.org/whl/cu118


    python -c "import torch; print(torch.__version__, torch.cuda.is_available())"

    pip installするとだーっと進捗が表示されて終わったらpython -cでtorchがインストールされているのか確認します
    torchのバージョン1.13とか1.12とか2.0が表示されたら入っていると思います

Automatic Installation on Windows

エクスプローラーで導入したい場所のフォルダを右クリックして

ターミナルで開く を実行

  1. git clone https://github.com/AUTOMATIC1111/stable-diffusion-webui.git

  2. webui-user.bat をエクスプローラーから実行

 1.をパワーシェルにコピペして実行

 処理が終わるとフォルダにwebui-user.batが作られているので実行する

 webブラウザから http://127.0.0.1:7860 を開く(http://localhost:7860 でもokな筈)

(設定で自動でブラウザで開くようにも出来ます。)


 導入以降はwebui-user.batを実行するようになります。

web-user.batの中身

@echo off

set PYTHON=
set GIT=
set VENV_DIR=
set COMMANDLINE_ARGS=

call webui.bat

VRAM4GB以下向けオプション

  VRAM消費量を低減する代わりに速度が犠牲になるとのこと。

    set COMMANDLINE_ARGS=--medvram

  ↑で out of memory が出た場合

    set COMMANDLINE_ARGS=--medvram --opt-split-attention

  ↑でもまだ out of memory が出た場合

    set COMMANDLINE_ARGS=--lowvram --always-batch-cond-uncond --opt-split-attention

その他のオプション

--xformers (高速化/VRAM消費減)

 torch2.0なら無くても良い 環境による

--opt-channelslast (高速化)

1111のWikiのよると、Tensor Coreを搭載したNVIDIA製GPU(GTX16以上)で高速化が期待できるとのこと。

--no-half-vae (画像真っ黒対策)

真っ黒になった時に

--ckpt-dir(モデルの保存先を指定する。)

 保存先を変えたい時に

--autolaunch (自動的にブラウザを立ち上げる)

 いちいちWebブラウザにアドレスを入れるのが面倒な時に

--opt-sdp-no-mem-attention または --opt-sdp-attention

(Torch2限定
xformersと同じく20%前後高速化し、出力にわずかな揺らぎが生じる。VRAM消費が多くなる可能性がある。
AMD Radeon,Intel Arcでも使える。)

--device-id 0 (複数枚GPUが刺さっている場合に指定する、0から始まる。デフォルトでは0を使う。)

 set PYTORCH_CUDA_ALLOC_CONF=garbage_collection_threshold:0.6,max_split_size_mb:24

PytorchでCUDAがメモリを使う時の設定

 閾値6割メモリが使われたら 24MB単位でGarbageCollectionするよ(メモリ上の使われていないデータを掃除、消費メモリが減る。のでCUDAがOutOfMemoryを表示して落ちなくなる・・・という願い。)

拡張機能によっては相性が悪かったりするのでreadmeをよく読んで使って下さい!

初期設定で起動すると自動でckptをダウンロードするのでしばらく時間が掛かります

sd-script導入

 パワーシェルでコマンドが実行出来るように権限を設定

powershellをスタートメニューから検索して右クリックして管理者として実行をクリックしてください

パワーシェルを開いて以下を一行ずつ実行

git clone https://github.com/kohya-ss/sd-scripts.git
cd sd-scripts

python -m venv venv
.\venv\Scripts\activate

pip install torch==1.12.1+cu116 torchvision==0.13.1+cu116 --extra-index-url https://download.pytorch.org/whl/cu116
pip install --upgrade -r requirements.txt
pip install -U -I --no-deps https://github.com/C43H66N12O12S2/stable-diffusion-webui/releases/download/f/xformers-0.0.14.dev0-cp310-cp310-win_amd64.whl

cp .\bitsandbytes_windows\*.dll .\venv\Lib\site-packages\bitsandbytes\
cp .\bitsandbytes_windows\cextension.py .\venv\Lib\site-packages\bitsandbytes\cextension.py
cp .\bitsandbytes_windows\main.py .\venv\Lib\site-packages\bitsandbytes\cuda_setup\main.py

accelerate config

LoRA_Easy_Training_Scripts 導入

v5以前の場合

https://github.com/derrian-distro/LoRA_Easy_Training_Scripts/releases

.batをダウンロードして配置したいフォルダで実行する

v6の場合

 Release installers v6 · derrian-distro/LoRA_Easy_Training_Scripts (github.com)

 installer.pyを導入したいフォルダに配置して

 ターミナルを開いてパワーシェルで

 python installer.py を打ち込み実行

 途中色々ダウンロードされるので待ちます

 Do you want to install the optional cudnn1.8 for faster training on high end 30X0 and 40X0 cards? [Y,N]?

 と聞かれるので30x0/40x0シリーズのグラボを使っている場合はYを入力、それ以外のグラボはNを入力してください

 sd-scriptが入りますが設定が終わっていないので

 パワーシェルで一行ずつ実行してください

 cd sd-scripts

 venv\Scripts\activate

 accelerate config


共通

accelerate configで次のように答えて下さい

- This machine
- No distributed training
- NO
- NO
- NO
- all
- fp16 (数字キーの1を押してリターンで選びます、矢印キーで操作しようとするとエラーで落ちます)

webui簡単インストーラー版

 https://github.com/AUTOMATIC1111/stable-diffusion-webui/releases/tag/v1.0.0-pre

 The webui.zip is a binary distribution for people who can't install python and git.

 Everything is included - just double click run.bat to launch.

 No requirements apart from Windows 10. NVIDIA only.

 After running once, should be possible to copy the installation to another computer and launch there offline.

 webui.zip は、python と git をインストールできない人向けの環境です。

すべてが含まれています - run.bat をダブルクリックして起動するだけです。

 Windows 10 以外の要件はありません。

 NVIDIA のみ。

一度実行した後、インストールを別のコンピューターにコピーして、オフラインで起動できるはずです。


 使っていないので解説出来ませんが、お手軽そうですね。

 Win10の環境が無いので検証できませんので他の方の記事を参考にして下さい。

LoRA ファイルについて

階層見本

stable-diffusion-webui
 ┗models   
   ┗lora  この中に使用したい学習データを保管します。

LoRAで使用可能なデータは「.safetensors」「.ckpt」の拡張子です。
識別子を使用する場合、プロンプトに識別子を記述することを忘れないようにしましょう。

CIVITAIではpnginfoのLoRAファイル名とダウンロードされるLoRAファイル名が異なるので

自分で書き換える作業が必要になるかと思います。

ファイル名書き換えるか、プロンプトの方を書き換えるかです。

学習用データセットの準備

 画像を用意する

 (画像が少なければ反転・切り取りなどを駆使)極論すれば一枚あればどうにか出来るらしい?

 ファイルをフォルダに配置する。(正則化画像は説明がめんどくさいのでいつか書く)

 targetが学習させたいものの名称だと思って下さいね

ファインチューン向けメタデータの作成方法

(jsonファイルを読み込んで学習させる場合)

 kyousi(フォルダ)

  target(フォルダ)

    target000.jpg(画像ファイル)

    target001.jpg(画像ファイル)

webui automatic1111の拡張機能のwd1.4taggerでタグ付けバッチ処理をする

(他の使った事無いのでベストかどうかは分からない)

 バッチ処理の入力フォルダの画像を読み込んで、出力フォルダに画像枚数だけ.txtファイルを書きだす。

ディレクトリ一括処理 タブを選んで

 入力ディレクトリにtargetを指定

 出力ディレクトリにtargetを指定

 重複するタグを削除(としあき製のタグクリーナーを使う場合は✅要らない)

 JSONで保存(としあき製のタグクリーナーを使う場合は✅要らない)

 インタロゲーターを指定できますがデフォルトのを使用しているので違いは良く分かりません

 インタロゲートのボタンを押すとバッチ処理が始まり、CMD窓(webui-user.batを実行すると開く窓)に進捗が表示され全て終了すると all done :) が表示されます。

Dataset Tag Editorでは

Wd1.4 taggerで作った.txtファイルや.jsonファイルを指定してタグを編集出来るようです。

 ファインチューン用jsonファイル作成バッチ

wikiで書かれている作成バッチのテキストをnotepadにコピペしてmake_json.batとか適当に名前を付けて保存

taggerで作られた.txtファイルを.jsonファイルにする。

rem ----ここから自分の環境に合わせて書き換える----------------------------------

rem sd-scriptsの場所

set sd_path="C:\LoRA_Easy_Training_Scripts\sd_scripts"

rem 学習画像フォルダ

set image_path="C:\train\kyousi\"

rem ----書き換えここまで--------------------------------------------------------

.batをnotepadで開いてフォルダの場所だけ書き換えます。

そして.batを実行

メタデータにキャプションがありませんと表示されますが気にしません(メタデータとかキャプションについてはよくわかりません)

merge_clearn.jsonの内容を編集します

 .jsonファイルの内容を見てトリガーワード(にしたいタグ)があったらそのまま、無ければ一番最初の位置に追加する(--keep_tokens=1と--shuffle_captionを指定する為)。

"C:\\Users\\watah\\Downloads\\kyousi_78\\siranami ramune\\100741149_p0.jpg": {

"tags": "siranami ramune,1girl, virtual youtuber, solo, v, fang, multicolored hair, blue jacket, blue hair, choker, hair behind ear, smile, crop top, bangs, streaked hair, hair ornament, jewelry, looking at viewer, earrings"

},

サンプルです。

.jsonファイルは上のような3行1セットな書き方をされています。画像ファイルの数だけセットがあると思って下さい。

”画像ファイルのパス”:{

”tags”:”token1,token2,,,,,,(略)”

},

token1でトリガーワードにしたいタグ(ややこしいですね)を入れます。

私はテキストエディアの置換で全部書き換えています。

置換元 -> 置換先

"tags": " -> "tags": "トリガーワード,

--shuffle_caption

これは各タグをシャッフルしてタグの重みを分散させる効果があるのだとか。

--keep_tokens=1

1番目のタグまでを保持(この場合は1番目にあるtoken1)にします。

トリガーワードを1つで強く効かせたいのでこのような設定をしています。

理論的な解説は他の方におまかせします。

 sd-scriptで学習を実行。

  venvの仮想環境に入ってコマンド直打ち、もしくはtoml設定ファイルを使用する。

    sd-scriptのフォルダを右クリックしてターミナルを開く

    venv/Scripts/activateと入力してvenv(仮想環境)に入る

    コマンドをコピペして実行

(改行を入れない、使いまわししてる設定は見やすくするために改行を入れています。また設定値は適宜変更して下さい。)

コピペして実行すると流れてくるのはこんな感じ

画像枚数 x 繰り返し回数 x 総epoch / バッチサイズ = 総ステップ数

経過時間 残り時間 処理速度 it/s loss

lossはよくわかりません監視しても意味が無いというのを見かけましたが諸説あると思います。

 (LoRAの場合)ステップ数6000くらいになるようにepochとrepeatを適当に弄る。

 特に根拠はありません。最適な数値は自分で模索しましょう。

 私の環境では所要時間一時間弱。だいたい 1.80it/sくらいの速度。

 出来上がったLoRAをwebuiのLoRAフォルダに入れてwebuiを立ち上げる。

 lokrは4000ステップくらいで回してますけどベストかどうかはよくわからないです・・・・誰か教えて

 インストール先で変わってくると思いますが多分ここら辺

 F:\stable-diffusion-webui\models\Lora

 にLoRA(拡張子.safetensorファイル)を設置してください

webuiの使い方


webui-user.batを選んでダブルクリック

何事も無ければRunnning on local URL: http://127.0.0.1:7860 と最後に表示されます

webuiは拡張機能により日本語化されています

設定値をマニュアルで弄る方法もあります

☠加筆修正中☠

日本語化拡張適用済

・サンプリング方法

 サンプリングアルゴリズム

 個人的にはDPM++ 2Mが早くて良い感じに描いてくれる気がする、諸説ある。

・サンプリングステップ数

 20-50の間くらいで、大きい数字入れてもクオリティが比例して上がるわけではないし時間が掛かる。諸説ある。

・高解像度補助(hires.fix)

 高解像度にする時に画像が崩れるのを防ぐ

・アップスケーラー

 拡大するアルゴリズム

 アニメ系はR-ESRGAN 4x+ Anime6Bがいいらしい。諸説ある。

・アップスケール比率

 拡大倍率

・高解像度でのステップ数

 高解像度でどのくらいステップ数を使って再描画するか

 迷ったらサンプリングステップ数と同じにしたらどうかな

・ノイズ除去強度


・バッチ回数

 合計何枚の絵を一度に作るのか

・バッチサイズ

 一度に作る画像の数 VRAM少ないなら1でいい、多いなら4とか?

・幅

 作りたい画像の横のサイズ

・高さ

 作りたい画像の縦のサイズ

・CFGスケール

 高いほどpromptの内容に忠実に従うような動きをする

・シード

 同じseed値を使うと同じ画像が作成される

 気が付かずに何枚も似たような絵が出てきてようやく気が付く

 -1でランダム

 png内部の情報をsend2でtxt2imgで開いた時は固定値になるので気を付けようね!(絵を再現する為)

・ポジティブプロンプト

 こうやって欲しいという指示を,で区切って指定する

・ネガティブプロンプト

 こういうのは嫌という指示を,で区切って指定する

・生成

 絵を生成するよ

 プロンプトを調整する。

  この辺りはCIVITAIで投稿されている画像から知恵を拝借するといいかも

 複数枚絵を生成して出来栄えが良い物を選別する。

  バッチ数を8枚くらいにしてしばし待つ

 どうしても結果が芳しくない場合はLoRAのepochの小さいものを使うか、

 さらにLoRAに学習を続ける。

sd-scriptで学習する時に --save_every_n_epochs=1 とすると1epochごとにセーブされるます

通常last.safetensorから試しますが過学習かな?となった時に小さい数値のepochで試していくというやり方をしています

 コピペ直打ちする時に--network_weights="hogehoge.safetensor"で指定するとLoRAファイルにさらに学習させられます。

 学習が足りないかな?というときに

waifu diffusion1.5beta2-aesthetic導入メモ

https://huggingface.co/waifu-diffusion/wd-1-5-beta/blob/main/checkpoints/wd15-beta1-fp16.safetensors

https://huggingface.co/waifu-diffusion/wd-1-5-beta/blob/main/checkpoints/wd15-beta1-fp16.yaml

https://huggingface.co/waifu-diffusion/wd-1-5-beta/blob/main/checkpoints/wd15-beta1-fp32.safetensors

https://huggingface.co/waifu-diffusion/wd-1-5-beta/blob/main/checkpoints/wd15-beta1-fp32.yaml

https://huggingface.co/waifu-diffusion/wd-1-5-beta/blob/main/embeddings/wdbadprompt.pt

https://huggingface.co/waifu-diffusion/wd-1-5-beta/blob/main/embeddings/wdgoodprompt.bin

stable-diffusion-webui
|-- embeddings
|   |-- wdbadprompt.pt
|   `-- wdgoodprompt.bin
|-- models
|   `-- Stable-diffusion
|       |-- wd-1-5-beta2-aesthetic-fp16.safetensors
|       `-- wd-1-5-beta2-aesthetic-fp16.yaml
`-- 〜省略〜

ファイルの設置はこれで良い筈

そして満足いく結果が得られたらいよいよCIVITAIに投稿です!

CIVITAIに投稿する

たしか登録しないと投稿出来なかった筈

 アカウント連携で登録できたと思います

 四つの内どれかのアカウントあればそのアカウントで認証出来ます

 無くても新規登録は出来た筈

登録終わってloginしていると想定して話を進めます

さっそくモデルを投稿していきたいと思います(80回目)

なまえ

 公開する時に表示されるなまえ

ファイルタイプ

 LoRAとかLyCORIS(Locon/LoHA)とか選べます

付与するタグ

 +を押して付けたい単語を入力します

 無ければ新規に作って登録します

モデル説明

 モデルがどういうものかを説明すればいいと思います

商業利用

 下の方に説明があります スクロールして読んでください

現実に実在する人物か?

 実在する人物は肖像権の関係があります

Is intended to produce mature themes only

 多分だけど成人した人物のみを扱いますとかそんな感じだと思う。

 FBIに通報されるようなデータを作らないでね

CIVITAIでの投稿時に注意すべき個人的ポイント

左のを意訳

このモデルを使う時にユーザー許可する内容

 私の名前(この場合watahanを)を表記しなくていいです

 このモデルのマージを共有してください

 マージには異なる許可を使用する

右のを意訳

商業利用

 全部禁止

 生成した絵を販売する

 AI絵生成サービスで使用する

 このモデルまたはマージしたものを販売する 

二次創作は二次創作ガイドラインがある場合、規約に従ってください。

モデルのタイトルにUnOfficialと必ず入れているのは公式だと誤認させない為です。

バージョン

 好きなように付けて下さい

アーリーアクセス

 早期アクセスよくわからないけど公開するまでの日数が設定出来るぽい

ベースモデル

 SDのどのバージョン系列かを選ぶ

 分からない場合はotherにする

トリガーワード

 LoRAを使う時に使うトリガーワードを書いてください

 無いとDLした人が使う時に困ります

学習時のepoch

 学習させたときのepoch数を入力

学習時の総ステップ数

 学習させたときの総ステップ数を入力

ckpt pt safetensor bin zipなどの拡張子のファイルがアップロードできます

クリックして開くかドロップする


アップロードするファイル名

 ローカルのファイル名が表示されます 違うファイルを選んだときはゴミ箱アイコンで削除出来ます

ファイルタイプ

 選んでください

アップロードを始める

 実際にファイルをアップロードします

投稿する画像ファイルをここから開くかドロップしてね

投稿するタグは必ず一つは設定しないと公開できないので+Tagで追加してください

既存に無ければ新規にタグを作ります

最後にpublish押して公開されます

これでCIVITAIのみんなにあなたの作ったLoRAファイルが公開されましたね

pnginfoは編集しないでそのまま載せてるのでLoRAファイル名を弄るだけで再現出来る筈(CIVITAIがファイル名を変更している為)。

ToME入れてるので背景のディテールが違う?xformersとかでも微妙に違って来るらしいがよくわかりません

VAEファイルを入れるとまた変わってくると思います よく使われるのにEasyNegativeとかあります

https://github.com/kohya-ss/sd-scripts/blob/main/train_README-ja.md

LoRA以外にも追加学習について書かれています。一読しましょう。

LoRAとかの拡張とかのメモ

https://scrapbox.io/work4ai/LoCon

LoRAは緑の部分しか学習していないが、LoConは黄色の部分を学習できるので、合わせてほぼすべてのレイヤーをカバーできる

上の図はConv2d-3x3拡張とはまた別なのだろうか?

https://scrapbox.io/work4ai/LyCORIS

左の図が2R個のランク1行列(縦ベクトルと横ベクトルの積)の総和になるのに対し、右の図はRの2乗個のランク1行列の総和になるので同じパラメータ数でランクを大きくできるらしい。

[(IA)^3]

This algo produce very tiny file(about 200~300KB)

実装 : [. https://github.com/tripplyons/sd-ia3]

>[LoRA]との大きな違いは、(IA)^3はパラメータの使用量がかなり少ないことです。一般的には、高速化・小型化される可能性が高いが、表現力は劣る。

lokr

 LyCORIS/Kronecker.md at b0d125cf573c99908c32c71a262ea8711f95b7f1 · KohakuBlueleaf/LyCORIS (github.com)

 行列をなんやかやするらしいが解説出来ないです

Dylora

 出たばかりなのでよくわかりません

LoCon拡張とLyCORIS拡張 メモ

a1111-sd-webui-locon:[lora]フォルダにある Lycoris (Locon)ファイルを判別、処理する。

<lora:MODEL:WEIGHT>

a1111-sd-webui-lycoris:[Lycoris]フォルダにある Lycoris (Locon)ファイルを処理する。プロンプトから重みづけ指定が可能。

<lyco:MODEL:TE_WEIGHT:UNET_WEIGHT>

Model名とTextEncoderのweightとu-netのweightを設定してやらないといけないのですね

予定

 LoRAのリサイズ、階層別マージも時間があればやりたい。

メモ 使いまわし設定の一部を変更してLyCORISを使う

LoCon使う時

 --network_module lycoris.kohya

  --network_dim=16

 --network_alpha=8

  --network_args "conv_dim=8" "conv_alpha=1" "dropout=0.05" "algo=lora"

LoHA使う時

 --network_module lycoris.kohya

  --network_dim=8

 --network_alpha=4

  --network_args "conv_dim=4" "conv_alpha=1" "dropout=0.05" "algo=loha"

ia3使う時(検証してない)

 --network_module = lycoris.kohya

 --network_dim = 32

 --network_alpha=16

 --network_args = "conv_rank=32", "conv_alpha=4", "algo=ia3"

 --learning_rate = 1e-3

lokr使う時

 --network_module lycoris.kohya

  --network_dim=8

 --network_alpha=4

 --network_args = "conv_rank=4", "conv_alpha=1", "algo=lokr",”decompose_both=True”,”factor=-1”

 --unet_lr=3.0e-4

 --text_encoder_lr=1.5e-4

消費メモリの削減

--gradient_checkpointingオプションを付けると学習速度が遅くなる代わりに消費メモリが減る。

消費メモリが減った分バッチサイズを増やせば全体の学習時間は速くなる。

公式のドキュメントにはオンオフは学習の精度には影響しないとあるため、

VRAMが少ない環境では学習速度の改善には--gradient_checkpointingオプションを追加してバッチサイズを増やすのが有効。

参考

VRAM8G、LoHa、512 x 512の場合、バッチサイズ15まで動作できることを確認。

VRAM8G、LoHa、768 x 768の場合、バッチサイズ5まで動作できることを確認。

SD2.0以降を学習時のベースモデルに使う場合

--v2

--v_parameterization

--resolution=768,768

768サイズで学習させているベースモデルなので

追加学習時に解像度を768設定してみます

新しい投稿からlokrに切り替えてみました。

 1.13it/s --optimizer_type lion

 1.33it/s --use_8bit_adamW

どうも学習が上手く行かないのでLoRAに戻してみます、lokrはちょっとピーキーな感じがする・・・。

optimizerにlion使うには

 sd-scriptフォルダを右クリックでターミナルで開くを選び

 venv/Scripts/activate

 pip install lion-pytorch

で導入しておきます

https://github.com/lucidrains/lion-pytorch

--optimizer_type lion

tomlファイル使うと楽になるらしいです

参考にした情報

 ふたば may AIに絵を描いてもらって適当に貼って適当に雑談するスレ 不定期

 としあきwiki 上のスレのまとめ

 なんJ なんか便利なAI部 5ch

 /vtai/ - VTuber AI-generated Art 4ch

 くろくまそふと

 経済的生活日誌

 Gigazine

 原神LoRA作成メモ・検証

 AIものづくり研究会@ディスコード

 [Guide] Make your own Loras, easy and free@CIVITAI

 githubのreadme sd-scriptとLyCorisとautomatic1111辺り 細かい設定や変更点・バグなどがあるので検索だけでは分からない事があります

使いまわししてる設定

 --max_train_epochs --dataset_repeats --train_data_dirだけ変えています。

accelerate launch --num_cpu_threads_per_process 16 train_network.py

--pretrained_model_name_or_path=C:\stable-diffusion-webui\models\Stable-diffusion\hogehoge.safetensors

--train_data_dir=C:\Users\hogehoge\Downloads\kyousi\

--output_dir=C:\train\outputs

--reg_data_dir=C:\train\seisoku

--resolution=512,512

--save_every_n_epochs=1

--save_model_as=safetensors

--clip_skip=2

--seed=42

--network_module=networks.lora

--caption_extension=.txt

--mixed_precision=fp16

--xformers

--color_aug

--min_bucket_reso=320

--max_bucket_reso=512

--train_batch_size=1

--max_train_epochs=15

--network_dim=32

--network_alpha=16

--learning_rate=1e-4

--use_8bit_adam

--lr_scheduler=cosine_with_restarts

--lr_scheduler_num_cycles=4

--shuffle_caption

--keep_tokens=1

--caption_dropout_rate=0.05

--lr_warmup_steps=1000

--enable_bucket

--bucket_no_upscale

--in_json="C:\train\marge_clean.json"

--dataset_repeats=5

--min_snr_gamma=5

学習時のベースモデルはAOM2を使っています

いわゆる1.4系?ですけど使用モデルをotherにしています

絵を生成する時はAOM2・AOM3・Counterfeit-V2.5・Defmix-v2.0辺りの相性は良さそうです

個人の好みの話になってくると思いますので好きなモデルでお試しください

XYZ plotでモデルを一通り試すといいかもしれません

※1引用元

https://www.kkaneko.jp/ai/win/stablediffusion.html より引用致しました

使用マシン 

     OS Win11

     RAM DDR4 128GB

     GPU 3060 VRAM 12GB

     ストレージ HDD何台かとNVMeを二台

Colabでの学習(調べ終わってないのでその内ちゃんと書きます)

webui automatic1111の日本語化拡張レポジトリの方が書いた大変分かり易いcolabの解説記事があったので

紹介します。

Linaqruf/kohya-trainer | GenerativeAI Wiki (katsuyuki-karasawa.github.io)

----------------------------------------

本文終わり

そして

「オレはようやくのぼりはじめたばかりだからな、このはてしなく遠いAI絵坂をよ…」

独り言

プロンプトエンジニアリングとかよくわからない 雰囲気だけでLoRAを作ってるもんで

Тэги: tutorialguidejapaneseloconlohaloralokria3
SHA256: EEC25803E007FECD8DD07F7BADC71719CD260BD9421BC7A43C6E0A262209482E

Promptvision - view all your generations in one place! Local image viewer! [✨Windows Executable 🗔 No install necessary✨]

файл на civitaiстраница на civitai

Promptvision

Features

Running executable on Windows

Advanced options

usage: promptvision.exe [-h] [--config CONFIG] [--imagedir IMAGEDIR] [--port PORT]

                        [--log {DEBUG,INFO,WARNING,ERROR,CRITICAL}]

Image viewer built with Flask.

options:

  -h, --help            show this help message and exit

  --config CONFIG       Path to configuration file

  --imagedir IMAGEDIR   Path to image directory

  --port PORT           Port number for the web server

  --log {DEBUG,INFO,WARNING,ERROR,CRITICAL}

                        Set the logging level

Source code available: https://github.com/Automaticism/Promptvision

(Use git to get source instead of downloading from here)

Feedback are welcome. Post it here in comments or on Github as issues :)

Installation

Installing Conda / miniconda

Miniconda is a lightweight version of the Anaconda distribution, which is a popular data science platform. Conda is a package manager that allows you to install and manage packages and dependencies for various programming languages, including Python. Here are the steps to install Miniconda:

  1. Go to the Miniconda website (https://docs.conda.io/en/latest/miniconda.html) and download the appropriate installer for your operating system. There are different installers for Windows, macOS, and Linux.

  2. Once the installer is downloaded, run it and follow the instructions to complete the installation process. You can accept the default settings or customize them based on your preferences.

  3. After the installation is complete, open a new terminal or command prompt window to activate the conda environment. You can do this by running the following command:

    conda activate base

    This will activate the base environment, which is the default environment that comes with Miniconda.

  4. To verify that conda is installed correctly, you can run the following command:

    conda --version

    This should display the version number of conda.

That's it! You have now installed Miniconda and activated the base environment. You can use conda to install packages and manage your Python environments.

Setting up a virtual environment with Conda and running Promptvision

Open up any terminal program (CMD, Windows terminal, Bash, zsh, Powershell). Use the cd command to navigate to the "Documents" folder. Type cd Documents and press enter. Use the git clone command to clone the repository. Type git clone [repository URL] and press enter. Replace "[repository URL]" with the URL of the repository you want to clone. For example:

git clone https://github.com/Automaticism/Promptvision.git

Use the "cd" command to navigate to the cloned repository. Type cd repository and press enter. Replace "repository" with the name of the cloned repository. Create a new conda environment and activate it with the following commands:

conda create --name myenv

conda activate myenv

These commands will create a new environment named "myenv" and activate it.

Install the necessary dependencies using the following command:

pip install -r requirements.txt

This command will install the dependencies listed in the "requirements.txt" file.

Finally, run the Python script with the following command, replacing "[your image folder]" with the name of the folder containing your images:

python gallery.py --imagedir "[your image folder]"

Using aesthetic score

Based on this: AUTOMATIC1111/stable-diffusion-webui#1831 See the code in gallery_engine.

Required extras, this assumes you have setup Nvidia CUDA version 11.8 in this case. Adjust pytorch-cuda=<version> according to what you have installed. If you have any challenges look at https://pytorch.org/get-started/locally/ to see how you can install it to your specific system.

conda install pytorch torchvision torchaudio pytorch-cuda=11.8 -c pytorch -c nvidia
pip install ftfy regex tqdm
pip install git+https://github.com/openai/CLIP.git
python gallery.py --imagedir "[your image folder]" --aesthetic True

This will calculate aesthetic score for all your images.

Usage

Run the application:

python .\gallery.py --imagedir "F:\stable-diffusion-webui\outputs\txt2img-images\2023-03-21\rpg"

Note: on launch it will extract exif data from all images and initialize metadata for all images. It will also create thumbnails. Everything will be placed in a metadata folder in the current working directory. Under this a folder for the will be created.

Note regarding sd webui plugin which has been discussed in the comments for a while:

Given that github.com/AlUlkesh/stable-diffusion-webui-images-browser exists I see no further point in making a sdwebui plugin.

I'll be continuing on with this standalone image viewer. Soon I'll be extending this with dataframe browsing that will enable users extensive insight into their own prompts and such based on their own metadata additions. I haven't yet landed on which framework since there is quite the extensive list of frameworks to choose from (e.g. Dash, Streamlit, Panel, and so on).

Virustotal scan results of the latest versions:

Latest exe: https://www.virustotal.com/gui/file/d48deef1e69425ce5d5b6cd350057180b72481f83ff611a69416b667ca62aeef?nocache=1 (Note that this has one false positive from Malwarebytes and their AI rules. This is most likely triggered because it's a "rare" file and because it trips "something" in their AI algorithm detection engine.)

https://www.virustotal.com/gui/file/290bb58559113d2224554bf1df856a799a4ff6ea2976d7b20c35ccd5ae7ced00

https://www.virustotal.com/gui/file/d2abc145eac706bae92a156985c59097ecadc3535980581bd4975ee1ebeb21b4?nocache=1

https://www.virustotal.com/gui/file/2cb8a232d132e8cf4ce42ac24520b03ddf44044a1e92bc1c734aefd318c24f06/details

Тэги: toolkitqolcategorizationtaggingmetadataviewerlinuxmacoswindowsexecutable
SHA256: D48DEEF1E69425CE5D5B6CD350057180B72481F83FF611A69416B667CA62AEEF

Breast expansion/growth gif creator

файл на civitaiстраница на civitai

Its a script that generates a gif with (I think) 40 images. It only took me about 3 minutes to make a gen (Euler A | 16 steps | RTX 3070)
THINGS TO NOTE:

Dont worry about this guy, thats for something in the future.

Dont put a comma or space at the end of your positive prompt (nothing bad will happen, but its slightly annoying)

make sure it looks like this

Make sure you're using the same seed (otherwise you'll get a seziure from the changing colors)

and finally, IF YOU ARE USING CONTROLNET, TURN THIS STUPID THING ON (in settings)

Тэги: scriptgifbreast growthbreast expansionbreast
SHA256: 8132B59D9D16F63C68B21D1BB318D2B96E994732D2EAF9C61FEACC3527A16B1B

my samus instaNGP workflow

файл на civitaiстраница на civitai

for some reason im struggling with uploading context images of this so im just not going to try anymore. either they are getting deleted or not visible to viewers and i am not being given any reason for them so i can fix it, so im not trying anymore

If you decide to do this please upload a gif in the comments, this is something new i tried and want to see what people can do with it.

there seems to be a confusion here, so to make it clear the body painted version images are not generated they are the base photogrammetry images i origenally used in instaNGP to generate the transform.json

Also

NVIDIA's instaNGP also known as NeRF is a neural photogrammetry application instantly generates a 3D dense point cloud from 50-160 images, which typically takes 300-500 images to produce a satisfactory result in 30 minutes to 1 hour. I just edited the photogrammetry images using controlnet.

The download contains the instaNGP folders with the transforms.json files for both datasets, the samus bodypaint and sanus nude (both transforms.json are exactly the same)

I'm using the transforms.json file from a pre-calculated dataset on a new dataset with the same dimensions. The transforms.json file contains the calculated camera locations and extracted features of the provided dataset. If the new dataset has images with the same dimensions as the original dataset, using the transforms.json file will allow the same model to be built with the new images.

Although there were some unusual images, I think instaNGP disregards the pixels that do not match up and utilizes the matching portions, so I decided to keep them.

Tutorial for control net

1 . convert your base photogrammetry images into a mp4 video

2 . setting the prompt

3 . set width and height the same as your video

4 . set control model - 0 as open pose (leave the image empty)

5 . set control model - 1 as normal_map (leave the image empty)

6 . set control model - 2 as depth (leave the image empty)

7 . select the controlnet m2m script from the script section (you should have it if you have controlnet) and put your mp4 video in ControlNet-0

8 . put the same mp4 video in ControlNet-1

9 . put the same mp4 video in ControlNet-2

10 . click generate and you video frames will start processing WARNING make sure you are absolutely ready to start because after starting it is very hard to stop.

11 . after all frames are generated rename the generated images to match the origenal photogrammetry images using a programme called "advanced renamer"

12 . copy the images in the images folder in the newfolder refered in the main bullet points

Тэги: controlnetinstangp
SHA256: 03F581F5BEFF6F1DF339E8CEFFE2665ECB7ADFC50FD5C26139B395EF27E2443F

Openpose - PMX model - MMD

файл на civitaiстраница на civitai

This is a *.pmd for MMD.

This is a V0.1. I did it for science.

I learned Blender/PMXEditor/MMD in 1 day just to try this.

It's clearly not perfect, there are still work to do :

- head/neck not animated

- body and legs joints is not perfect.

How to use in SD ?
- Export your MMD video to .avi and convert it to .mp4.
- In SD :

How to install ?

- Extract .zip file in your "...\MMD\UserFile\Model" repository

- Open MikuMikuDance.exe and load the model

Credit :

https://toyxyz.gumroad.com/l/ciojz for the openpose blender model

Тэги: controlnetopenposemmdpmd
SHA256: 5E952D4E8F84F5F76273D3202FE7C2374D160B04FBBD92A67361CB51ABB5B9DC

Timelapse/Breast Growth

файл на civitaiстраница на civitai

Disclaimer, this is not my script, I did not make it and I can't take credit for it whatsoever (if you recognise the script and it's owner, please let me know so I can contact them and ask them for permission, if you recognise this as your own script and you would like it removed, please let me know!)

The initial script was designed for making a deepthroat animation, and admittedly I could never get it to work, but it piqued my curiosity so I've tampered with it several times, this being one of the better iterations! This doesn't do anything the original script it will allow, so once again, the original author deserves all credit.

For anyone who knows how to edit the script, you'll be able to see what it does. This version has 18 frames, ranging from "topless, (small breasts:1.2), nipples" > "topless, (huge breasts:1.4), nipples) and exports them into a gif afterwards. I couldn't work out how to upload the file without choosing a .zip file, but just extract it into the 'Scripts' folder and it should show up where you'd choose the X/Y prompt option.

Advanced tips:
1: You should try to control the image as much as possible, making sure to pose your subject, their hands, the background as much as possible so as much will stay the same as possible.
2: Img2Img frames. If the gif turned out alright, save for one or two frames where it's a little too different, I've had decent luck using Img2Img with that frame, until it looks like it'll match with the rest. Then just use something like https://ezgif.com/maker to make it manually!
3: It prefers drawn models more than realistic!

Тэги: breast growthtimelapse
SHA256: F5FF9286BDF825B6C1787434AC281C0796750298A7DACE3D5CDB768E3850E0C8

ControlNet Stop Motion Animation - Automatic1111 Extension

файл на civitaiстраница на civitai

ControlNet Stop Motion Animation

Make a quick GIF animation using ControlNet to guide the frames in a stop motion pipeline

Installation

Add this extension through the extensions tab, Install from URL and paste this repository URL:

https://github.com/gogodr/sd-webui-stopmotion

Usage

** As a recommendation use numbered files (Ex: 1.png, 2.png, 3.png ...)

*** The individual frames will be saved as normal in the corresponding txt2img or img2img output folder, but only the gif will be shown then the processing is done.

TODO:

Тэги: animationextensionautomatic1111
SHA256: 1B13CC934A2C0E6D694BD75E8EA469E4B005E6922492D46E2541DEBB4E930BA9

Cutoff for ComfyUI

файл на civitaiстраница на civitai

This is a node based implementation of the cutoff extension for A1111. Cutoff is a method to limit the influence of specific tokens to certain regions of the prompt. This can be helpful if you want to e.g. specify exactly what colors certain things in the generated image should be.

For a detailed explanation of the method, the introduced nodes, or raise an issue, please see the github page for this project. You can take any of the example images listed in the gallery and load them into ComfyUI to have a closer look at an example node tree.

To install simply unzip into the custom_nodes folder.

Тэги: comfyuinodescustom nodes
SHA256: 7BC2FB945D577BEE863D7035DF70493F63785C6E25E856B1311E6E43B4F8CCAE

sample-config

файл на civitaiстраница на civitai

This is sample config json file.

SHA256: D42F6012DFAE3EF42FDC13497B4F4B3779C7B640961C467C585694A5D3644A8A

animated gif helper scripts

файл на civitaiстраница на civitai

On request, here's a script to turn your prompts into gifs.

I built this off the prompts_from_file gif that comes with the webui.

USAGE!

prompts_from_file_to_gif

if all you want is a script in the webui to turn a list of prompts into a gif, then this is the only file you need to worry about!

Grab the prompts_from_file_to_gif upload, unzip it, and put it into your webui/scripts directory, then restart your webui. You'll find it under the name "prompts from file or textbox with gif generation."

sample_prompts

Grab the sample_prompts_to_get_you_started upload, unzip it, and then you can either open it up, and copy paste into the box, or you can click the upload_prompts_here button in the script to select the txt file.

Each prompt needs to be on one line, so if you have a bunch of prompts, you need to move them each to their own line.

parameter_grabber

To help with that, I also uploaded the parameter_grabber script.

If you don't want to, then you don't need to worry about that, but what it does, is it has simple gui, and it grabs the parameter data for all of the images files in a given directory, with an option to remove new line characters, and to write only your prompts, one per line, to a file.

Helps a lot. You can generate your images, one at a time, not needing to worry about saving the gen data seperate, then just drag and drop them off the webui to a new folder when you find a new frame you like, and at the end, you can use the parameter_grabber script to build the generation file for you.

It's particularly useful for img2img, and so that's why I uploaded the prompts_from_file_for_batch script.

prompts_from_file_for_batch

drop it into your webui scripts directory, then, it again uses the prompts from file script as a base, but what this one does, is it applies the prompts in the list you give it to the files in your batch.

So, if you go to the img2img tab, select batch, and choose the image folder that you put all of your images in? You can use the prompts file you got from parameter_grabber for those images, and then do whatever you want, batch to those files. ControlNet them, change the resolution, change cfg, anything.

It does apply them in filename order, so line one, should apply to the first file in the batch, and so on.

Тэги: script
SHA256: 45FCC33CA62065ECDD42183D64C5113E44972D36983BBD2FBE4A162DD94F7E8C

Simple text style template node for ComfyUi

файл на civitaiстраница на civitai

A node that enables you to mix a text prompt with predefined styles in a styles.csv file. Each line in the file contains a name, positive prompt and a negative prompt. Positive prompts can contain the phrase {prompt} which will be replaced by text specified at run time.

Тэги: nodecomfyuinodescustom nodes
SHA256: 286510B069748DBF5FDF1FDD34095FF03AC13173B3D11B8776615D4876E9D019

Grapefruit VAE

файл на civitaiстраница на civitai

Now I made a decent image, you can deduce what the VAE is for

SHA256: F921FB3F29891D2A77A6571E56B8B5052420D2884129517A333C60B1B4816CDF

[Guide] LoRA Block Weight - a way to finetune LoRAs

файл на civitaiстраница на civitai

Reddit version of this guide: https://www.reddit.com/r/StableDiffusion/comments/11izvoj

LoRAs used as example: https://civitai.com/models/7649, https://civitai.com/models/9850

In a nutshell

Extension name: sd-webui-lora-block-weight

Syntax: <lora:loraname:casyalweight:blockweights>

What is it for?

This extension allows you to connect not the entire LoRA, but only individual blocks. This allows you to use some overtrained models, find a fault in your model, or in some cases combine the best epochs.

For example you can use it to take only initial blocks from LoRA, which have influence on the composition. The last blocks, which mostly determine the color hue. Or the middle blocks. color tone, or the middle blocks, which are responsible for a little bit of everything. This can make it easier to generate things that LoRA wasn't particularly intended, for example:

  1. Lowering the weight of the initial blocks can give you your favorite Anime character with normal proportions.

  2. Lowering the weight of the end blocks allows you to get the same character with eyes half a face, but in a normal color scheme.

  3. Adding end blocks from extraneous LoRAs can enhance stroke, reflections, skin texture, lighten or darken the image

  4. A style that sees everything as homes will slightly reduce its enthusiasm and start drawing characters.

  5. And add all sorts of freaks, artifacts, extra eyes and fingers and stuff. After all, we're going to break the normal workings of the model, by cutting off the pieces you don't like.

Installation

To install, find sd-webui-lora-block-weight in the add-on list and install it.

After restarting the UI, the txt2img and img2img you will see new element: LoRA Block Weight.

Please note: There is currently a conflict with Composable Lora and Additional Networks. Additional Networks right now just broke this extension. Composable Lora can be installed at the same time, only one of them must be Enabled /Activate at a time. Otherwise the effect of the LoRA can be applied twice (if not more), creating a scorched image or a mishmash of colors. This is most likely a Webui problem because prompt scheduling shows similar problems in some conditions.

Off topic, but let me explain. Prompt scheduling is changing a request at a certain step, for example, [cat:dog:0,4] will start drawing the cat, but when 40% of all steps have passed it will remove the cat from the prompt and put a dog in the same place. This can result in an animal that has features of both, as well as and a separately standing badly drawn cat and dog.

Usage

I'll give you a good starting point to start experimenting with block weights:

  1. In the prompt after the name of the LoRA model and weight write another colon and the word XYZ, in the example of the popular model it would be <lora:yaeMikoRealistic_yaemikoMixed:1:XYZ> , or if you check screenshot <lora:HuaqiangLora_futaallColortest:1:XYZ>

  2. After this, make sure that the addon is enabled (Active), expand the XYZ plot of the addon (do not confuse with the X/Y/Z plot in the scripts section) check the XYZ plot option.

  3. Select X Types Original Weights, in the X field enter:

INS,IND,INALL,MIDD,OUTD,OUTS,OUTALL

Preparation is finished, you will see a table like the one attached.

If you like any of the results, replace XYZ in the prompt to the tag, that was at the top of the image, like MIDD:

<lora:HuaqiangLora_futaallColortest:1:MIDD>

If you don't like any of the options, you can try inverting query, all weights will turn into their opposites. To do this instead of XYZ write ZYX and run generation again. There is one small bug: At this point in the article, you need to add one more LoRA with weight 0 and tag XYZ. For example, I took Paimon. I think Paimon was happy that she has weight 0 no matter what. Maybe this will be fixed, maybe it won't. As the author of the add-on explained, this will require a change in the logic of the of the extension.

So example: <lora:HuaqiangLora_futaallColortest:1:ZYX> <lora:paimonGenshinImpact_v10:1:XYZ>

If you like one of the inverted options, You will need to expand below Weights setting list, find in the list the corresponding line, for example MIDD, copy it into notepad/Excel/Word and replace all 1's with any character, all 0's with 1 and the previously specified character to 0, then paste it directly into prompt instead of ZXY. Or you can find ready weights in the comments. Do not forget to remove Paimon from prompt and disable XYZ plot.

Тэги: tutorialguideextension
SHA256: 88931884E55442DD72A3AD9C8C1D74C193BFEA0AD0EFE856F5BB67CA7D65B0D7

ComfyUI - Visual Area Conditioning / Latent composition

файл на civitaiстраница на civitai

Davemane42's Custom Node for ComfyUI

Also available on Github

Instalation:

MultiAreaConditioning 2.4:

MultiLatentComposite 1.1:

Тэги: custom nodecomfyuinodes
SHA256: 940A576DA637BEBB48250EB6EEF26556E72AC0E59F6C52C785BAED3D6ECBD477

H2O LoHa pack

файл на civitaiстраница на civitai

Experimental Lycoris LoRA (LoHa) trained on pixiv artist with several configurations.

Decided to upload most succesful ones.

Poster image done on H2O_64-64-64-64_4e-4_COS3R-03 version.

Name format: network dim - network alpha - conv dim - conv alpha - unet lr - scheduler (all cosine with 3 restarts in this case) - epoch.

Seems CivitAi bugged again and did not allow to attach model file, so marked it as "other" and uploaded zipped.

Тэги: animeart stylelohalycorislorapixiv
SHA256: 87AE5225EE9560F8F0073C5085F050E104815A6184CA667A5116C3438DA8246A

ComfyUI Custom Nodes by xss

файл на civitaiстраница на civitai

Custom Nodes for ComfyUI

These are a collection of nodes I have made to help me in my workflows. None of the nodes here require any external dependencies or packages that aren't part of the base ComfyUI install so they should be plug and play.

Installation

  1. Download the node's .zip file

  2. Extract it into your ComfyUI\custom_nodes folder

  3. Restart your ComfyUI server instance

  4. Refresh the browse you are using for ComfyUI

  5. Have fun!

Let me know if you see any issues.

Тэги: maskmosaicimage processingcustom nodenodecomfyuiimage filtersinverse
SHA256: 212E7F51D09CA3B4A3ED7E9FCAB8FEF97B39DF3D16EBF3E6B24361A1D109611E

ComfyUI - Loopback nodes

файл на civitaiстраница на civitai

Loop the output of one generation into the next generation.

To use create a start node, an end node, and a loop node. The loop node should connect to exactly one start and one end node of the same type. The first_loop input is only used on the first run. Whatever was sent to the end node will be what the start node emits on the next run.

More loop types can be added by modifying loopback.py

Тэги: custom nodenodecomfyuicustom nodesbatchimage sequence
SHA256: 468B77237F818CBFDBECD7FA22A49CE2C9B09A1A0065EC0D5A2E7BAFC3F2064B

Bayesian Merger Extension

файл на civitaiстраница на civitai

sd-webui-bayesian-merger

What is this?

An opinionated take on stable-diffusion models-merging automatic-optimisation.

The main idea is to treat models-merging procedure as a black-box model with 26 parameters: one for each block plus base_alpha (note that for the moment clip_skip is set to 0).

We can then try to apply black-box optimisation techniques, in particular we focus on Bayesian optimisation with a Gaussian Process emulator.

Read more here, here and here.

The optimisation process is split in two phases:

1. exploration: here we sample (at random for now, with some heuristic in the future) the 26-parameter hyperspace, our block-weights. The number of samples is set by the

--init_points argument. We use each set of weights to merge the two models we use the merged model to generate batch_size * number of payloads images which are then scored.

2. exploitation: based on the exploratory phase, the optimiser makes an idea of where (i.e. which set of weights) the optimal merge is.

This information is used to sample more set of weights --n_iters number of times. This time we don't sample all of them in one go. Instead, we sample once, merge the models,

generate and score the images and update the optimiser knowledge about the merging space. This way the optimiser can adapt the strategy step-by-step.

At the end of the exploitation phase, the set of weights scoring the highest score are deemed to be the optimal ones.

Juicy features

- wildcards support

- TPE or Bayesian Optimisers. cf. Bergstra et al. 2011 for a comparison

- UNET visualiser

- convergence plot

OK, How Do I Use It In Practice?

Head to the wiki for all the instructions to get you started.

Тэги: extensionoptimisationmerge
SHA256: EF6F53AAAE81AB7068AAF8AC74AE1A64F7569766FB6CD5A7F2A5CCC664ADDB72

Guide - Lora training Note , Log [WIP]

файл на civitaiстраница на civitai

Experimenting and observing changes

1. LR-Text Encoder

Information is a personal test, may not match. Please test it yourself. via LoRA weight adjustment

Sometimes it can only be trained on Unet. What influence does the Text-Encoder have on Unet now that it takes time to observe?

question

DIM = 8 Alpha 4

example TE weight - Unet 1e-4 TE 5e-5 [x0.5]

example TE weight - Unet 1e-4 TE 1e-4 [x1]

example TE weight - Unet 1e-4 TE 2e-5 [x0.2]

example TE weight - Unet 1e-4 TE 1e-5 [x0.1]

example TE weight - Unet 1e-4 TE 3e-4 [x3]

Result https://imgur.com/Cs1As45

Personal opinion: TE acts as an indicator of what is happening in the training image. keep the details in the picture
If this value is too high It will also pick up useless things. If it's too small, it will lack image details.

TE test results 5e-5 individual epochs
every 1 epochs = 237 steps https://imgur.com/a/SdYq1ET

2. LR-Unet https://imgur.com/lVilHf9

Will change the image the most. Using too many or too few steps. This greatly affects the quality of LoRA.

Using LR unet more than usual It can cause a LoRA Style [even if it's not intended to be a Style]. This can happen when the training image is less than 100.

It was found that in 3e-4 and TE 1e-4 [x0.3] There is a chance that details will be lost.

When using TE x0.5, even if using LR-Unet 2 times higher, TE and Alpha /2 will prevent Unet from overfitting [but training too many steps can overfitting as well]

in 5e-5 White shirt tag is bad due to TE = 5e-5 causing poor tag retention.
may need training to 10 epochs

PS. Using a DIM higher than 16 or 32 might use more Unet ? [idk]

3. Train TE vs Unet Only [WIP] https://imgur.com/pNgOthy
File size - TE 2,620KB | Both 9,325KB | Unet 6,705KB

The Unet itself can do images even without a TE but sometimes the details of the outfit are worse.
both training Makes the image deformation in the model less. If you intend to train LoRA Style, only train Unet.

4. min_snr_gamma [WIP]

It's a new parameter that reduces the loss, takes less time to train.

gamma test [Training] = 1 - 20

Loss/avg

top to down - no_gamma / 20 / 10 / 5 / 2 / 1

From the experiment, it was found that the use of steps was reduced by up to 30% when using gamma = 5

4.1. DIM / Alpha [WIP]

?? Using less alpha or 1 will require more Unet regardless of DIM ??

4.2 Bucket [WIP]

according to the understanding displayed in CMD

Is to cut the proportions of various image sizes

by reducing the size according to the resolution setting If the image aspect ratio exceeds the specified bucket, it will be cropped. Try to keep your character as centered as possible.

4.3 Noise_offset

This setting if the trained image is too bright or too dark. set not more than 0.1

In most cases, practicing with anime images is recommended to set 0

PS. This setting will result in easier overfitting

4.4 Weight_Decay , betas

It is a parameter that is quite difficult to define. It is recommended to use between 0.1-1

betas then don't set it up

5. LoRA training estimation [WIP]

This was an ideal practice. which is difficult to happen with many factors

With too little training or high unet, the Text-Encoder doesn't get enough information and lacks detail.

With a low learning rate, it takes longer than usual. This makes overfitting very difficult. But it makes underfitting easier.

TE is responsible for storing the information of the Tag what it is in the image. and save details in the Tag
more changes Unet is different, the more data it collects ?

SHA256: 8739C76E681F900923B900C9DF0EF75CF421D39CABB54650C4B9AD19B6A76D85

A Certain Theory for LoRa Transfer

файл на civitaiстраница на civitai

Inspired by the introduction of AnyLora by Lykon and an experiment done by Machi, I decide to further investigate the influence of base model used for training.

Here is the full documentation

https://rentry.org/LyCORIS-experiments#a-certain-theory-on-lora-transfer

On the same entry page I also have other experiments

I focus on anime training here. To quick recapitulate,

General Advice

I am not able to upload the full resolution image (more than 100mb for each), but you can download the zip and check yourself.

Civitai Helper: SD Webui Civitai Extension

файл на civitaiстраница на civitai

Now, we finally have a Civitai SD webui extension!!

Update:

1.6.1.1 is here, to support bilingual localization extension.

This extension works with both gradio 3.23.0 and 3.16.2.

Civitai Helper 2 is under development, you can watch its UI demo video at github page.

Note: This extension is very stable and works well with many people. So, if you have an issue, read its github document and check console log window's detail.

Civitai Helper

Stable Diffusion Webui Extension for Civitai, to help you handle models much more easily.

The official SD extension for civitai takes months for developing and still has no good output. So, I developed this Unofficial one.

Github project:

https://github.com/butaixianran/Stable-Diffusion-Webui-Civitai-Helper

(Github page has better document)

Feature

Install

Everytime you install or update this extension, you need to shutdown SD Webui and Relaunch it. Just "Reload UI" won't work.

How to use

First of all, Update Your SD Webui to latest version!

This extension need to get extra network's cards id. Which is added since 2023-02-06. If your SD webui is an earlier version, you need to update it!

After install, Go to extension tab "Civitai Helper". There is a button called "Scan Model".

Click it, extension will scan all your models to generate SHA256 hash, and use this hash, to get model information and preview images from civitai.

After scanning finished,

Open SD webui's build-in "Extra Network" tab, to show model cards.

Move your mouse on to the bottom of a model card. It will show 4 icon buttons:

If those buttons are not there, click the "Refresh Civitai Helper" button to get them back.

Everytime extra network tab refreshed, it will remove all additional buttons of this extension. You need to click Refresh Civitai Helper button to bring them back.

Тэги: extension
SHA256: 1E3BA18723A529D78BB299D1212D0FC6A225A5D1C7A4406CB4F8269573AEA271

ComfyUI Derfuu Math and Modded Nodes

файл на civitaiстраница на civitai

ComfyUI: LINK

Github repo + nodes description: LINK

Leave suggestions and errors if you meet them

What's new in 0.5.0:

Simple* introduction:

Installing: unzip files in ComfyUI/custom_nodes folder

Should look like this:

For example (v0.5.0) there is an example how scaled ConditioningArea can improve image after scaled latent combining:

Only LatentCombine:

Combining preview:

LatentCombine with scaled ConditioningArea (640*360 to 1360*768):

Example of workflow i made for this located in: /Derfuu_ComfyUI_ModdedNodes/workflow_examples/

model: hPANTYHOSENEKO (sorry, couldn't find link)

negative promp: embedding:verybadimagenegative6400

TROUBLESHOOTING:

If there are troubles with different sizes, aside from *64, this may solve problem: found on GitHUB

This code is at the end of this file: /ComfyUI/comfy/ldm/modules/diffusionmodules/openaimodules.py

NOTES#2:

P.S.:

Тэги: custom nodecomfyuicustom nodes
SHA256: 1DD6AC3661A0FA484E020FC0CD7FFC4B8EA73A1143608B6FDCC9DE6BE5C7886C

ComfyUI Colab

файл на civitaiстраница на civitai

https://github.com/camenduru/comfyui-colab

🐣 Please follow me for new updates https://twitter.com/camenduru
🔥
Please join our discord server https://discord.gg/k5BwmmvJJU

Тэги: colabcomfyui
SHA256: E8D0A958DDDEF01934D50B5FF040225E668581B6D91A000A4CC62C1FFE0A5255

simple wildcard for ComfyUI

файл на civitaiстраница на civitai

https://github.com/lilly1987/ComfyUI_node_Lilly

```

ex : {3$$a1|{b2|c3|}|d4|{-$$|f|g}|{-2$$h||i}|{1-$$j|k|}}/{$$l|m|}/{0$$n|}

{1|2|3} -> 1 or 2 or 3

{2$$a|b|c} -> a,b or b,c or c,a or bb or ....

{9$$a|b|c} -> {3$$a|b|c} auto fix max count

{1-2$$a|b|c} -> 1~2 random choise

{-2$$a|b|c} -> {0-2$$a|b|c} 0-2

{1-$$a|b|c} -> {0-3$$a|b|c} 1-max

{-$$a|b|c} -> {0-3$$a|b|c} 0-max

{9$$ {and|or} $$a|b|c} -> a or b or c / c and b and a

```

install : ComfyUI\custom_nodes\ComfyUI_node_Lilly

txt folder :

ComfyUI\wildcards

or edit line

card_path=os.path.dirname(__file__)+"\\..\\wildcards\\**\\*.txt"

Тэги: custom nodenodecomfyuiwildcardswildcard
SHA256: 87B1B0E9D98FA46C69EBAA63A8C3202DFF56630412267AF9ED550ECF9EBFCFEB

ComfyUI - FaceRestore Node

файл на civitaiстраница на civitai

FaceRestore node for ComfyUI. To install copy the facerestore directory from the zip to the custom_nodes directory in ComfyUI.

I bodged this together in an afternoon. You might need to pip install a package if it doesn't work at first.

You'll need codeformer-v0.1.0.pth or GFPGANv1.4.pth in your models/upscale_models directory. The node uses another model for face detection which it will download and put in models/facedetection

Тэги: custom nodecomfyuinodes
SHA256: CA295E9F45C3D64CFF89CCA971C730E381B392520A85D184E1F75676566B5223

ComfyUI Workflows

файл на civitaiстраница на civitai

BGMasking V1:

Installation:

Install https://github.com/Fannovel16/comfy_controlnet_preprocessors

thanks to Fannovel16

Download:

https://civitai.com/models/9251/controlnet-pre-trained-models

at least Canny, Depth is optional

or difference model (takes your model as input, might be more accurate)

https://civitai.com/models/9868/controlnet-pre-trained-difference-models

put those controlnet models into ComfyUI/models/controlnet

thanks to Ally

Download attached file and put the nodes into ComfyUI/custom_nodes

Included are some (but not all) nodes from

https://civitai.com/models/20793/was-node-suites-comfyui

thanks to WAS and abbail

Restart ComfyUI

Usage:

Disconnect latent input on the output sampler at first.

Generate your desired prompt. Adding "open sky background" helps avoid other objects in the scene.

Adjust the brightness on the image filter. During my testing a value of -0.200 and lower works. Flowing hair is usually the most problematic, and poses where people lean on other objects like walls.

A free standing pose and short straight hair works really well.

The point of the brightness is to limit the depth map somewhat to create a mask that fits your subject.

Choose your background image. It can either be the same latent image or a blank image created by a node, or even a loaded image.

Alternatively you want to add another image filter between the yellow

Monochromatic Clip and ImageToMask node and add a little bit of blur to achieve some blend between the subject and the new background.

When you are satisfied with how the mask looks, connect the VAEEncodeForInpaint Latent output to the Ksampler (WAS) Output again and press Queue Prompt.

For this to work you NEED the canny controlnet. I have tried HED and normalmap aswell, but canny seems to work the best.

Depending on your subject you might need another controlnet type.

You would have to switch the preprocessor from canny and install a different controlnet for your application.

Applying the depth controlnet is OPTIONAL. It will add a slight 3d effect to your output depending on the strenght.

If you are strictly working with 2D like anime or painting you can bypass the depth controlnet.

Simply remove the condition from the depth controlnet and input it into the canny controlnet. Without the canny controlnet however, your output generation will look way different than your seed preview.

I added alot of reroute nodes to make it more obvious of what goes where.

Reproducing this workflow in automatic1111 does require alot of manual steps, even using 3rd party program to create the mask, so this method with comfy should be very convenient.

Disclaimer: Some of the color of the added background will still bleed into the final image.

BGRemoval V1:

Requirements:

https://github.com/Fannovel16/comfy_controlnet_preprocessors

https://civitai.com/models/9251/controlnet-pre-trained-models

(openpose and depth model)

optional but highly suggest:

https://civitai.com/api/download/models/25829

Tested with a few other models aswell like F222 and protogen.

The following explanation and instruction can also be found in a text node inside the workflow:

I used different "masks" in the load addition node aswell, with vastly different results but all returned backgrounds. Also the same mask in different colors.

This one is strickly a gradient of white created on a completely black background.

I can only presume that the AI uses it as some sort of guidance to distribute noise.

The green condition combine node input order actually matters. The output of the green "Depth Strenght" has to go into the lower input.

The upper input of that node comes from CLIP positive with the pose.

The blue sampler section does nothing more than to produce a depth map which is then encoded to latent and used as latent input for the cyan colored output sampler.

For the green image scale, I would suggest to always match it with your original image size with crop DISABLED

DEPTH STRENGHT setting can change the final image quite a bit, and you will lose weight of the original positive prompt if its too high.

You can start as low as 0 in some cases, but if background appears you want to increase it, even up to a strenght of 1. (lower is better)

If you haven't already I suggest you download and install

Fannovels preprocessors found here

https://github.com/Fannovel16/comfy_controlnet_preprocessors

The seed node and the Sampler with seed input you can download here

https://civitai.com/api/download/models/25829

The openpose and depth models are found here

https://civitai.com/models/9251/controlnet-pre-trained-models

You could also try using WAS's depth preprocessor, but I found it to create a depth map that is too detailed, or doesn't have the threshold that is useful for this.

The model I am using you can find here

https://civitai.com/models/21343/rpgmix

Тэги: image processingcustom nodenodecomfyuinodescustom nodes
SHA256: C3A5197202212F81690826E1D40189478B1A5763287C279B6580A9FCD4342D4F

TheAlly's 100% Beginner Guide to Getting Started in Generative AI Art

файл на civitaiстраница на civitai

Hey!

This Guide & The Author

I'm TheAlly! You might have seen my content around here - I produce and host a diverse range of stuff to help boost your image creation capabilities. I've released some of the most popular content on Civitai, and am constantly pushing the boundaries with experimental and unusual projects.

Me!

This guide is aimed at the complete beginner - someone who is possibly computer-savvy, with an interest in AI art, but doesn’t know where to look to get started, or is overwhelmed by the jargon and huge number of conflicting sources.

This guide is not going to cover exactly how to start making images - but it will give you an overview of some key points you need to know, or consider, plus information to help you take the first steps of your AI art journey.

Generative AI, & Stable Diffusion

So what is “Generative AI”, and how does Stable Diffusion fit into it? You might have heard the term Generative AI in the media - it’s huge right now; it’s on the news, it’s on the app-stores, Elon Musk is Tweeting about it - it’s beginning to pervade our lives.

Generative AI refers to the use of machine learning algorithms to generate new data that is similar to the data fed into it. This technology has been used in a variety of applications, including art, music, and text generation. The goal of generative AI is to allow machines to create something new and unique, rather than simply replicating existing data.

This guide will specifically cover Stable Diffusion, but will touch on other Generative AI art services.

The Basics

In mid-2022, the art world was taken by storm with the launch of several AI-powered art services, including Midjourney, Dall-E, and Stable Diffusion. These services and tools utilize cutting-edge machine learning technology to create unique and innovative art that challenge traditional forms and blur the lines between human and machine creation.

The impact of AI art on the industry has already been significant. Many artists and enthusiasts are exploring the possibilities of this new medium, while many fear the repercussions for established artists' careers. Many art portfolio websites have developed new policies that prohibit the display of AI-generated work. Some websites require artists to disclose if their work was created using AI, and others have even implemented software that can detect AI-generated art.

The Companies

There are many big-players in the AI art world - here are a few names you'll often see mentioned;

Controversies

There are already a number of lawsuits challenging various aspects of the technology. Microsoft, GitHub and OpenAI are currently facing a class-action lawsuit, while Midjourney and Stability AI are facing a lawsuit alleging they infringed upon the rights of artists in the creation of their products.

Whatever the outcome, Generative AI is here to stay.

How does Stable Diffusion Work?

That is an incredibly complex topic, and we’ll just touch on it very briefly here at a very very high level;

(Forward) Diffusion is the process of slowly adding random pixels (noise) to an image until it no longer resembles the original image, and is 100% noise - we’ve diffused, or diluted, the original image. By reversing that process, we can reproduce something similar to the original image. There is obviously a lot more going on in the process, but that’s the general idea. We input text, the “model” processes that text, generates it from the “diffused” image, and displays an appropriate output image.

Simple! (because that's not really what's happening, don't @ me - I know)

How can I make Stable Diffusion Images?

There are a number of tools to generate AI art images, some more involved and complex to set up than others. The easiest method is to use a web-based image generation service, where the code and hardware requirements are taken care of for you but there’s often a fee involved.

Alternatively, if you have the required hardware (ideally an NVIDIA graphics card), you can create images locally, on your own PC, with no restriction, using Stable Diffusion.

When we talk about Stable Diffusion, we’re talking about the underlying mathematical/neural network framework which actually generates the images. We need some way to interface with that framework in a user-friendly way - that’s where the following tools come in;

To run on your own PC - Local Interfaces

This guide is extremely high level and won’t get into the deep technical aspects of installing (or using) any of these applications (I will be posting an extremely in-depth guide at a later date), but if you’d like to run Stable Diffusion on your own PC there are options!

Note that to get the most out of any local installation of Stable Diffusion you need an NVIDIA graphics card. Images can be generated using your computer’s CPU alone, or on some AMD graphics cards, but the time it will take to generate a single image will be considerable.

To run on your own Mac - Local Interfaces

Mac owners can run Automatic1111’s WebUI, InvokeAI, and also a popular, lightweight, and super simple to use Interface, DiffusionBee;

To run via an Image Generation Service

There are many websites appearing which allow you to create Stable Diffusion images if you don’t want the fuss of setting up an interface on your local PC, or if your computer hardware can’t support one of the above interfaces.

An example of Midjourney generated artworks.

I now have an interface (or have chosen a Generation Service)! What are “models”?

Checkpoints, also known as “weights” or “models” are part of the brains which produce our images. Each model can produce a different style of image, or a particular theme or subject. Some are “multi-use” and can produce a mix of portrait, realistic, and anime (for example), and others are more focused, only reproducing one particular style of subject.

Models come in two file types. It’s important to know the distinction if running a local Stable Diffusion interface, as there are security implications.

Pickletensor (.ckpt extension) models may contain and execute malicious code when downloaded and used. Many websites, including Civitai, have “pickle scanners” which attempt to scan for malicious content. However, it’s safer to download Safetensor (.safetensor) models when available. This file type cannot contain any malicious code and is inherently safe to download.

Note that if using a Generation Service you will only be able to use the models they provide. Some services provide access to some of the most popular models while others use their own custom models. It depends on the service.

Along with models there are many other files which can extend and enhance the images generated by the models, including LoRA, Textual Inversion, and Hypernetworks. We’ll look at those in a more in-depth guide.

Where do I get models?

Most stable diffusion interfaces come with the default Stable Diffusion models, SD1.4 and/or SD1.5, possibly SD2.1 or SD2.2. These are the Stable Diffusion models from which most other custom models are derived and can produce good images, with the right prompting.

Custom models can be downloaded from the two main model-repositories;

Other Generative AI Services?

Generative AI is a huge field, with many applications. Some of the most popular and interesting tools right now are;

Resources

The Stable Diffusion Glossary

The Definitive Stable Diffusion Glossary (which needs to be updated, like, yesterday). Volunteers?

Tutorials

I run a popular Patreon site with lots of in-depth material - patreon.com/theally

What's on it?

Primarily, tutorials! Text-based, extremely in-depth, with lots of illustrative pictures and easy to understand language. There are also a range of files - scraped data sets, data set prep scripts, embeddings and LoRAs I'm too embarrassed to release on Civitai, that sort of thing.

I have tutorials covering;

And a bunch more. Some of the content currently in development includes;

Isn't that gatekeeping knowledge?

Have you ever paid for a Udemy course? Or paid for someone's help on Fiverr? The Generative AI space moves so quickly that it's easy to get overwhelmed, and sure, there're a lot of (conflicting) tutorials out there for free - but I'm consolidating, testing, and presenting my findings to you in a plain, comprehensible, way so you don't have to go wading through tons of sus info. They're timesavers.

Ok, I'm sold, where is it?

Great! I look forward to interacting with you! It's over here - https://www.patreon.com/theally

Тэги: civitaitutorialmodelguidehelpercontrolnetcommunitypatreonhow-tobeginnerbasics
SHA256: E1D7A587209F0D140FB39E4DA0167DD45F17062D30F7FBA098F52A0062C9F9BD

Loopback Scaler

файл на civitaiстраница на civitai

Overview:

The Loopback Scaler is an Automatic1111 Python script that enhances image resolution and quality using an iterative process. The code takes an input image and performs a series of image processing steps, including denoising, resizing, and applying various filters. The algorithm loops through these steps multiple times, with user-defined parameters controlling how the image evolves at each iteration. The result is an improved image, often with more detail, better color balance, and fewer artifacts than the original.

Note: This is a script that is only available on the Automatic1111 img2img tab.

Key features:

  1. Iterative enhancement: The script processes the input image in several loops, with each loop increasing the resolution and refining the image quality. The image result from one loop is then inserted as the input image for the next loop which continually builds on what has been created.

  2. Denoise Change: The denoising strength can be adjusted for each loop, allowing users to strike a balance between preserving details and reducing artifacts.

  3. Adaptive change: The script adjusts the amount of resolution increase per loop based on the average intensity of the input image. This helps to produce more natural-looking results.

  4. Image filters: Users can apply various PIL Image Filters to the final image, including detail enhancement, blur, smooth, and contour filters.

  5. Image adjustments: The script provides sliders to fine-tune the sharpness, brightness, color, and contrast of the final image.

Recommended settings for img2img processing are provided in the script, including resize mode, sampling method, width/height, CFG scale, denoising strength, and seed.

Please note that the performance of the Loopback Scaler depends on the gpu, input image, and user-defined parameters. Experimenting with different settings can help you achieve the desired results.

Tips, Tricks, and Advice:

Manual Installation:

  1. Unzip the loopback_scaler.py script.

  2. Move the script to the \stable-diffusion-webui\scripts folder.

  3. Close the Automatic1111 webui console window.

  4. Relaunch the webui by running the webui-user.bat file.

  5. Open your web browser and navigate to the Automatic1111 page or refresh the page if it's already open.

Automatic1111 Extension Installation:

  1. In Automatic1111 navigate to your 'Extensions' tab

  2. Click on the 'Install from URL' sub-tab

  3. copy/paste https://github.com/Elldreth/loopback_scaler.git into the 'URL for extension's git repository' textbox

  4. Click on the 'Install' button and wait for it to complete

  5. Click on the 'Installed' sub-tab

  6. Click the 'Apply and Restart UI' button

Тэги: utilityupscaledetailscript
SHA256: 7B329B6C0B5B2E363B3960CE344C263187223CAE453D263FD7B72AF09DFA763F

Flora

файл на civitaiстраница на civitai
None
SHA256: 7F69EF8952DECA0FF7640FB6F951D7CB819C9A0E89695B6549F66CEC65D0A9E2

[Guide] Make your own Loras, easy and free

файл на civitaiстраница на civitai

You don't need to download anything, this is a guide with online tools. Click "Show more" below.

🏭 Preamble

Even if you don't know where to start or don't have a powerful computer, I can guide you to making your first Lora and more!

In this guide we'll be using resources from my GitHub page. If you're new to Stable Diffusion I also have a full guide to generate your own images and learn useful tools.

I'm making this guide for the joy it brings me to share my hobbies and the work I put into them. I believe all information should be free for everyone, including image generation software. However I do not support you if you want to use AI to trick people, scam people, or break the law. I just do it for fun.

Also here's a page where I collect Hololive loras.

📃What you need

🎴Making a Lora

It has a reputation for being difficult. So many options and nobody explains what any of them do. Well, I've streamlined the process such that anyone can make their own Lora starting from nothing in under an hour. All while keeping some advanced settings you can use later on.

You could of course train a Lora in your own computer, granted that you have an Nvidia graphics card with 8 GB of VRAM or more. We won't be doing that in this guide though, we'll be using Google Colab, which lets you borrow Google's powerful computers and graphics cards for free for a few hours a day (some say it's 20 hours a week). You can also pay $10 to get up to 50 extra hours, but you don't have to. We'll also be using a little bit of Google Drive storage.

This guide focuses on anime, but it also works for photorealism. However I won't help you if you want to copy real people's faces without their consent.

🎡 Types of Lora

As you may know, a Lora can be trained and used for:

However there are also different types of Lora now:

📊 First Half: Making a Dataset

This is the longest and most important part of making a Lora. A dataset is (for us) a collection of images and their descriptions, where each pair has the same filename (eg. "1.png" and "1.txt"), and they all have something in common which you want the AI to learn. The quality of your dataset is essential: You want your images to have at least 2 examples of: poses, angles, backgrounds, clothes, etc. If all your images are face close-ups for example, your Lora will have a hard time generating full body shots (but it's still possible!), unless you add a couple examples of those. As you add more variety, the concept will be better understood, allowing the AI to create new things that weren't in the training data. For example a character may then be generated in new poses and in different clothes. You can train a mediocre Lora with a bare minimum of 5 images, but I recommend 20 or more, and up to 1000.

As for the descriptions, for general images you want short and detailed sentences such as "full body photograph of a woman with blonde hair sitting on a chair". For anime you'll need to use booru tags (1girl, blonde hair, full body, on chair, etc.). Let me describe how tags work in your dataset: You need to be detailed, as the Lora will reference what's going on by using the base model you use for training. Anything you don't include in your tags will become part of your Lora. This is because the Lora absorbs details that can't be described easily with words, such as faces and accessories. Knowing this you can let those details be absorbed into an activation tag, which is a unique word or phrase that goes at the start of every text file, and which makes your Lora easy to prompt.

You may gather your images online, and describe them manually. But fortunately, you can do most of this process automatically using my new 📊 dataset maker colab.

Here are the steps:

1️⃣ Setup: This will connect to your Google Drive. Choose a simple name for your project, and a folder structure you like, then run the cell by clicking the floating play button to the left side. It will ask for permission, accept to continue the guide.

2️⃣ Scrape images from Gelbooru: In the case of anime, we will use the vast collection of available art to train our Lora. Gelbooru sorts images through thousands of booru tags describing everything about an image, which is also how we'll tag our images later. Follow the instructions on the colab for this step; basically, you want to request images that contain specific tags that represent your concept, character or style. When you run this cell it will show you the results and ask if you want to continue. Once you're satisfied, type yes and wait a minute for your images to download.

3️⃣ Curate your images: There are a lot of duplicate images on Gelbooru, so we'll be using the FiftyOne AI to detect them and mark them for deletion. This will take a couple minutes once you run this cell. They won't be deleted yet though: eventually an interactive area will appear below the cell, displaying all your images in a grid. Here you can select the ones you don't like and mark them for deletion too. Follow the instructions in the colab. It is beneficial to delete low quality or unrelated images that slipped their way in. When you're finished, send Enter in the text box above the interactive area to apply your changes.

4️⃣ Tag your images: We'll be using the WD 1.4 tagger AI to assign anime tags that describe your images, or the BLIP AI to create captions for photorealistic/other images. This takes a few minutes. I've found good results with a tagging threshold of 0.35 to 0.5. After running this cell it'll show you the most common tags in your dataset which will be useful for the next step.

5️⃣ Curate your tags: This step for anime tags is optional, but very useful. Here you can assign the activation tag (also called trigger word) for your Lora. If you're training a style, you probably don't want any activation tag so that the Lora is always in effect. If you're training a character, I myself tend to delete (prune) common tags that are intrinsic to the character, such as body features and hair/eye color. This causes them to get absorbed by the activation tag. Pruning makes prompting with your Lora easier, but also less flexible. Some people like to prune all clothing to have a single tag that defines a character outfit; I do not recommend this, as too much pruning will affect some details. A more flexible approach is to merge tags, for example if we have some redundant tags like "striped shirt, vertical stripes, vertical-striped shirt" we can replace all of them with just "striped shirt". You can run this step as many times as you want.

6️⃣ Ready: Your dataset is stored in your Google Drive. You can do anything you want with it, but we'll be going straight to the second half of this tutorial to start training your Lora!

⭐ Second Half: Settings and Training

This is the tricky part. To train your Lora we'll use my Lora trainer colab. It consists of a single cell with all the settings you need. Many of these settings don't need to be changed. However, this guide and the colab will explain what each of them do, such that you can play with them in the future.

Here are the settings:

▶️ Setup: Enter the same project name you used in the first half of the guide and it'll work automatically. Here you can also change the base model for training. There are 2 recommended default ones, but alternatively you can copy a direct download link to a custom model of your choice. Make sure to pick the same folder structure you used in the dataset maker.

▶️ Processing: Here are the settings that change how your dataset will be processed.

▶️ Steps: We need to pay attention here. There are 4 variables at play: your number of images, the number of repeats, the number of epochs, and the batch size. These result in your total steps.

You can choose to set the total epochs or the total steps, we will look at some examples in a moment. Too few steps will undercook the Lora and make it useless, and too many will overcook it and distort your images. This is why we choose to save the Lora every few epochs, so we can compare and decide later. For this reason, I recommend few repeats and many epochs.

There are many ways to train a Lora. The method I personally follow focuses on balancing the epochs, such that I can choose between 10 and 20 epochs depending on if I want a fast cook or a slow simmer (which is better for styles). Also, I have found that more images generally need more steps to stabilize. Thanks to the new min_snr_gamma option, Loras take less epochs to train. Here are some healthy values for you to try:

▶️ Learning: The most important settings. However, you don't need to change any of these your first time. In any case:

▶️ Structure: Here is where you choose the type of Lora from the 3 I explained in the beginning. Personally I recommend you stick with LoRA for characters and LoCon for styles. LoHas are hard to get right.

The dim/alpha mean the size and scaling of your Lora, and they are controversial: For months everyone taught each other that 128/128 was the best, and this is because of experiments wherein it resulted in the best details. However these experiments were flawed, as it was not known at the time that lowering the dim and alpha requires you to raise the learning rate to produce the same level of detail. This is unfortunate as these Lora files are 144 MB which is completely overkill. I personally use 16/8 which works great for characters and is only 18 MB. Nowadays the following values are recommended (although more experiments are welcome):

▶️ Ready: Now you're ready to run this big cell which will train your Lora. It will take 5 minutes to boot up, after which it starts performing the training steps. In total it should be less than an hour, and it will put the results in your Google Drive.

🏁 Third Half: Testing

You read that right. I lied! 😈 There are 3 parts to this guide.

When you finish your Lora you still have to test it to know if it's good. Go to your Google Drive inside the /lora_training/outputs/ folder, and download everything inside your project name's folder. Each of these is a different Lora saved at different epochs of your training. Each of them has a number like 01, 02, 03, etc.

Here's a simple workflow to find the optimal way to use your Lora:

  1. Put your final Lora in your prompt with a weight of 0.7 or 1, and include some of the most common tags you saw during the tagging part of the guide. You should see a clear effect, hopefully similar to what you tried to train. Adjust your prompt until you're either satisfied or can't seem to get it any better.

  2. Use the X/Y/Z plot to compare different epochs. This is a builtin feature in webui. Go to the bottom of the generation parameters and select the script. Put the Lora of the first epoch in your prompt (like "<lora:projectname-01:0.7>"), and on the script's X value write something like "-01, -02, -03", etc. Make sure the X value is in "Prompt S/R" mode. These will perform replacements in your prompt, causing it to go through the different numbers of your lora so you can compare their quality. You can first compare every 2nd or every 5th epoch if you want to save time. You should ideally do batches of images to compare more fairly.

  3. Once you've found your favorite epoch, try to find the best weight. Do an X/Y/Z plot again, this time with an X value like "0.5>, 0.6>, 0.7>, 0.8>, 0.9>, 1>". It will replace a small part of your prompt to go over different lora weights. Again it's better to compare in batches. You're looking for a weight that results in the best detail but without distorting the image. If you want you can do steps 2 and 3 together as X/Y, it'll take longer but be more thorough.

  4. If you found results you liked, congratulations! Keep testing different situations, angles, clothes, etc, to see if your Lora can be creative and do things that weren't in the training data.

Finally, here are some things that might have gone wrong:

If you got something usable, that's it, now upload it to Civitai for the world to see. Don't be shy. Cheers!

Тэги: tutorialcolabguideloconlohalycoris
SHA256: AEBF7F7117CEE1972ECE51CAFCC0D8803307C701F9B2CFE2096DF7C1F919C00F

Tutorial Regional Prompter - More consistent colors

файл на civitaiстраница на civitai

READ THE DESCRIPTION

In this tutorial I would like to teach you how to get more consistent colors on your characters. Everything is based on this extension: hako-mikan/sd-webui-regional-prompter: set prompt to divided region (github.com)

Previously I did another tutorial to achieve a similar result: No more color contamination - Read Description | Stable Diffusion Other | Civitai


Step 1: Install this extension


Step 2: Restart Stable Diffusion (close and open)

Step 3: Active Regional Prompter (in txt2img under controlnet or additional network)

Step 4: Let's try

In positive prompt we put without quotes:


"blue hair twintail BREAK

yellow blouse BREAK

orange skirt"

In negative prompt we must place a negative token or several, if we do not put a single negative token, Stable Diffusion will bugge:

"worst quality, low quality"

In resolution I will put 572 x 768 and I will go to "divide mode" in Regional Prompter and put vertical. If I choose to put 768 x 572 then I must make horizontal and not vertical.

In divide ratio I will put 1,1,1. This will divide our image into 3 equal parts. Then I place an image to better understand what happens.

In short, let's imagine that our image is 100%, if we put it 1,1,1 it would be divided by 33%, 33%, 33%. If we put it 1.1, it would be 50%, 50%. I have not tested the proportions much.

For this step we should have our regional prompter in this way:

My result, if you don't look good, I leave printscreen to see my configuration used at the time of generating: https://prnt.sc/q395bQl_y9z7


Some things to take into account, this is already taken directly from the extension: hako-mikan/sd-webui-regional-prompter: set prompt to divided region (github.com)

Active

If checked, this extention is enabled.


Prompt

Prompts for different areas are separated by "BREAK". Enter prompts from the left for horizontal prompts and from the top for vertical prompts. Negative prompts can also be set for each area by separating them with BREAK, but if BREAK is not entered, the same negative prompt will be set for all areas. Prompts delimited by BREAK should not exceed 75 tokens. If the number is exceeded, it will be treated as a separate area and will not work properly.


Use base prompt

Check this if you want to use the base prompt, which is the same prompt for all areas. Use this option if you want the prompt to be consistent across all areas. When using base prompt, the first prompt separated by BREAK is treated as the base prompt. Therefore, when this option is enabled, one more BRAKE-separated prompt is required than Divide ratios.


Base ratio

Sets the ratio of the base prompt; if 0.2 is setted, the base ratio is 0.2. It can also be specified for each region, and can be entered as 0.2, 0.3, 0.5, etc. If a single value is entered, the same value is applied to all areas.


Divide ratio

If you enter 1,1,1, the area will be divided into three parts (33,3%, 33,3%, 33,3%); if you enter 3,1,1, the area will be divided into 60%, 20%, and 20%. Decimal points can also be entered. 0.1,0.1,0.1 is equivalent to 1,1,1.


Divide mode

Specifies the direction of division. Horizontal and vertical directions can be specified.


THANKS hako-mikan

Тэги: animecharactergirlcolorfulvibrant colorsdigital colorsvivid colorsshiny colorscolored skin
SHA256: ED95F81222AF92D429447C48DE6FF25A092A4AA4ECA81FBAE8CC1B1226230764

Tool that shuffles and picks x amount of prompts from input prompt file(s)

файл на civitaiстраница на civitai

Updated 21.3.:


Tool that helps with selecting a random amount of prompts from a file that contains prompts. I am using it when testing the different prompt packages I am uploading. I'll take a big enough sample to generate a few images. Remove and fix obvious maligned prompts, rinse and repeat.

Requirements

Usage

How to guide

  1. Download this file / copy the code below into a file called guitoolkit.py (or whatever you want to call it)

  2. Make/use a virtual environment python -m venv venv

  3. Activate environment venv\Scripts\activate

  4. Run the command pip install gradio to install the gradio library which is required to use this

  5. When you have installed that, run either gradio guitoolkit.py or python guitoolkit.py

  6. You should now have the tool ready to use if you get the following: gradio .\guitoolkit.py
    launching in reload mode on: http://127.0.0.1:7861 (Press CTRL+C to quit)

  7. You can now visit http://127.0.0.1:7861 where the tool is ready to use

  8. Input the file(s) you want to shuffle, select how many you want, copy the output, insert it into e.g. Automatic1111


Source code

import gradio as gr
import random

def shuffle_file(file_obj, no_prompts):
    prompts = []
    for file in file_obj:
        with open(file.name) as infile:
            in_prompts = infile.readlines()
        prompts.extend(list(set(in_prompts)))
    
    prompts = random.sample(prompts, no_prompts)
    random.shuffle(prompts)
    print(type(prompts))
    return "".join(prompts)

demo = gr.Interface(
    fn=shuffle_file,
    inputs=["files",  gr.Slider(5, 10000)],
    outputs=["code"],
)

if __name__ == "__main__":
    demo.launch(server_port=9800)
Тэги: guitoolsqolquality of lifegradioprogram
SHA256: D6CE87F196159AEC4F0DA8DA79D012CCCB69F0601C097864A5305B23074CB12C

Pruned Anime VAE

файл на civitaiстраница на civitai

Windows Defender is reporting very common anime based VAE files to be malware and is automatically deleting them. This VAE file is a pruned version of that file using the A1111 ToolKit extension, and in testing it works the same. It will not trigger detection and has been scanned by the premium antivirus software SpyHunter 5 and found to be malware-free.

Sample images were made with the same seed, prompt, and model, but switching between the original VAE file and my version. I have also included a simple difference map using layering functions in The GIMP image editing software, and a screenshot of the alert I received from Windows Defender.

SHA256: D3DD66D7212AC6467EFB2B10588B98C389CCAFDE541A45E70EA30EE9280CC928

AdverseCleaner Automatic1111 Extension

файл на civitaiстраница на civitai

AdverseCleaner Extension for AUTOMATIC1111/stable-diffusion-webui

This extension provides a simple and easy-to-use way to denoise images using the cv2 bilateral filter and guided filter. Original script by: https://github.com/lllyasviel/AdverseCleaner

Installation
Go to Extensions > Install from URL and paste the following URL:
https://github.com/gogodr/AdverseCleanerExtension
Or unzip this file manually in your extensions folder.

Тэги: extension
SHA256: D19B2EA85C21A0B4009A4C6A8ED638FF513A016958DB9E134FA14FC5BF68D5B3

anything-model-batch-downloader

файл на civitaiстраница на civitai

Get in GitHub: https://github.com/kanjiisme/anything-model-batch-downloader

Introduce:

Feature:

Batch download:

Automatically download necessary parts like checkpoint and VAE if it is the model on CivitAI.

Arguments System:

Easy Expansion:

Use:

First, you need to have a download list file in JSON format, it should look like this:

{
    "urls" : [
        {
            "model_url": "https://civitai.com/models/2583/grapefruit-hentai-model"
        },
        {
            "model_url" : "https://civitai.com/models/11367/tifameenow",
            "args" : "sub"
        },
        {
            "model_url" : "https://civitai.com/api/download/models/12477",
            "args" : "raw=\"arknights-suzuran.safetensors\" type=\"lora\" sub forcerewrite"
        },
        {
            "model_url" : "https://civitai.com/models/4514/pure-eros-face",
            "args" : "sub saveto=\"nsfw\""
        }
    ]
}

In there:

Run:

python batch_download.py

Or if you have a custom JSON file:

python batch_download.py --listpath="you/path/to/json"

Arguments:

See it here.

Have fun (●'◡'●).

Тэги: utilitycolabsagemaker
SHA256: 0607BAAC1A5E10F957379EDF3DCA2C41385B59DC8236B82B3C0086A1B549F819

WAS's ComfyUI Workspaces (HR-Fix and more!)

файл на civitaiстраница на civitai

These are worksapces to load into ComfyUI for various tasks such as HR-Fix with AI Model Upscaling

Note: WAS's Comprehensive Node Suite (WAS Node Suite) has a bloom filter now which works similar, except provides a high frequency pass to base the bloom off of. This is more accurate and used in screen-space bloom like in video games.

Requirements:

HR-Fix Usage:

  1. Extract "ComfyUI-HR-Fix_workspace.json" (or whatever the worksapce is called)

  2. Load workspace with the "Load" button in the right-hand menu and select "ComfyUI-HR-Fix_workspace.json"

  3. Select your desired diffusion model

  4. Select VAE model or use diffusion models vae

  5. Select your desired upscale model

  6. change prompt and sampling settings as seen fit.
    (currently v1 set to 512x768 x4= 2048x3072, v2 has a resize so final size is 1024x1536)

Тэги: comfyuiupscalehr-fixworkspacehigh resolution fix
SHA256: 00AB19FF3B41AD47F1F5BC72C33A62665822FECC98A32B31F9FC5489FE42C11E

ComfyUI Custom Workflows

файл на civitaiстраница на civitai

These files are Custom Workflows for ComfyUI

ComfyUI is a super powerful node-based, modular, interface for Stable Diffusion. I have a brief overview of what it is and does here. And full tutorial on my Patreon, updated frequently.

Please consider joining my Patreon! Advanced SD tutorials, settings explanations, adult-art, from a female content creator (me!) patreon.com/theally

Тэги: comfyuiworkflowhires fix
SHA256: 227754BBCFB34766996E19560DFC948DB41C6130CB25DF02908CB8E54AFF70BB

ComfyUI Custom Nodes

файл на civitaiстраница на civitai

These files are Custom Nodes for ComfyUI

ComfyUI is a super powerful node-based, modular, interface for Stable Diffusion. I have a brief overview of what it is and does here. And full tutorial content coming soon on my Patreon.

In this model card I will be posting some of the custom Nodes I create. Let me know if you have any ideas, or if there's any feature you'd specifically like to see added as a Node!

Please consider joining my Patreon! Advanced SD tutorials, settings explanations, adult-art, from a female content creator (me!) patreon.com/theally

Тэги: image processingcustom nodenodecomfyui
SHA256: D6A7340653C289D8E838564569ACEB13716B72F63EBE0941AE05B18F19D019FF

How to create 8bit AI Animated Sheets Tutorial

файл на civitaiстраница на civitai

This is my complete guide how to Generate sprites for 8bit games or GIFs :) Enjoy the video

Use it with my toolkit to get similer results to the ones on the video: https://civitai.com/models/4118

or any other model that you like :)

Few other useful links:

My Artstation: https://www.artstation.com/spybg

My official Discord channel: https://discord.io/spybgtoolkit

Patreon: https://www.patreon.com/SPYBGToolkit

Тэги: characteranimation8bit
SHA256: C17C1650DD90236EFC46D8D17A69BC304E31EBD00886B0432F08B1D9B234D3A9

No more color contamination - Read Description

файл на civitaiстраница на civitai

READ THE DESCRIPTION


Do not download LoRa (NOT NECESSARY)


This is a simple and powerful tutorial, I uploaded a LORA file because it was mandatory to upload something, it has nothing to do with the tutorial. Tribute and credit to hnmr293.


Step 1: Install this extension

Step 2: Restart Stable Diffusion (close and open)


Step 3: Enable Cutoff (in txt2img under controlnet or additional network)

Step 4: Put in positive prompt: a cute girl, white shirt with green tie, red shoes, blue hair, yellow eyes, pink skirt


Step 5: Put in negative prompt: (low quality, worst quality:1.4), nsfw


Step 6: Put in Target tokens (Cutoff): white, green, red, blue, yellow, pink

Step 7: Put 2 of weight. Leave everything else as the image.

Tips:

0# Give priority to colors, first them and then everything else, 1girl, masterpiece... but without going overboard, remember tip #3

1# The last Token of Target Token must have "," like this: white, green, red, blue, yellow, pink, 👈 ATTENTION: For some people it works to put a comma at the end of the token, for others this gives an error. If you see that it has an error, delete it.

2# The color should always come before the clothes. Not knowing much English happened to me that I put the colors after the clothes or the eyes and the changes were not applied to me.

3# Do not go over 75 token. It is a problem if they go to 150 or 200 tokens.

4# If you don't put any negative prompt, it can give an error.

5# Do not use token weights below 1 eg: (red hoddie:0.5)

20 images were always worked on and in most of the tests it was 100%. If they put, for example, green pants, some jean pants (blue) can appear, also with the skirts a black skirt can appear. These "mistakes" can happen.

That's why I put 95% in the title because 1 or 2 images out of 20 images may appear with this error.

Тэги: animecolorfulvibrant colorsdigital colorsvivid colorsshiny colors
SHA256: C9BF7FADA8EE21EE2136F217597003595B04F8680C830D699A3F4E1A30E0852A

ema pruned VAE

файл на civitaiстраница на civitai

It's VAE that, makes every colors lively and it's good for models that create some sort of a mist on a picture, it's good with kotosabbysphoto model that sometimes create mist on image and blend colors, dropped it here because it's faster to download if you use stable diffusion on huggingface so you don't have to drop file in Google colab and wait longer than you have : D

Тэги: animecharacterphotorealisticwomanportraits
SHA256: C6A580B13A5BC05A5E16E4DBB80608FF2EC251A162311590C1F34C013D7F3DAB

[LuisaP] ⚠️LORA don't need to be bigger!!!⚠️ *New Recipe

файл на civitaiстраница на civitai

Stable diffusion = 2GB, Trained on 5B images.
Lora = 128mb, trained on 10/100/300?????

this image, for example, was trained in 1 dim, 1 alpha, yes, 1 mb of filesize.
and also, trained with only 3 images.

a portrait of a girl on red kimono, underwater, bubbles

and this too, the style is identical and it's changes with prompt.

a portrait of a girl

a portrait of elon musk

unet_lr: 2e3
network_train_on: unet_only [ for styles ]

100 repeats 5 epochs because uses low number of images.
//////////////// New training setup
my new training recipe is 1e3, unet only, dim and alpha 1.

cosine with restart / 12 cycles.

10 repeats / 20 epochs.

⚠️was trained on anime vae, so it's need anime vae or will look fried ⚠️

Тэги: luisap[luisap]tutorial
SHA256: A88A4309CD1C610986BFB7B970F2BFAF264577254DC8FC6DFC65E78D202F04C6

[LuisaP] Tutorial Hypernetwork - Monkeypatch method

файл на civitaiстраница на civitai

clip 2, vae on, hypernetwork strenght 1.

1-Install Monkeypatch Extension and reload the ui

https://github.com/aria1th/Hypernetwork-MonkeyPatch-Extension

2-Go to create Beta hypernetwork in your train section.
3-Place this layer structure 1,0.1,0.1,1 //thanks queria!, i personally like this so much.

4-Select activation function of hypernetwork:tanh

5-Select Layer weights initialization:xavier normal

6-and finally, create the hypernetwork.

7-now in Train_Gamma, select your new hypernetwork.

8-Hypernetwork Learning rate: 6.5e-3 "this is for the math" so is perfectly normal ,also, 6.5e-4 will cause less damage to original image.

9-enable Show advanced learn rate scheduler options(for Hypernetworks) and Uses CosineAnnealingWarmupRestarts Scheduler.

10-Steps for cycle = number of images in your dataset.

11-Step multiplier per cycle: 1.1 or 1.2

12-Warmup step per cycle = the half of number of images.

13-Minimum learning rate for beta scheduler = 1e-5 [ or 6.5e-7 , will get less style from dataset, but more control ]

14-Decays learning rate every cycle = 0.9 or 1

15a-batchsize 2, grad 1, steps 1000.

15b-you can also do this [ batchsize 2, grad(number of image in dataset divided by two) but for that you only will need something like 250 steps, but personally i don't like it.


16- your prompt file need to be style.txt.

17- you can also try to "Read parameters (prompt, etc...) from txt2img tab when making previews" to see results with the style in your prompt, for example, mine is "girl in a red kimono".

Note: i train with 2 clip skip, none hypernetwork, and 1 hypernetwork strength.

18- and i'ts that! 5 MB of hypernetwork trained in under 10/20 minutes.

Тэги: luisap[luisap]tutorial
SHA256: 7163C3D6CC82B70D324675CEB2BC7F776416261F2E74AB1977DF2344A164847C