I will explain in English and Japanese(日本語).
Please click here for emergencies.
https://twitter.com/hypersankaku2
URL for extension's git repository
https://github.com/new-sankaku/stable-diffusion-webui-metadata-marker.git
--
Installation
On your Stable Diffusion WebUI, click the Extensions tab, then the Install from URL internal tab in that section. Paste the URL for this repo and click Install.
If downloading directly:
Unzip the downloaded Zip file in the "extensions" folder in WebUI.
If installing from within the WebUI:
Click the "install from url" button in the "extensions" tab.
Enter https://github.com/new-sankaku/stable-diffusion-webui-metadata-marker.git
Click the "install" button.
Version1.0
It is an extension of tex2img.
The output image will have generation information rendered on it.
It is designed mainly for verification purposes.
For example, you can verify differences that arise from various prompts.
Additionally, it can be useful when you want to share generated information on Twitter.
This extension has the following features:
You can switch the output image settings.
You can set the information to be rendered on each item.
The font size automatically adjusts based on the image size.
If there is a feature you would like to add, please let us know.
I will accommodate your request if possible.
Version1.1
We've added a new feature. This allows us to create a margin around the image and write text in that space. Now, you can add text to your image without covering any important parts of it.
Version1.2
Specify Font Size: Allows users to set a custom font size for the text. Added clear line breaks: Implements line breaks for better readability of the text.
---
急用の際はこちらにどうぞ。
https://twitter.com/hypersankaku2
インストール
Stable Diffusion WebUI で、[拡張機能] タブをクリックし、そのセクションの [URL からインストール] 内部タブをクリックします。 このリポジトリの URL を貼り付け、「インストール」をクリックします。
直接ダウンロードする場合:
ダウンロードしたZipファイルをWebUIの「extensions」フォルダに解凍します。
WebUI 内からインストールする場合:
「拡張機能」タブの「URLからインストール」ボタンをクリックします。
https://github.com/new-sankaku/stable-diffusion-webui-metadata-marker.git と入力します。
「インストール」ボタンをクリックします。
Version1.0
tex2imgのExtensionです。
出力する画像に生成時の情報を描画します。
主に検証用途で使われることを想定しています。
例えば、Promptの違いによる差を確認することができます。
あるいは、生成情報をツイッターで紹介したいとき、役に立つと思います。
このExtensionは以下の機能を持っています。
・画像の出力設定を切り替えられます。
・描画される情報を項目ごとに設定できます。
・画像サイズによってフォントサイズが自動で切り替わります。
追加したい機能があればリクエストしてください。
私に可能であれば対応します。
Version1.1
新しい機能を追加しました。 これにより、画像の周囲に余白を作成し、そのスペースにテキストを書き込むことができます。 これで、画像の重要な部分を隠さずに画像にテキストを追加できるようになりました。
Version1.2
カスタム フォント サイズを指定: ユーザーがテキストのカスタム フォント サイズを設定できるようにします。
直感的な改行: テキストを読みやすくするために改行を実装します。
Design thinking is a powerful methodology that is used by top companies like Apple, IBM, and Google to create innovative and effective solutions to complex problems. However, the idea of design thinking can be intimidating, especially for those who are new to the concept. But fear not, because with the right tips and tricks, you can craft your own models like a pro. In this article, we'll explore the basics of design thinking and provide you with actionable advice on how to apply it to your own model. Whether you're a seasoned designer or just starting out, these tips will help you streamline your design thinking process and create solutions that truly meet the needs of your users. So, let's dive in and learn how to make design thinking easy and effective.
Design thinking is a methodology that helps you solve complex problems by understanding the needs and creating solutions that meet those needs. The process is broken down into five stages: empathize, define, ideate, prototype, and test.
Show FULL please download pdf.
These are some NightCity 4K Wallpapers generated by a lora I published before, but now it needs to be fixed. You can download them as your wallpapers if you like them.
This is a simple css file to remove the folders from automatic1111 'show/hide extra networks' tabs.
If you are like me and have a ton of loras separated by folders, all those folders make visual clutter that can be hard to navigate. This css file will remove all the buttons with the text of the folders on them while leaving all the loras.
How to use:
Unzip and grab the user.css file
Add this file to your stable-diffusion-webui folder in the base directory.
Reload the UI.
Done!
This package contains 50 images of hands for the use of depth maps, Depth Library and ControlNet.
Usage:
Place the files in folder \extensions\sd-webui-depth-lib\maps
ControlNet Preprocessor: lineart_realistic, depth_zoe or depth_midas
ControlNet Model: control_xxx_lineart or control_xxx_depth
ControlNet Starting Control Step: 0.1~0.2
Depth Library:
https://github.com/jexom/sd-webui-depth-lib
The images are originated from anatomy360.info Free Reference and all rights are reserved to their respective owners. Please support their site! What I did includes cutting each hand out and making the transparent background such that the images can be read by Depth Library and converted into depth maps by ControlNet. The editing was all done by hand and took quite a while to finish.
License Agreement from anatomy360.info:
This package contains 900 images of hands for the use of depth maps, Depth Library and ControlNet.
Usage:
Place the files in folder \extensions\sd-webui-depth-lib\maps
ControlNet Preprocessor: lineart_realistic, depth_zoe or depth_midas
ControlNet Model: control_xxx_lineart or control_xxx_depth
ControlNet Starting Control Step: 0.1~0.2
Depth Library:
https://github.com/jexom/sd-webui-depth-lib
The images are originated from kamitokatachi.com and all rights are reserved to their respective owners. Please support their site! What I did includes cutting each hand out and making the transparent background such that the images can be read by Depth Library and converted into depth maps by ControlNet. The editing was all done by hand and took quite a while to finish.
License Agreement from kamitokatachi.com:
"The works on this site are licensed under Creative Commons Attribution-NonCommercial 4.0 International License."
Extract the zip file to logs/44k and load the model to use. This is the initial version of the model, and the model trained based on 800 songs will be updated in the future.
The modal source and training code come from the Internet, and the model is only used for exchange of scientific research interests. If there is any infringement, please contact to delete, thank you.
图源和训练代码来源于网络,模型仅作为科研兴趣交流使用,如有侵权请联系删除,谢谢!
画像ソースとトレーニング コードはインターネットから取得され、モデルは科学研究の利益の交換にのみ使用されます.侵害がある場合は、連絡して削除してください。
It is prohibited to use this model for commercial purposes and any scenarios of illegal acts and purposes.
本人原则上不支持使用此模型生成任何成人内容。用户在使用本模型时,请务必遵守当地法律法规,勿侵犯他人的名誉权、隐私权或肖像权。
GitHub Repo: https://github.com/TinyTerra/ComfyUI_tinyterraNodes
V1.3:
Added imageRemBG node - Background Removal node with optional image preview & save.
Added imageOutput node - Preview or Save an image with one node, with image throughput.
Image shows an example workflow for photobashing directly from generations. JSON can be found in \workflows
v1.2:
fixed pipeLoader having image output instead of clip
Added clip output to pipeKSampler
Added original pipe throughput to pipe>basic_pipe and pipe>detailer_pipe nodes
________________________________________________________________________________
added config.json for auto update (set to false by default) -
you will need to install the nodepack via git clone https://github.com/TinyTerra/ComfyUI_tinyterraNodes.git
from inside the ComfyUI\custom_nodes
folder, and set autoUpdate to true in the config file for auto update to work properly.
________________________________________________________________________________
v1.1:
Added 'pipe > basic_pipe' and 'pipe to detailer_pipe' for better compatibility with ltdrdata's ImpactPack
v1:
Adds pipeLoader and pipeKSampler (Modified with merge of Efficiency nodes and Advanced Clip Text Encode) for even more efficient Loading and Sampling.
Along with pipe Utils (IN, OUT and MERGE)
** all the templates have been updated, please re-download if you have an old version **
This collection of ComfyUI workflow templates is designed for use with the Comfyroll checkpoint but can be used with any checkpoint model.
https://civitai.com/models/58712/comfyroll
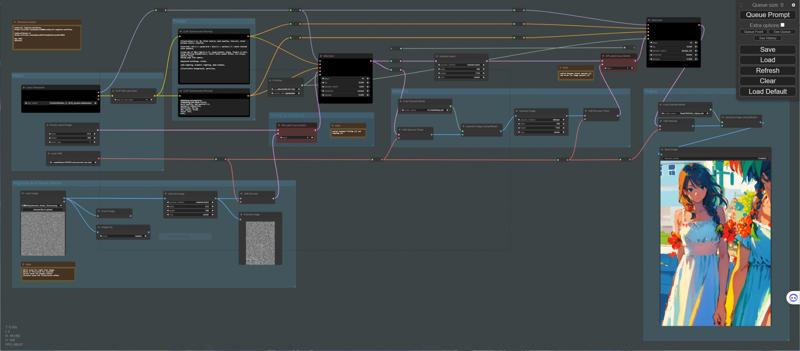
The initial collection comprises of the following:
A simple workflow with a variable semi-realistic style prompt
A simple workflow for creating anime style illustrations
An intermediate workflow for creating more complex stylized anime style illustrations
A simple workflow for creating simple stylized illustrations
An intermediate workflow for creating complex stylized illustrations
An advanced workflow for creating more complex stylized illustrations
It is planned to add more templates to the collection over time.
Img2Img noise masks:
The download includes a folder containing noise masks sourced from Wiki Commons. These are used in the workflows. The masks can be used to enhance the pseudo-HDR effect and also to add detail and style in the output.
There are many other types of noise, and many royalty free sources where these can be found. For example, textures and halftone images can make good noise masks.
Style masks:
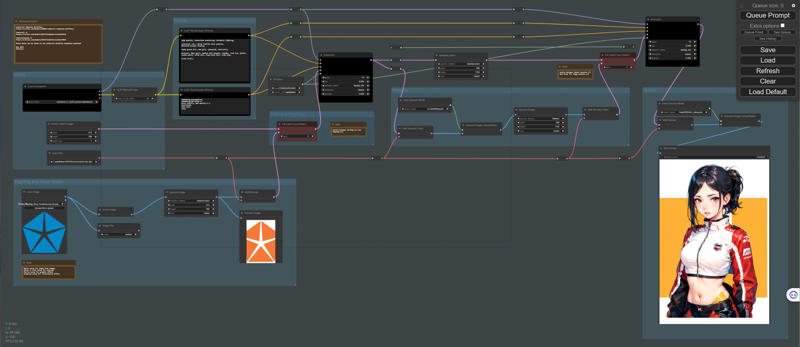
The download also contains a folder for style masks. Style masks are masks that impact the composition and coloring used in the output. They can be made from textures, logos, and many other image types. Here are a couple of examples from royalty free sources.
Company logos https://commons.wikimedia.org/wiki/Category:Logos_of_companies_by_industry
Alphabetic characters
https://commons.wikimedia.org/wiki/Category:Single_letter_icons
You can save the workflow templates anywhere.
The Custom Nodes in the download should be saved in your \ComfyUI\custom_nodes folder.
Download and install WAS Node Suite from https://civitai.com/models/20793/was-node-suite-comfyui
If you have an older version then the model name may need updating or an image mask may need connecting. You can update these in the Load Checkpoint and Load Image nodes.
Sample noise mask images can be found in the download.
If you have other errors then try re-downloading and check to see if there is a more recent version of the template in the download.
General notes on templates:
Nothing about the templates should be regarded as unchangeable. Please feel to modify them as much as you want. New styles can be discovered through experimention.
Clip Skip -1 provides a slightly less realistic cutesy style, but is also good for some illustration styles
Clip Skip -2 provides a semi-realistic style that also combines well with illustration styles
Increasing the sampling steps provides a smoother image. Lower sampling steps produce a more contrasty manga like style.
All of the templates require custom switch nodes provided in the download. These are colored red in the templates and can be set to either 1 or 2 to control the flow through the workflow.
Most of the templates also require custom nodes from WAS Node Suite
this is highly recommended
Template 1 - Simple variable prompt
this template can be used to produce semi-realistic or anime style images
use Comfyroll for semi-realistic style
use ComfyrollAnime for anime style
it uses a variable prompt that can be used for experimentation and discovery
the style can easily be changed by modifying the style line
e.g. semi-realistic, HDR, 2.5D,
the color palette can easily be changed by modifying or removing the color criteria line
e.g. colorized, black + red + green + yellow limited color palette,
additional variables can be easily added, e.g. {summer|winter|autumn|spring|}
existing variables can be easily modified be adding or deleting items within the curly brackets
Template 2 - Simple anime style template
this template produces anime style images
the style can easily be changed by modifying the style line
e.g. concept drawing, illustration, manga, anime line-art style,
the color palette can easily be changed by modifying or removing the color criteria line
e.g. colorized, pink + light-blue + white + purple limited color palette,
additional variables can be easily added, e.g. {swimsuit|bikini|sportswear|}
existing variables can be easily modified be adding or deleting items within the curly brackets
two sample images are provided using this template
Template 3 - Intermediate anime-style stylized illustrations
this template produces more complex anime-style stylized images
it works best with the ComfyrollAnime model
it is similar to the simple anime-style template but with the following additional features
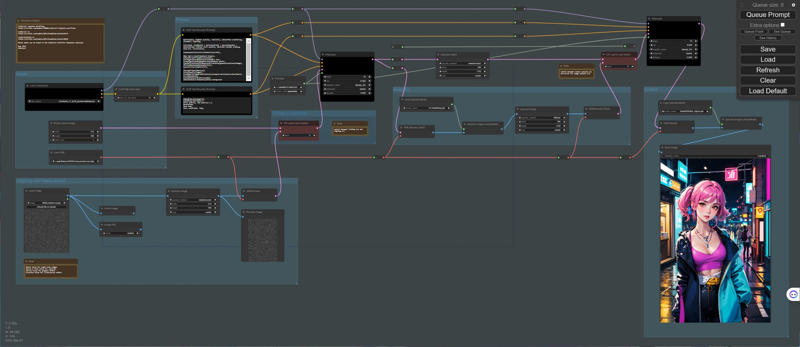
a ControlNet to apply a noise mask after the hi-res upscale
padding on the image mask
four manual switch points
blurring on the image output
additional features are planned for later versions
this is similar to using a ControlNet on the Img2Img tab in Auto1111, but the ControlNet is applied after the Hires fix
Template 4 - Simple semi-realistic stylized illustrations
this template produces simple semi-realistic stylized images
the style can easily be changed by modifying the style line
detailed concept drawing, illustration, line-art style, watercolor,
the color palette can easily be changed by modifying or removing the color criteria line
colorized, red + green + blue + yellow limited color palette,
the coloring and complexity of the image mask will impact the final output
logos and textures make good image masks for stylized pictures
halftone images also make great masks
panelled masks can be used to create panelled output
recommended denoising between 0.85 and 0.95
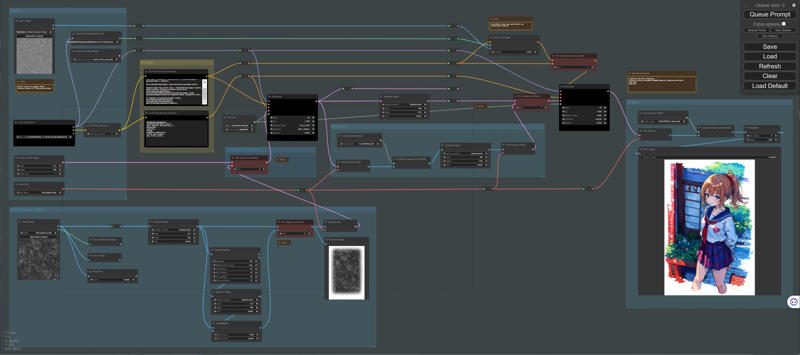
Template 5 - Intermediate semi-realistic stylized illustrations
this template produces more complex stylized images
it is similar to the simple template but with the following additional features
a ControlNet to apply a noise mask after the hi-res upscale
padding on the image mask
optional switch between latent upscale and hires fix
blurring on the image output
this is similar to using a ControlNet on the Img2Img tab in Auto1111, but the ControlNet is applied after the Hires fix
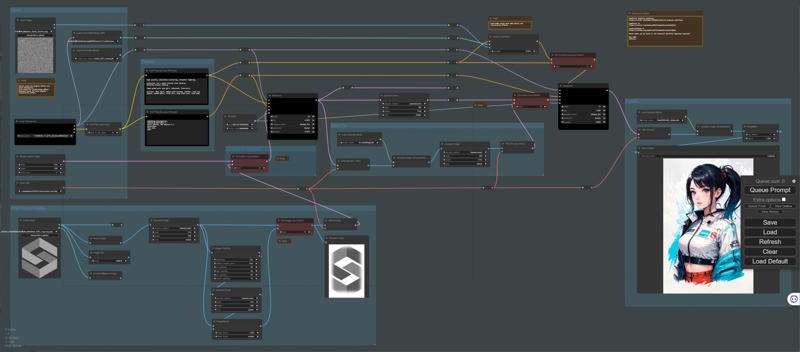
Template 6 - Complex stylized illustrations (advanced)
the template is packed with different options and may take some time to get familiar with, but will be worth the effort
it includes 11 manual switching points for controlling the flow
each optional component can be bypassed using the switches
this template is similar to template 5 but with the following additional features
dual prompts at different stages in the workflow
dual ControlNets at different stages in the workflow
dual loras
batch process for loading Images or ControlNets
more switch points
image preview (pre-hires)
this is similar to using batch Img2Img and multi-ControlNet in Auto1111, but with lots of additional options
set the Load Image Batch to single-image when it is not being used
White Noise Mask https://commons.wikimedia.org/wiki/File:White.noise.b.w.png
Pink Noise Mask https://commons.wikimedia.org/wiki/File:Pink.noise.b.w.png
Dissolve Noise Mask https://commons.wikimedia.org/wiki/File:512x512_Dissolve_Noise_Texture.png
Perlin Noise Mask
https://commons.wikimedia.org/wiki/Category:Perlin_noise#/media/File:Perlin_noise_example.png
Comfyroll Custom Nodes by https://civitai.com/user/RockOfFire6