Others

metadata-marker

файл на civitaiстраница на civitai

For emergencies, please click here.

https://twitter.com/hypersankaku2

install

・For Stable Diffusion WebUI

Click the Extensions tab, then click the Install from URL inner tab. Paste the repository URL below and click Install.

https://github.com/new-sankaku/stable-diffusion-webui-metadata-marker.git

・When downloading directly:

Unzip the downloaded zip file to the "extensions" folder of WebUI.

Explanation of Extensions

Images create files starting with the name "metadata_" in the "txt2img-images" folder.

Draw generation information on the output image.

Also, you can add any text.

This extension is effective when it is troublesome to open an image file as a text file. I think it is useful when pasting images to Twitter or Discord, which deletes the generation information in the image file.

Any text may include information such as copyright.

The generated information to be drawn is as follows.

Prompt, Nefative Prompt, Steps, Sampler, CFG scale, Seed, Size ,Model, Model hash

The drawing is the following 5 patterns.

Overlay on the image.

Create margins on either the top, bottom, left, or right.

You can change the following when drawing:

Font, font size, font color, background color, background color opacity, arbitrary text.

If there is a feature you would like to add, please request it.

I will respond if possible.

ーー

急用の際はこちらにどうぞ。

https://twitter.com/hypersankaku2

インストール

・Stable Diffusion WebUIの場合

[拡張機能] タブをクリックし、 [URL からインストール] 内部タブをクリックします。 以下のリポジトリの URL を貼り付け、「インストール」をクリックします。

https://github.com/new-sankaku/stable-diffusion-webui-metadata-marker.git

・直接ダウンロードする場合:

ダウンロードしたZipファイルをWebUIの「extensions」フォルダに解凍します。

Extensionの説明

画像は"txt2img-images"フォルダに”metadata_”という名前から始まるファイルを作成します。

出力する画像に生成情報を描画します。

また、任意のテキストを追加できます。

画像ファイルをテキストファイルとして開くのがめんどくさい場合、このExtensionは有効です。画像ファイル内の生成情報を削除してしまうTwitterやDiscordに画像を貼り付ける場合、役に立つと思います。

任意のテキストにコピーライトのような情報を含めても良いでしょう。

描画される生成情報は以下です。

Prompt, Nefative Prompt, Steps, Sampler, CFG scale, Seed, Size ,Model, Model hash

描画は以下の5パターンです。

画像にOverlayします。

上下左右のいずれかに余白を作ります。

描画時に以下を変更できます。

フォント、フォントサイズ、フォント色、背景色、背景色不透明度、任意のテキスト。

追加したい機能があればリクエストしてください。

私に可能であれば対応します。

Тэги: toolsextensionimagetool
SHA256: 586820AF7975A75E542E0DAA6F1630049AEE924FC83A36D4120AB9AC33421AA6

Guides & User Update

файл на civitaiстраница на civitai

Join my new Discord here! https://discord.gg/Mk9bvp4C

Update

Hello civitai followers. Update: GodPussy1 was banned. Currently trying to get it unbanned. Depending on the outcome, I may not post here anymore. I created a new discord to keep people updated. If you are interested in joining, feel free to click the above link!

Otherwise, this guide will just be a central post to summarize tips I've found to create good Stable Diffusion images both with and without any of my models. Hope you find it useful.

Recommended Settings (NSFW Pussy LoRAs)

Notes

Sample Workflow

Contact me at aihotgirls@proton.me

Тэги: guide
SHA256: BECFB3F5672504EC6CE771E41AB0362D2C6FD8B6F8604242B4C611DF7CA4F9AF

ai-Rick Astley-so-vits-svc-4.0

файл на civitaiстраница на civitai

Some AI cover songs:here

This version may require RIPX or AU to remove some mute sounds

Extract the zip file to logs/44k and load the model to use. This is the initial version of the model

The modal source and training code come from the Internet, and the model is only used for exchange of scientific research interests. If there is any infringement, please contact to delete, thank you.

图源和训练代码来源于网络,模型仅作为科研兴趣交流使用,如有侵权请联系删除,谢谢!

画像ソースとトレーニング コードはインターネットから取得され、モデルは科学研究の利益の交換にのみ使用されます.侵害がある場合は、連絡して削除してください。

Legal & Risk

It is prohibited to use this model for commercial purposes and any scenarios of illegal acts and purposes.

本人原则上不支持使用此模型生成任何成人内容。用户在使用本模型时,请务必遵守当地法律法规,勿侵犯他人的名誉权、隐私权或肖像权。

Тэги: musictoolsovits
SHA256: FF223DC11646D6E27547E67CD70D227EA4F976BEA9C20466887B0B78118561AD

Wahu

файл на civitaiстраница на civitai
Тэги: animefemalestylegame character
SHA256: 4087BF91D0E4CDD10AA4310B608FEFF74DD6387DF30242E88B71F49C22FF7009

Settings Accordion - Collapse your settings sliders

файл на civitaiстраница на civitai

This is an Autmatic1111 extension that allows you to collapse the default settings sliders just like all of the other extensions allow you to do. I find this super useful when using the webUI on a smaller monitor and want to focus on another extension such as ControlNet or when I am managing the UI from my phone.

~~~~~~~~~~~~~~~~~~~~~~~~~~~~~~~~~~~~~~

To install:

  1. Extract the zip

  2. Place the "hide-settings-v2-inner" folder in:

A1111 WebUI Root \ extensions

or

A1111 WebUI Root \ extensions-builtin

For example, mine is in:

E:\AI\A1111\extensions-builtin\hide-settings-v2-inner

  1. Reload UI

  2. Ensure the extension shows up and is checked on the extensions tab.

~~~~~~~~~~~~~~~~~~~~~~~~~~~~~~~~~~~~~~

I can't take credit for all of the code; some very friendly people helped me create this.

I also want to put in a plug for the extension SD-Lock-UI it works as a toggle to hide all settings and extensions and just show the output box. It works well with my extension as you can collapse settings when you need or remove them all-together.

His extension is located here https://github.com/VekkaAi/SD-Lock-UI

Тэги: uiguide
SHA256: 7992506C68506149C255377637BC2362CE41B696B247FC0C18439F888F1547FA

Tutorial: Free Demo Spaces for SD Models on HuggingFace

файл на civitaiстраница на civitai

Tutorial: Free Demo Spaces for SD Models on HuggingFace

Want to be able to test a model you've seen around that has a diffusers option on huggingface?

(Please note: This tutorial does not cover yoinking models that DONT have a diffusers option and making your own spaces, nor does it cover adding your own diffusers option to your model, that'll come sooner than later.)

Added file is a zip file with IMAGES and a PDF/DOCX of just the images, i may add the text version later on.

Join our Reddit: https://www.reddit.com/r/earthndusk/

This is fairly straight forward and should be easy enough to follow.

So your first thing is to go to https://huggingface.co - if anything you're likely not logged in (and yes sadly it stores cookies from both FIREFOX and chrome, and it logged me off mid uploading models to a repository - ugh i'm dumb)

When you're there, don't worry if you don't have an account, this tutorial is for both users and non users of HF. You'll have ways of finding what you need, and sometimes Civit users will post their HF links in their descriptions.

You'll LIKELY FIRST want to try clicking models. Don't worry, there's a way to find what you need it's not easy but there's some ways around this nightmare GitHub styled fuel.
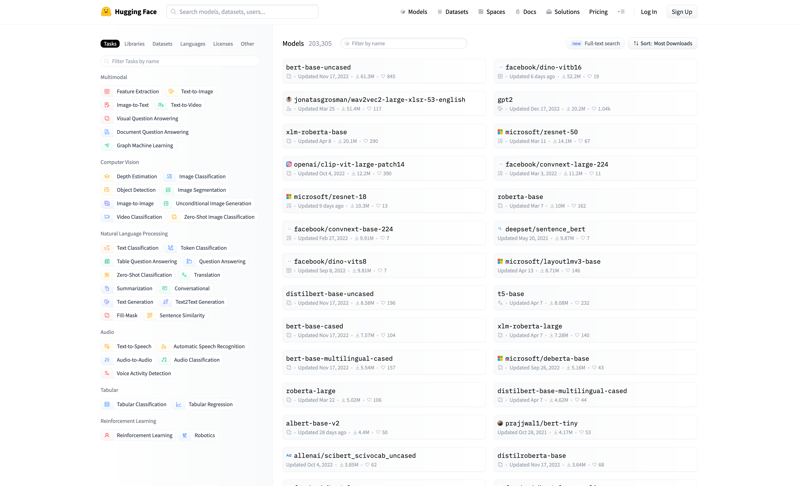
This is what it looks like when you first get to the models page, it's a little daunting because they offer more than just SD or Text to Image models.
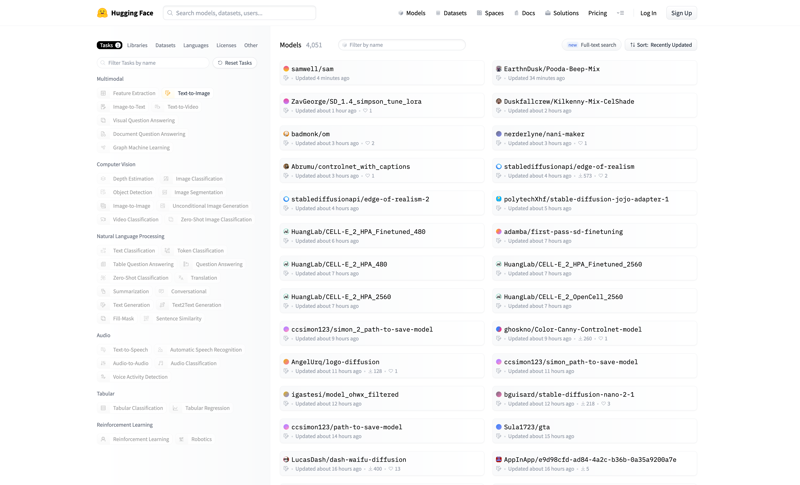
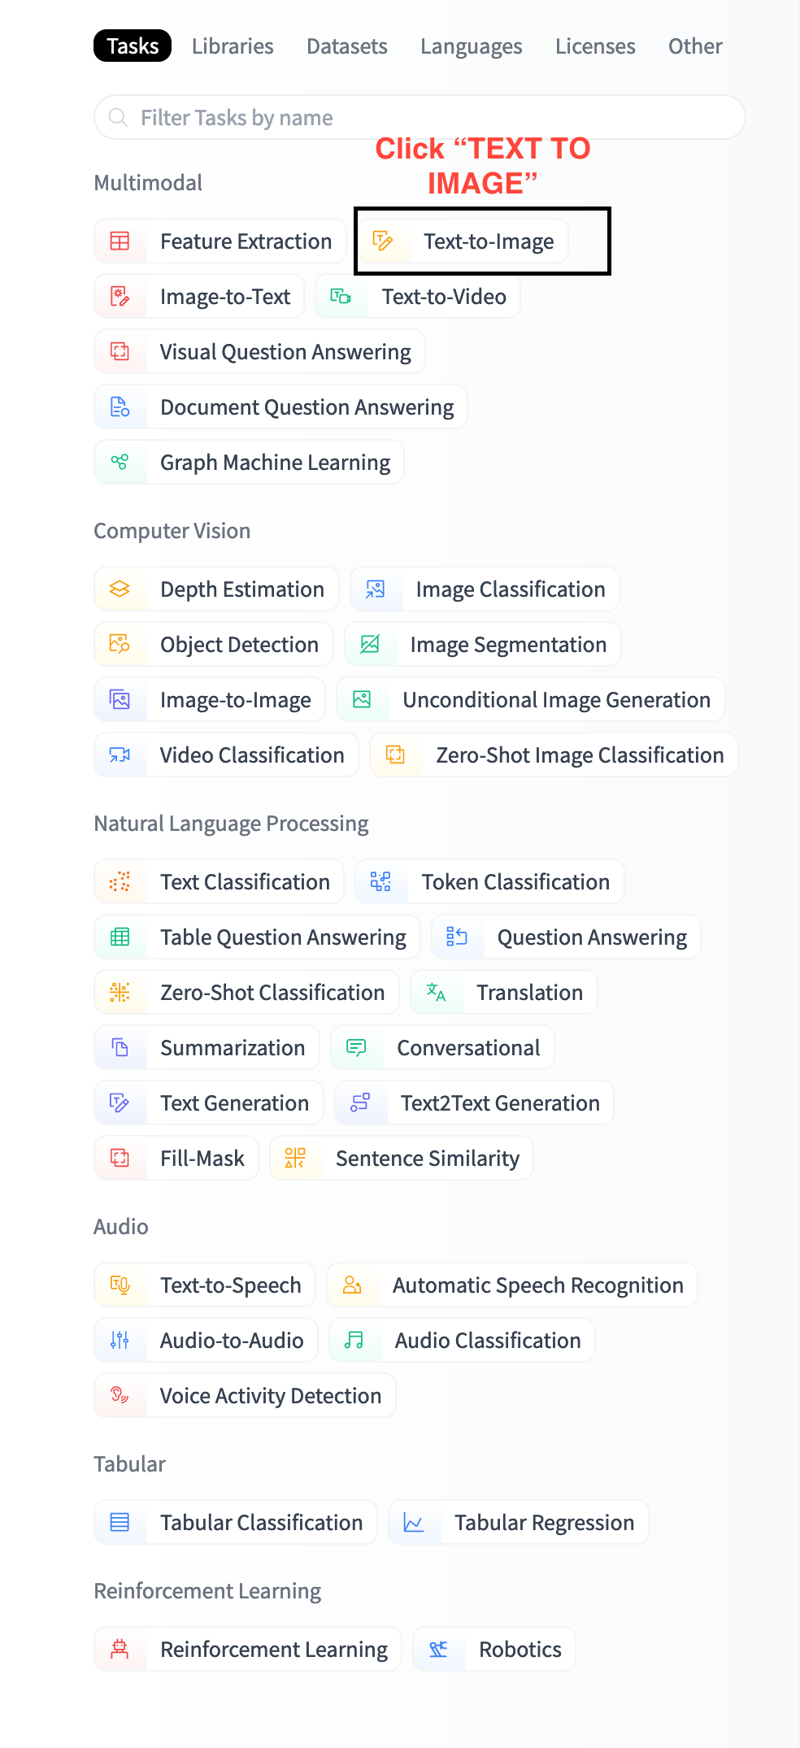
You're going to want to click TEXT TO IMAGE
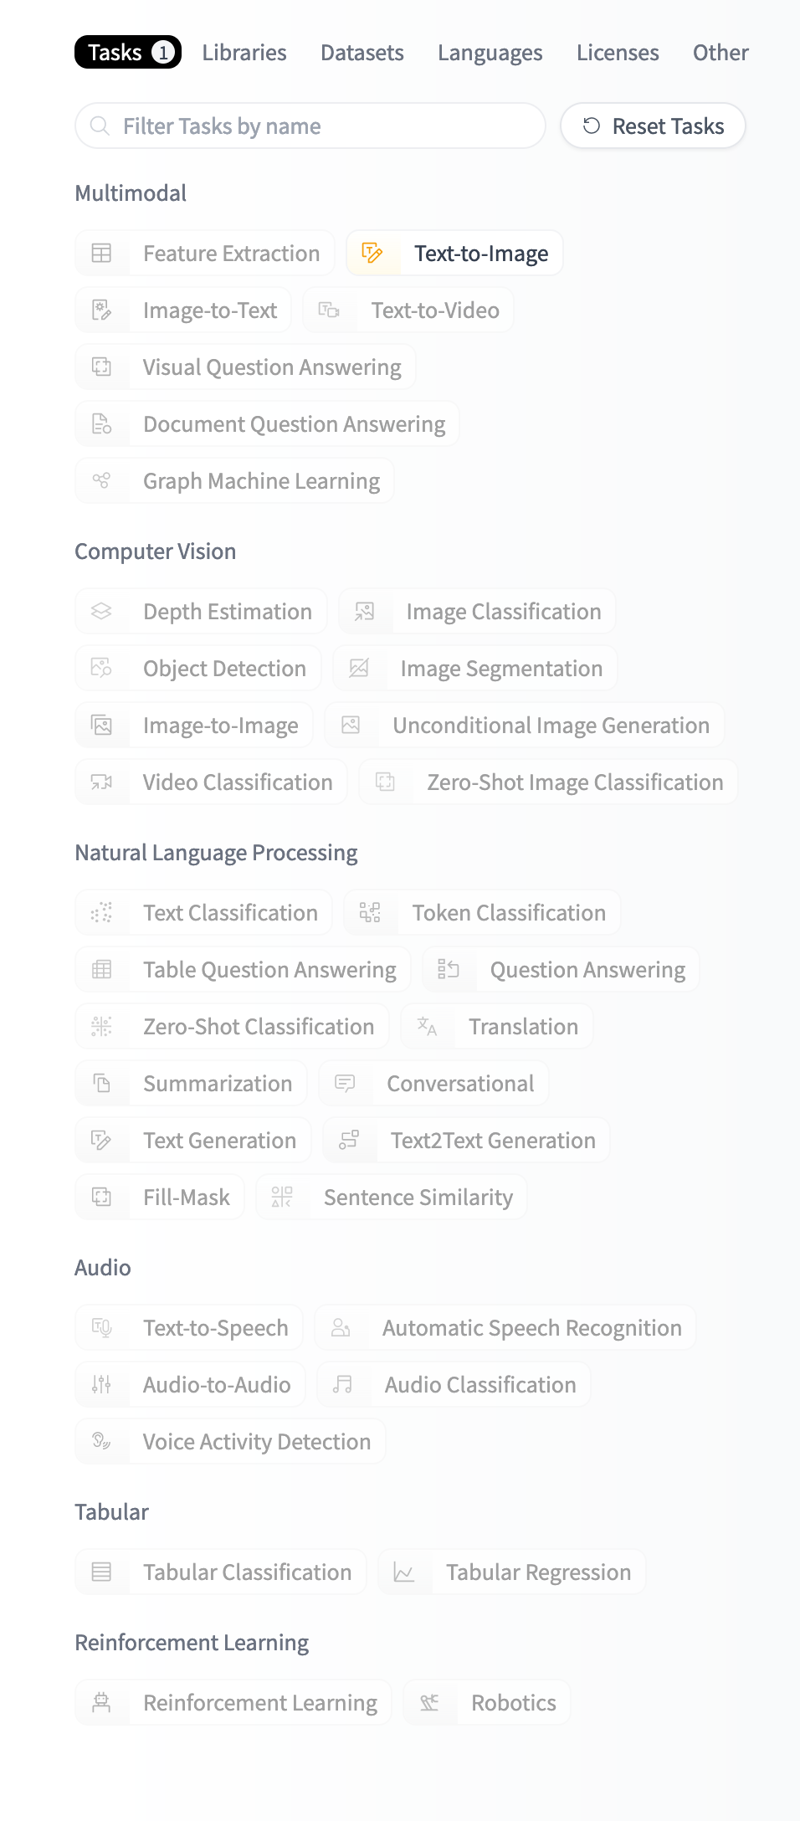
Once you've clicked that (though you're allowed to browse the other sections my child just wait your turn! LOL) - you'll see the rest of the sections greyed out:
For this instance we've actually just clicked on our model for reference, but you have the choice of 1000s of different things Inclusive of Dreamshaper, Protogen & More!
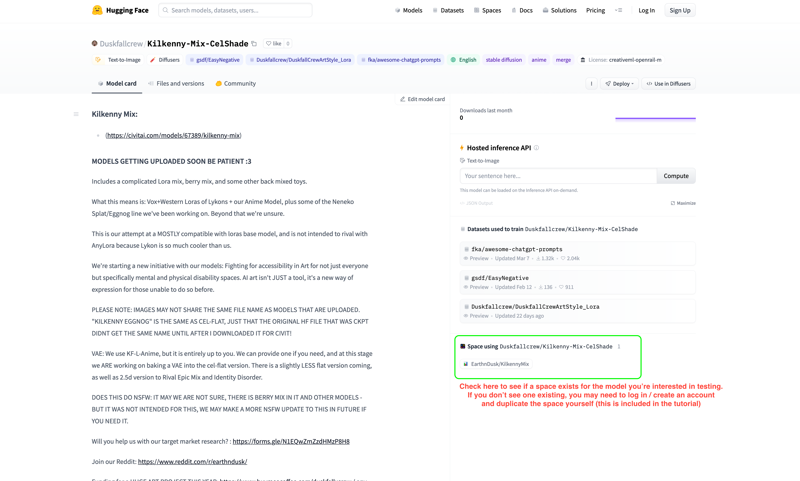
You will note the model card varies per space, and you have a choice of JUST testing it via the model card OR - there may be spaces available already.

If there's a space available you'll see it in the bottom right hand corner of your screen.

Warning: It MAY QUEUE up depending on the popularity, we will cover logging in and duplicating this.
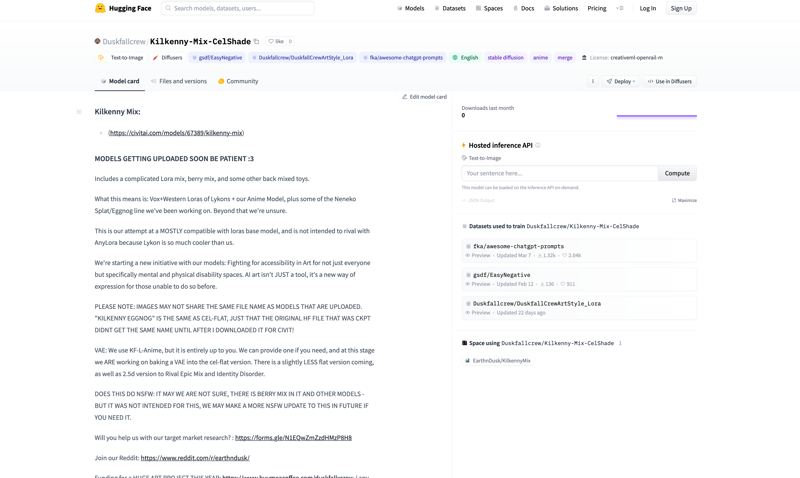
Just for show this is what it looks like when I don't make tons of text on the screen for you.
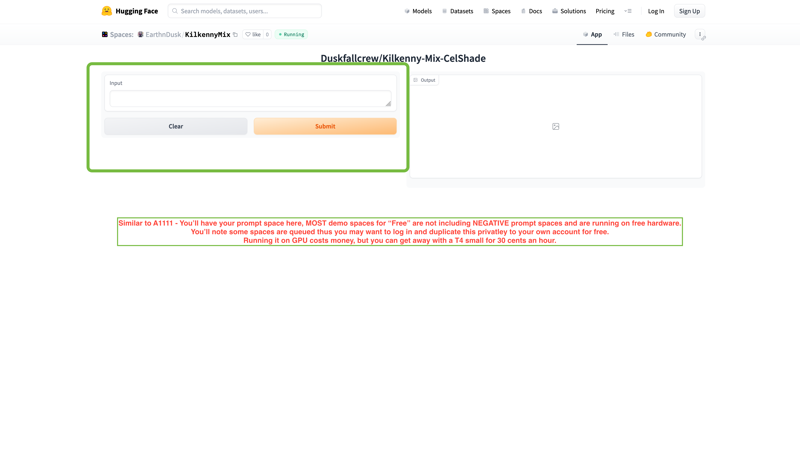
Also noting that since this is a FREE gradio based space, there is no negative prompt and it is limited by the FREE API that is included in the space. Again we'll let you know how to dupe this. privately.
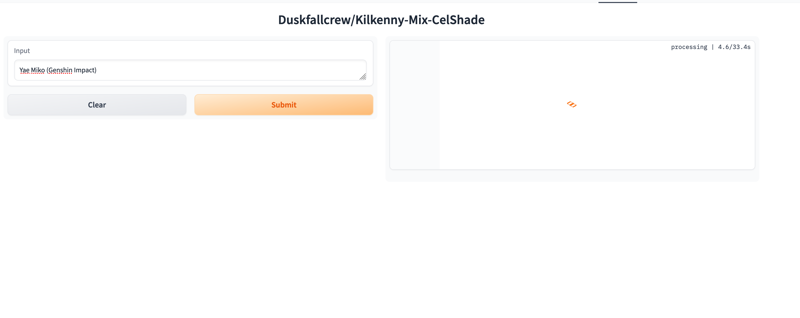
NOW! you can make PRETTY WAIFUS! (lol) - Or just y'now test it!
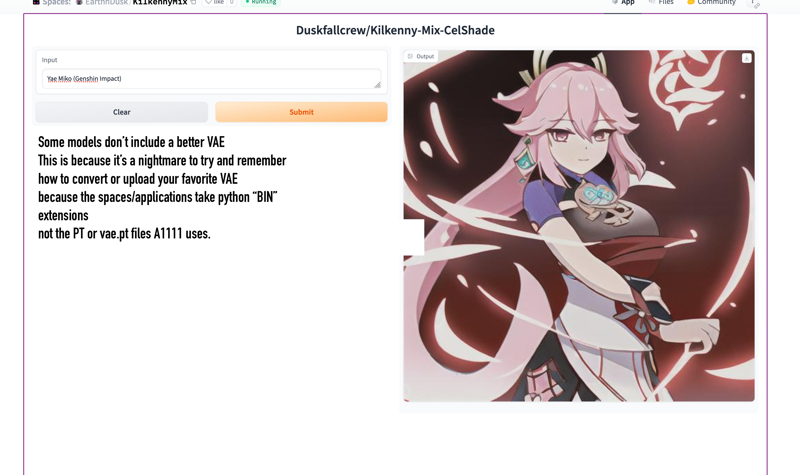
Yea so here's a REALLY BAD EXAMPLE because we haven't had the moment to get the correct VAE running - because even for a mid tier user like me you have to download the diffuser's VAE from the right space and replace it like a ninja before someone realizes you're vae-less. (It's not QUITE VAE-LESS it's just running on what's encoded in the model - and in this case none of mine are baked). SOME PEOPLE do have this fixed, one or two of ours ARE the right VAE, and Lykon makes baked VAE versions and adds them for demo spaces.

NOW FOR THE FUN PART: If you haven't got an account SIGN UP, because you'll need it for making tons of your own private duplicated spaces to test things.
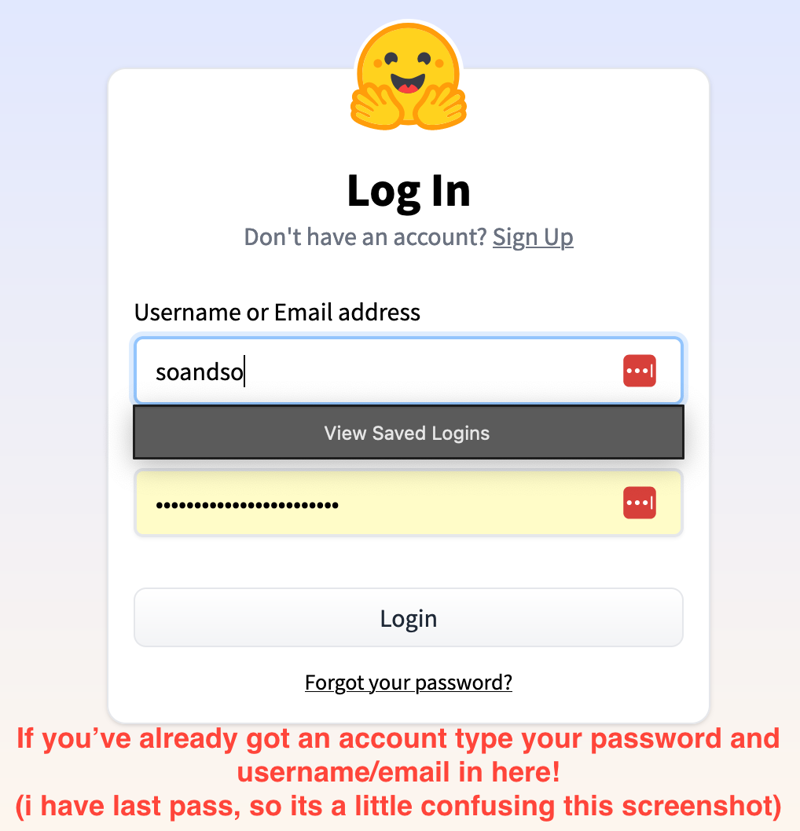
Again I use last pass, so it gets in the way - and I was trying not to doxx my email so I typed in the box. So if you've got an account or finished signing up - do log in. (WARNING: I USE DARK MODE SO COMING UP EVERYTHING IS IN DARK MODE)
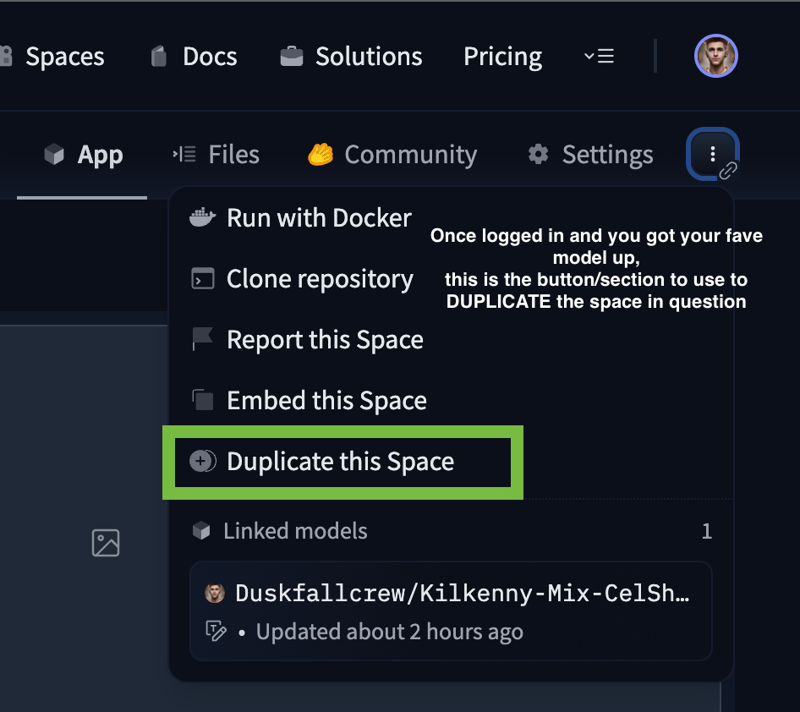
When you get to the space in question AGAIN you'll see the top right hand corner has a LINK/ATTACHEMENT button - kinda like a 2-3 dot hamburger menu with a chain link. "DUPLICATE THIS SPACE" is your option you're looking for. YOU CAN embed it randomly in an HTML site if you felt like it but i'm not covering any advanced options if i haven't tried it yet myself.
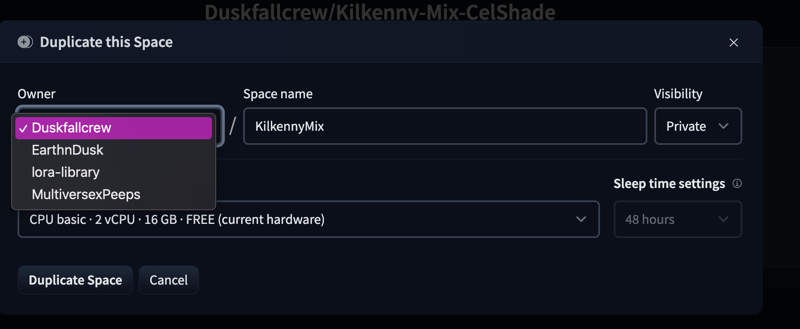
This is ROUGHLY WHAT IT WILL LOOK like, i'm not going to show you what it looks like while building because i'm not really in the mood to re-duplicate six of my model spaces LOL. You'll get a choice between any ORGANIZATIONS you've signed up for OR just your base profile, name the space what you want and if you WANT extra GPU GO BRR and wanna pay for it you have the option. You can do PUBLIC or PRIVATE for this and private just means you don't have to wait in the queue to make WAIFUS.
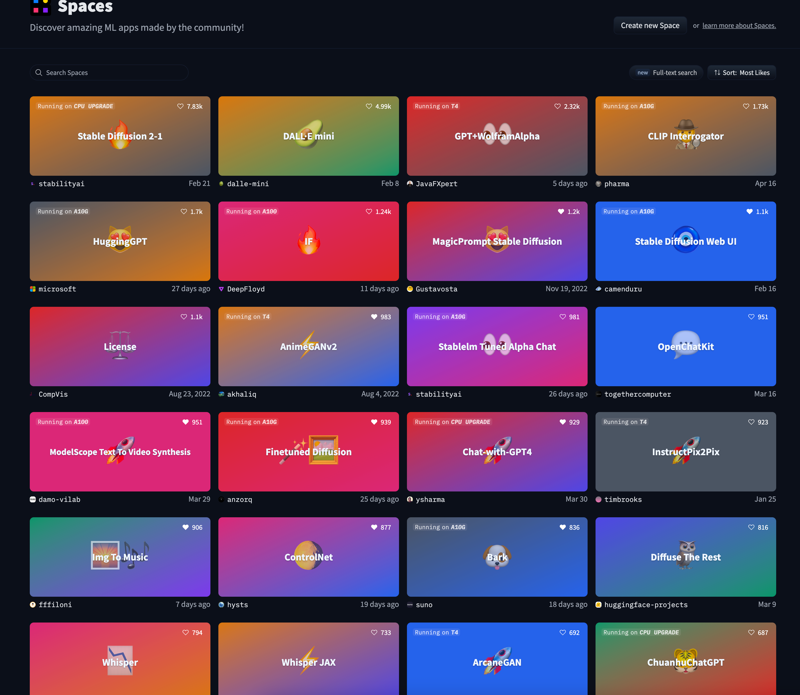
This is the fun playground, you get to see TONS of new things made every day inclusive of things from corporations using Huggingface. Not just interested in Waifus or fap material? (Kidding, it's also about art, and fun XD) - You can use Mubert, Riffusion or even see the latest in Text GPT models!

THEN YOU CAN EVEN DUPLICATE MOST OF THESE IN PRIVATE TOO!
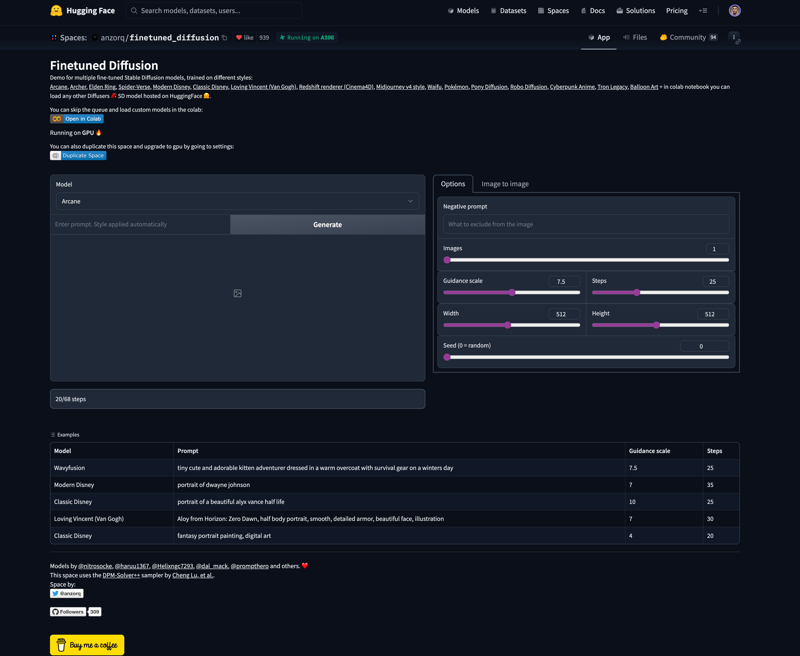
There ARE WEBUI like functionality spots with hardware paid for by either HF through grants OR via the user themselves. Duplicating these without paying for hardware breaks the spaces and is a no no and a bad annoying idea.
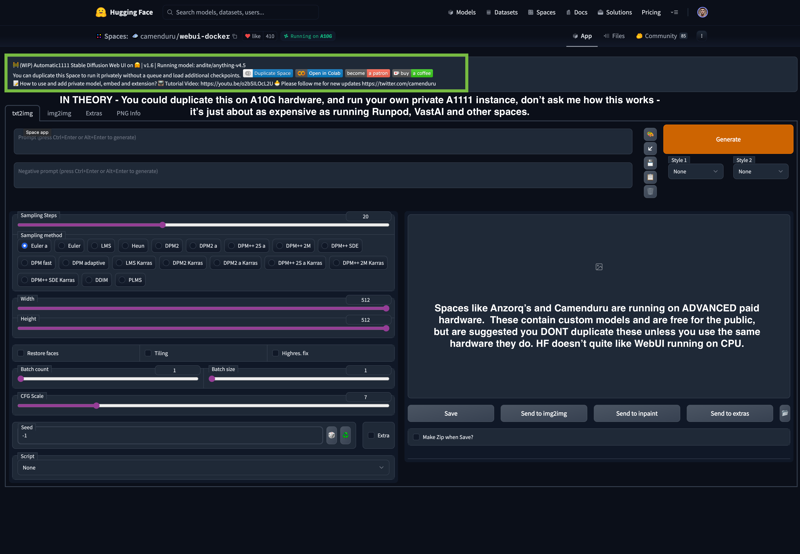
not that it's illegal to do so, but because a lot of these aren't coded to run on HF spaces without higher end hardware. If you're looking to run WEBUI free well, you know the deal Google hates freeloaders (and their paid users XD) - and finding free options these days is a NIGHTMARE.

If ya got any questions?

Will you help us with our target market research?: https://forms.gle/N1EQwZmZzdHMzP8H8

Join our Reddit: https://www.reddit.com/r/earthndusk/

:Funding for a HUGE ART PROJECT THIS YEAR:: https://www.buymeacoffee.com/duskfallxcrew / any chance you can spare a coffee or three? https://ko-fi.com/DUSKFALLcrew

:If you got requests, or concerns, We're still looking for beta testers: JOIN THE DISCORD AND DEMAND THINGS OF US:: https://discord.gg/Da7s8d3KJ7

:Listen to the music that we've made that goes with our art:: https://open.spotify.com/playlist/00R8x00YktB4u541imdSSf?si=b60d209385a74b38

Тэги: animetutorialguidehugginghugging facestable diffusion spacedemo
SHA256: AC4D7D758A50E4CDC6AB1F691BC745F877532FA76C5F773DFD5649A6747B487F

Move LoRAs (Extra Networks) below everything.

файл на civitaiстраница на civitai

This is a simple css file to move the Extra Networks such as LoRAs and HyperNetworks to appear below the settings and output box.

If you are like me and have a lot of LoRAs, it can get annoying scrolling through them to go back and forth between the prompt and the output. This simple CSS file will just move all of the LoRAs to sit below the output so you can scroll down and pick one, and then go back up and work with it.

I also included some code to remove the small scroll box for the LoRAs, so you can scroll through all of them.

How to use:

  1. Unzip and grab the user.css file

  2. Add this file to your stable-diffusion-webui folder in the root directory.

    If you are already using a user.css file, you can just copy the contents of this file and add it to yours.

  3. Reload the UI.

Тэги: guide
SHA256: 5BF73A33D27CA0A0F4974236E4F3B854325E43F07E5BCAC49B049E6492FF441B

{DD} Usefull stuff&scripts I use to make Loras

файл на civitaiстраница на civitai

Hello friends!

Lots of questions about how to train a grid Lora, so I'll make a quick guide to my workflow. First, let me say, that we are (with @Bartuba) making an app, that will be a huge help for all of you, who want to create a Lora (actualy any kind of Lora, not just Grids). I'll post the link here as soon as we are ready to share the MVP and prepare larger tutorial which will be accumulating all of the experience I have at that moment.

Overview

So to train a Lora with grids you need to do this:

Gathering data

First of all you need a bunch of clips that represent your concept. I suggest to find a good quality clips (with resolution at least 1280x720). Gifs from danbooru are ok - they are mostly good quality, but I suggest not using them, because gifs most of the time have low amount of colors. Which is not good for training.

How to do that?

So if we a talking about grid Lora you need a bunch of clips. Well actually we need a frames from that clips, and there are lots of ways to get them. Here are some of them:

for %i in (*.webm) do ffmpeg -ss 0.5 -i "%i" -fps_mode vfr -frame_pts true -vframes 9 "%iout-%02d.png

Where:

Most of the time it gives pretty decent results.

*Our UI will help with that part in the future.

What frames should I take?

Well that's the first tricky part. For example you want to create a frid Lora with smiling. So pay attention to the following:

If the anwer on any of the question is NO - think twice about that clip. Some of them can be fixed in photoshop, but it's time consuming.

Preparing data

Ok now we have a dataset of the raw images. We need to do the following:

Cleaning and cutting

I use photoshop for that. Boring stuff. Nothing to say here)

The only one tip - stack the frames from one clips together and cut them all at once. Then use export layers to files. Saves time.

Frames should be in the same logical order for all of the grids. Like "smile" should get wider every frame for all of the clips. If it's vise versa - reverse it. Or you'll get the mess in order of the final results.

*If you are lazy to do so, you can overcook your model. Overtraining kinda helps - because the final result will stick to one image from the dataset. It will criple the results though.

*Our UI will help with that part in the future.

Resizing

I think everybody already knows it, but Birme is a good tool for that.

Merging

Again there a lot of ways to do so. Here are some:

Resize grids to the 512x512 for 2x2frames, and 768x768 for 3x3frames.

That's it for now, folks :)

I made this guide to share my tools and make it a little bit easier for those who want to try to train grid models too) In the next steps I am not sure yet, so I leave it like this for now. I'll come back after our UI is ready.

Have a nice day)

Tagging

TBD

Training

TBD

Checking the results and analizing

TBD

Feel free to ask any questions here in comments, or in my discord channel.

Also I am making games with AI arts. They will be free in the future, but if you want to participate in making or have an early access - you can support me on patreon)

Also my wet hair Lora was banned here, I dunno why. You can download the last version of it from my patreon for free.

Тэги: trainingguidetoolsddlora
SHA256: D2B356239D3B6E6B6463D60714100876D43B7D4FC3188471BFF1E6A2496EA1FB