This extension provides assistance in installing and managing custom nodes for ComfyUI.
Features:
ComfyUI: update
custom nodes: install/uninstall/update/enable/disable
Node suggestion of A1111 alternatives.
models: download
Please refer to the GitHub page for more detailed information.
https://github.com/ltdrdata/ComfyUI-Manager
Install guide:
Method 1:
Download
Uncompress into ComfyUI/custom_nodes
Restart ComfyUI
Method 2:
goto ComfyUI/custom_nodes in cmd
Restart ComfyUI
This custom node provides functionality for image detection with the Detector node, image enhancement of masks with the Detailer node, iterative upscaling support with the Iterative upscaler node, and various convenience nodes based on Clipspace.
Please refer to the GitHub page for more detailed information.
https://github.com/ltdrdata/ComfyUI-Impact-Pack
Install guide:
Method 1:
Download
Uncompress into ComfyUI/custom_nodes
Restart ComfyUI
Method 2:
goto ComfyUI/custom_nodes in cmd
Restart ComfyUI
Troubleshootings:
Occasionally, when a new parameter is created in an update, the values of nodes created in the previous version can be shifted to different fields. This can result in unintended results or errors if executed as is, so it is important to check the node values. In particular, when updating from version v1.4 or earlier to version v1.5, all parameter values under guide_size will be different, so be careful when using previously created workflows.
Updates:
v2.7
Whole new nodes and New install system
Interactive SAM Detector, PreviewBridge
Iterative Upscaler, PIPE, ...
FaceDetailer
v1.7
new feature: mask-points, mask-area on SAMDetectorCombined
improve mask painting: wheel brush size, right button eraser
SAMDetectorCombined bbox range bug fix
v1.6.1
bug fix for DetailerForEachDebug
v1.6
MaskPainter, EmptySEGS node added
bug fix for MaskToSEGS
v1.5
guide_size_for parameter added
more predictable upscale size patch
crop_factor on ONNXDetectorForEach node
v1.4
guide_size bug fix
ONNXLoader, ONNXDetectorForEach nodes added
v1.3
MaskToSEGS node added.
v1.2
Support external_seed for Seed node of WAS node suite.
v1.1
Fixed a package dependency issue with pycocotools on Windows.
Resolved an issue where the software was unable to recognize the "ComfyUI" folder in certain cases.
space ship dreadnougth, with 3 quad barrel main gun Turrent, shooting at alien Hive ship
ControlNet m2m script を利用すると動画のフレームをもとに画像を生成し、それを最後にまとめて GIF 動画として出力してくれます。(movie to movie)
勘違いが無いように書きますが、プロンプトだけで動画を生成することは出来ないということをご理解の上でお読みください。また、手間の割に出来上がるものは短い動画 1 つなので、不毛な時間を過ごした気分になれることは間違いないでしょう。
以下の内容は飽くまで一例・私個人のやり方であって、必ずこのようにやらなければならないということではありませんのでご留意ください。
私の他の投稿は ここ から見ることが出来ます
これらも私個人が勝手に使っているソフトです。代替となる方法やソフトウェアは世の中に山ほどあると思うので、個人に合ったものを選択してください。
各ソフトウェアのダウンロード、インストール、設定、使用方法などは取り上げません。ご自身で調べてください。 (そもそも解説できるだけの深い知識はありません)
ざっくりとした手順は以下の通りです
ソースとなる動画を用意する
動画から切り出した 1 フレームだけの画像を ControlNet に読み込ませてテストする
プロンプトをテストする
Seed 値をテストする
ControlNet m2m script にソースとなる動画を読み込ませて出力する
自分は OBS Studio を利用して 3D のアダルトゲームを録画しました。Blender から出力したアニメーション動画や、MMD の映像なども利用できると思います。可逆圧縮の utvideo コーデックを使って録画し、AVI コンテナに保存しています。
録画が済んだら aviutl にて必要な箇所だけ切り出します。
この時あまりにも長い区間を切り出してしまうと、出力にものすごく時間が掛かるので短い方が良いと思います。なので自分は 0.5 ~ 1 秒程度を目安としています。これを短いと感じる人も居るかもしれませんが、例えば 30fps の動画ではたったの 1 秒でも 30 枚の画像を生成することになります。
また、ループ再生してちゃんと連続的になるようにカットします。ループ再生に向かない内容なら、開始と終了にフェードイン/アウトのエフェクトなどを使用すると良いでしょう。ただ、この段階ではエフェクトは付けません。
被写体や背景が著しく変化するような場合やカメラが大きく動くような映像の場合、そもそも別のシーンとしてカットしてしまった方が良いと思います。これは後々プロンプトを書く時に、映っているものに合わせて書く必要があるからです。例えば被写体が 1 回転するような映像だった場合、正面が映っているフレームと背中が映っているフレームがあることになります。正面が映っているフレームは、みんな大好きな breasts
などと書いておけばいいですが、背中が映っているのフレームを処理する際のプロンプトでは breasts
は消して back
などと書かなくてはならないでしょう。( backboob
かもしれませんがw)
カットが済んだら x264 エンコーダを利用して mp4 形式にエンコードします。aviutl であれば x264guiEx プラグインがあると楽でしょう。
この時、x264 のオプションに --qp 0
を指定すると可逆圧縮 (無劣化) となります。エンコードによるノイズがソース動画に発生すると生成される画像に悪影響があったりするので、自分は可逆圧縮を行っています。
mp4 以外の形式のまま m2m script に動画を読み込ませると自動的に mp4 に変換される様ですが、この時にノイズが乗る可能性があるので自分でエンコードを行っています。
動画を m2m script に読み込ませる前に、動画から画像を切り出してテスト画像とし、それを使ってテストを行います。
画像を切り出す方法はいくらでもありますが、自分は FFMpeg の連番出力機能で全フレームを画像化しています。(たまに他のフレームでもテストしたくなることがあるので)
以下は FFMpeg で動画から連番画像を出力するコマンド例です
ffmpeg -hide_banner -i "src.mp4" -ss "0:00" -f "image2" -startnumber 1 "%04d.png"
いきなり動画を m2m に読み込ませてテキトーなプロンプトやパラメータで出力してもまず良い動画にはなりません。
先ほど作ったテスト画像を使って色々なプロンプトや ControlNet のパラメータで出力を試します。この時はランダムな Seed でテストします。
ControlNet のどのモデルを使ったりパラメータを調整するかは、どのようなソース動画かによって変わりますが、自分は lineart や tile_resample を weight 0.5 ずつくらいで使うことが多いです。
新しく実装された reference_only 用の画像を用意すれば、かなりイメージに近づけやすくなると思います。
以下はプロンプトによる違いの例です (ControlNet のモデルとパラメータは同じです)
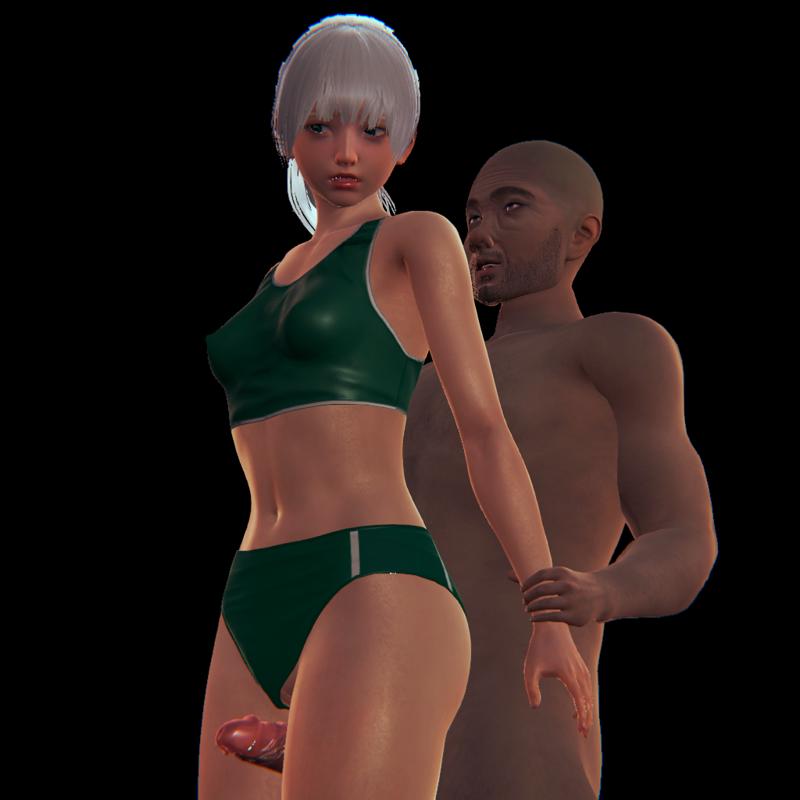
1 枚目はソース画像、2 枚目はクオリティのみ、3 枚目はクオリティと描画される (べき) ものも書き込んだプロンプトです。
2 枚目のプロンプトは以下です
(masterpiece:1.2, best quality)
Negative prompt: (worst quality, low quality:1.4), EasyNegative
3枚目のプロンプトは以下です
thigh sex, clothed female nude male, simple background, black background, sad face young girl, silver short hair, diagonal bangs, blue eyes, green sportswear, covered nipples, panties aside, evil simle ugly man, frottage, grinding, penis, bald, (beard:0.8), (masterpiece:1.2), (best quality)
Negative prompt: (worst quality), (low quality:1.4), EasyNegative, (haze:1.4), (steam:1.4), (breath:1.4), text, subtitled, watermark, (logo:1.4), signature, username, artist name, title, subtitle, date stamp, header, footer, (clothes writing:1.4), tag, name tag, green skin
元となる動画があるからプロンプトはテキトーで良い、ということは全く無く、2 枚目の画像の様にそもそも服の色が違ったり、男性の性器が消えてしまったりします。(太ももコキの動画なのにチンチン消されたらたまらないですね)
こういう大きい違いが生まれる部分はプロンプトに書き込んで描いてもらうようにします。
元の動画に存在しない物をプロンプトで生成したりもできますが、全フレームで安定して同じように描いてくれることはほぼ無いです。服の色を変える、程度のことならできますが、これも模様が出てしまったり、色合いが変わったりして安定しません。
そしてプロンプトを書いてみたものの、3 枚目は AI が謎に気を利かせてしまい、見えないはずの女性の右手が描かれています。こういった場合はプロンプトで消すことは難しいので、次の Seed 値のテストに入ります。(ガチャ)
大体どの Seed 値でも同じような傾向で出力されるようになってきたら、プロンプトを固定します。
プロンプトは変えずに Seed 値だけを変えて複数の画像を出力し、その中に気に入ったものがあればその画像の Seed 値で固定します。
気に入ったものがいつまでも出てこない場合は、プロンプトに過不足があるか、そもそも細かいところにこだわり過ぎているかのどちらかです。
以下は先ほどの 3 枚目の画像と同じプロンプトで、Seed 値が違う画像の例です。
この 2 つの Seed 値は服の色が変わってしまっていて違いが目立つので採用できませんが、このような大きい違いで無ければあまり気にしなくても大丈夫だと思います。
100% 完璧で細部まで理想通りの画像を出力してくれることは無いので、ある程度の妥協は必要です。
例えば 30fps の動画の 1 コマはたったの 0.033...秒しか表示されません。
1 コマの出来が良いに越したことはないですが、前後のフレームとの違いが大きい方が最終的に動画として見た時の違和感になると思っています。
この違和感を減らすために Seed 値を固定してしまいます。
ControlNet がインストールされていれば Script の一覧の中に controlnet m2m
があります。
このスクリプトはシンプルで、
スクリプト欄で controlnet m2m
を選ぶ
動画を枠内にドラッグアンドドロップする
Duration
を設定する
たったこれだけで使うことが出来ます。
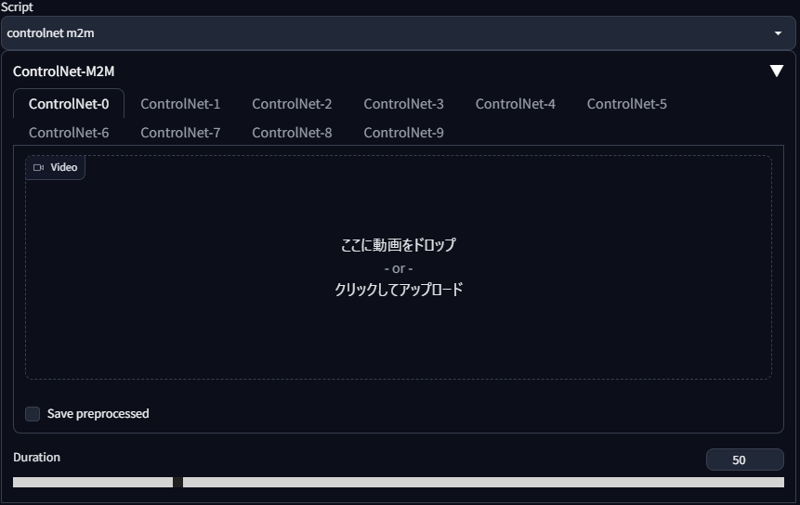
ここで 1. でエンコードして用意した mp4 形式のソース動画を m2m script に読み込ませます。
Duration
には「1 枚のフレームが表示される時間」を指定します。(ミリ秒?)
Generate ボタンを押して出力を開始すると各フレームが全て画像として出力され、全フレームの処理が終わると GIF 動画が出来上がります。
ffmpeg を使用すると、連番画像から動画を作ることが出来ます。
m2m script は GIF を作りますが、同時に連番画像も出力してくれます。その連番画像から AVI の動画を作成します。
以下は連番画像を AVI 形式の動画に変換するコマンド例です
ffmpeg -hide_banner -framerate "30" -i "%05d-<SEED_VALUE>.png" -vcodec "utvideo" -video_size "512x512" -pix_fmt "yuv444p" -r "30" "output.avi"
-i "%05d-<SEED_VALUE>.png"
の <SEED_VALUE>
は自分が出力に使用した Seed 値に置き換えます。山括弧 (<
と>
)は不要です。
-framerate
、-r
で任意のフレームレートを指定できます。-video_size
は任意の解像度を WxH
の形式で指定できます。
AVI 形式の動画に変換してしまえば動画編集ソフトで自由に編集できます。
ffmpeg を使用すると (ry
ffmpeg -hide_banner -i "src.avi" -filter_complex "[0:v] fps=30,scale=512:512,split [a][b];[a] palettegen [p];[b][p] paletteuse=dither=floyd_steinberg" "output.gif"
ディザリングのアルゴリズムは他にもあるので試してみて良いと思う。見た目やファイルサイズが微妙に変わります。
以下はディザリングのアルゴリズムのリストを表示するコマンド例です
ffmpeg -hide_banner -h filter=paletteuse
Q. i2i を使っているのか
A. 現状使ったことが無いが、フレーム単位で細かい修正が必要ならアリなのかもしれない。ものすごい手間だとは思うが。
Q. 背景を消しているのか
A. 現状消していない。元々シンプルな黒背景の動画をソースにしている。もし背景を消そうと思ったら高価で高性能な After Effects の「ロトブラシ」の様な機能が必要になると思う。それか GIMP で全フレーム (!) の背景を地道に消していくか・・・。
Q. この記事を英訳してほしい
A. 無理。中学英語ですら怪しい自分には英訳は不可能。DeepL や ChatGPT などを使うか、日本語に詳しい人物でも探して読んでもらってください。
そもそも日本語でこのページを書くのですら自分には何の得にもならない行為なのに、輪を掛けて英訳するモチベーションなどあるわけもなく。
EF EPI によると日本人の英語理解度は 111 か国中 80 位 だったそう。(2022年)
能力レベルとしては「低い」で、アジアだけで見ても 24 か国中 14 位と低い。
https://www.ef.com/wwen/epi/regions/asia/japan/
https://www.efjapan.co.jp/epi/
For emergencies, please click here.
https://twitter.com/hypersankaku2
Click the Extensions tab, then click the Install from URL inner tab. Paste the repository URL below and click Install.
https://github.com/new-sankaku/stable-diffusion-webui-metadata-marker.git
Unzip the downloaded zip file to the "extensions" folder of WebUI.
Images create files starting with the name "metadata_" in the "txt2img-images" folder.
Draw generation information and system information on the output image.
The generation time is about 1 second shorter than the number of seconds displayed on the Web UI, so please treat it as a reference.
Also, you can add any text.
This extension is effective when it is troublesome to open an image file as a text file. I think it is useful when pasting images to Twitter or Discord, which deletes the generation information in the image file.
Any text may include information such as copyright.
The generated information to be drawn is as follows.
Prompt, Nefative Prompt, Steps, Sampler, CFG scale, Seed, Size ,Model, Model hash
The drawing is the following 6 patterns.
Overlay, Overlay Center on the image.
Create margins on either the top, bottom, left, or right.
You can change the following when drawing:
Font, font size, font color, background color, background color opacity, arbitrary text.
If there is a feature you would like to add, please request it.
I will respond if possible.
ーー
急用の際はこちらにどうぞ。
https://twitter.com/hypersankaku2
[拡張機能] タブをクリックし、 [URL からインストール] 内部タブをクリックします。 以下のリポジトリの URL を貼り付け、「インストール」をクリックします。
https://github.com/new-sankaku/stable-diffusion-webui-metadata-marker.git
ダウンロードしたZipファイルをWebUIの「extensions」フォルダに解凍します。
画像は"txt2img-images"フォルダに”metadata_”という名前から始まるファイルを作成します。
出力する画像に生成情報、システム情報を描画します。
生成時間はWeb UIで表示される秒数より1秒程度短いので、参考程度に扱ってください。
また、任意のテキストを追加できます。
画像ファイルをテキストファイルとして開くのがめんどくさい場合、このExtensionは有効です。画像ファイル内の生成情報を削除してしまうTwitterやDiscordに画像を貼り付ける場合、役に立つと思います。
任意のテキストにコピーライトのような情報を含めても良いでしょう。
描画される生成情報は以下です。
Prompt, Nefative Prompt, Steps, Sampler, CFG scale, Seed, Size ,Model, Model hash
描画は以下の6パターンです。
画像にOverlay, Overlay Centerします。
上下左右のいずれかに余白を作ります。
描画時に以下を変更できます。
フォント、フォントサイズ、フォント色、背景色、背景色不透明度、任意のテキスト。
追加したい機能があればリクエストしてください。
私に可能であれば対応します。
That Photoshop Can't Do, DragGAN Can! See How! - YouTube
Drag Your GAN: Interactive Point-based Manipulation on the Generative Image Manifold
DragGAN - Next-Level Image Editing Like You've Never Seen Before! Quick Demo - YouTube
We all look forward to this June. We are going to see the movements. and we learn
Some AI cover songs:here
This version may require RIPX or AU to remove some mute sounds
Extract the zip file,Rename configs and place them in the so-vits-svc-4.0\configs folder
Put G_ Rename xxx.pth and place it in the so-vits-svc-4.0\logs\44k folder and load the model to use. This is the initial version of the model
The modal source and training code come from the Internet, and the model is only used for exchange of scientific research interests. If there is any infringement, please contact to delete, thank you.
图源和训练代码来源于网络,模型仅作为科研兴趣交流使用,如有侵权请联系删除,谢谢!
画像ソースとトレーニング コードはインターネットから取得され、モデルは科学研究の利益の交換にのみ使用されます.侵害がある場合は、連絡して削除してください。
It is prohibited to use this model for commercial purposes and any scenarios of illegal acts and purposes.
本人原则上不支持使用此模型生成任何成人内容。用户在使用本模型时,请务必遵守当地法律法规,勿侵犯他人的名誉权、隐私权或肖像权。
Some AI cover songs:here
Extract the zip file,Rename configs and place them in the so-vits-svc-4.0\configs folder
Put G_ Rename xxx.pth and place it in the so-vits-svc-4.0\logs\44k folder and load the model to use.
This is the initial version of the model, and the model trained based on 800 songs will be updated in the future.
The modal source and training code come from the Internet, and the model is only used for exchange of scientific research interests. If there is any infringement, please contact to delete, thank you.
图源和训练代码来源于网络,模型仅作为科研兴趣交流使用,如有侵权请联系删除,谢谢!
画像ソースとトレーニング コードはインターネットから取得され、モデルは科学研究の利益の交換にのみ使用されます.侵害がある場合は、連絡して削除してください。
It is prohibited to use this model for commercial purposes and any scenarios of illegal acts and purposes.
本人原则上不支持使用此模型生成任何成人内容。用户在使用本模型时,请务必遵守当地法律法规,勿侵犯他人的名誉权、隐私权或肖像权。