Others

[GUIDE] How to Use AingDiffusion Models

файл на civitaiстраница на civitai

YOU DON'T NEED TO DOWNLOAD ANYTHING. THE GUIDE IS BELOW

AingDiffusion-Guide

This is a readme file designed to provide a simple guide on how to use AingDiffusion models effectively.

Introduction

AingDiffusion (pronounced as "Ah-eeng Diffusion") is a combination of various anime models. It is a powerful model that can generate high-quality anime images. The term "aing" is derived from the informal Sundanese language spoken in West Java, Indonesia. It translates to "I" or "my." The name signifies that this model produces images that align with my personal taste.

How to Use the Model

This tutorial can be applied to other models as well and is not specific to AingDiffusion. Before proceeding, please ensure that you have the latest version of AUTOMATIC1111's Stable Diffusion WebUI installed. To begin, follow these steps:

  1. Save the desired model to the models directory, located at [YOUR_SDWEBUI_DIR]\models\Stable-diffusion. For example, if you are using the Stable Diffusion model, save it to [YOUR_SDWEBUI_DIR]\models\Stable-diffusion.

  1. Save the VAE (Variational Autoencoder) in the [YOUR_SDWEBUI_DIR]\models\VAE directory.

Adjust the Clip Skip to 2

After launching the WebUI, navigate to the Settings tab.

Once in the settings tab, click on Stable Diffusion on the left side of the page. This will take you to the Stable Diffusion settings. Scroll down and locate the setting labeled "Clip Skip." Set its value to 2.

Specify the VAE

On the same page, you will find a setting called SD VAE. Select the VAE you downloaded from AingDiffusion. If the VAE does not appear in the list, click the Refresh button next to the list box to update the VAE list.

Set ENSD (Eta Noise Seed Delta) to 31337

Switch to the "Sampler Parameters" tab. On the left side of the page, click on Sampler Parameters. Scroll down until you find the setting labeled "Eta noise seed delta." Set its value to 31337. This number originated from the leaked NovelAI model and is still commonly used.

Adjust Eta (Noise Multiplier) for Ancestral Samplers to 0.667

On the same page, locate the setting labeled "Eta (noise multiplier) for ancestral samplers." Change its value to 0.667.

This setting will improve the performance of ancestral samplers such as Euler a.

Disclaimer

Please note that this guide does not provide an exhaustive list of settings for optimizing SD-WebUI for image generation. There are many other potential improvements that can be made by adjusting the settings. Please feel free to explore and experiment with different configurations to achieve the desired results.
Тэги: guide
SHA256: 353EBF5329B027CAD23323C420509205352F329F12D5BBF31838FC295EDA668A

FemaleEmployee0

файл на civitaiстраница на civitai
Тэги: base model
SHA256: C1035DBB95346C20AF3B6CC90DC699F8A3EDD0F3FE76E4C3EA54C4AF98210E8D

3D-ish parralax animation (Guide)

файл на civitaiстраница на civitai

So, you're wondering about how to create pseudo-3D parallax gifs. Luckily, it's very easy!

I'll be specifically going about using this on existing images, as you're probably not trying to animate every single thing your SD generates, although it would be possible with Option 2.

Although I'll be mainly talking about generated images, this exact process works with just about any picture.

Attached are the two images I've showcased for you to play around with, I'd just ask for you not to re-upload them. Otherwise, generation data is available in the still (non-animated) images posted.

Option 1: LeiaPix

Great results in seconds, external tool

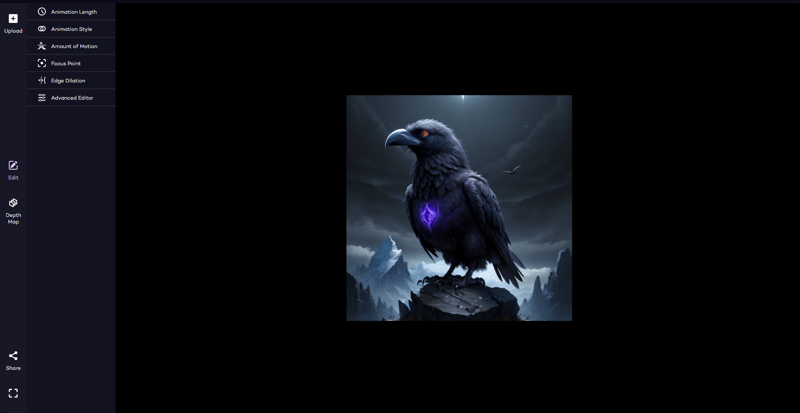
Option number 1 is using an external tool, the LeiaPix Converter. It can be found here.

You have to create an account on the site, but the tool is (currently) completely free to use. All you have to do is drop your image into the site after making an account and wait for the processing to complete. You can then play around with the options to the left, which are all completely self-explanatory.
Under the "Depth Map" tab to the far left you can override the automatically generated depth map, which is quite finicky.

Option 2: WebUI-Extension

Takes a few minutes to run and results are slightly less good, but runs locally

Note: this should work with Collab, but I have absolutely no experience with that so this guide focuses on local installations of SD using AUTOMATIC1111s WebUI.

If you're like me and don't want to rely on external tools which may or not stay free to use, you can use an extension for the WebUI called Depthmap Script.

In your WebUI, open the the extensions tab, head to Install from URL and paste the following into the first input field:
https://github.com/thygate/stable-diffusion-webui-depthmap-script.git
Then just hit Install, wait for the process to complete (have an eye on the output of your Terminal window running the .bat-Script - if you're on Windows), then just head back to the Installed tab and hit Apply and restart UI.

After reloading, there is a new Tab in your WebUI, labeled Depth.

Note:

Have fun bringing your GPUs creations to life!

Тэги: 3danimationtutorialguidegifparallax
SHA256: 684FA90EA4990379CE71CCC50AB452022B88E9C35B435B3491CDA460F3726E7A

sefja

файл на civitaiстраница на civitai

hot latine girl

Тэги: sexyposes
SHA256: C9F9694076EC17E41B99DBB9D459A01B48493C62A0A4A6C85B4EA9F56BCB044E

Nudify images using Stable Diffusion for Dummies

файл на civitaiстраница на civitai

If you enjoy the work I do and would like to show your support, you can donate a tip by purchasing a coffee or tea. Your contribution is greatly appreciated and helps to keep my work going. Thank you for your generosity!

https://ko-fi.com/gswan
https://www.buymeacoffee.com/gswan

------------------------------------------------------------------------------------------


This isn't a guide on how to install stable diffusion, but you can find the version I'm using and install instructions here: https://github.com/AUTOMATIC1111/stable-diffusion-webui

You
will need the following models to follow along with this:

Here's a quick guide on the workflow. we're able to invent new parts of the image that didn't exist before.:

14w.png


This all takes a bit of time and patience, but the results are well worth it. This one was actually a rush job so I had something to sue for this example, and it still looks pretty decent! A lot more time could be spent refining it, but I think it's enough to get the message across.The best part is, this method works on people who are fully clothed, so you don't need an image of them wearing a bikini. Anything will do

Here's the basic steps I use to achieve something like this:

  1. Before doing anything, make sure to go to settings and check "Apply color correction to img2img results to match original colors." Also check "Save a copy of image before applying color correction to img2img results." This can come in handy, as sometimes the nude looks great in the preview, until it finishes and colour corrects back to the colour of the clothes that were once there. If this happens, go to your image folder and use the non colour corrected version.

  2. Another important thing to note is that you may want to avoid using large images. I've found best practice is to just open the image on your monitor and use the snipping tool to grab a screenshot of it. Then you can check "Inpaint at full resolution" and everything will work great. Going in with higher res images can sometimes lead to unexpected results, but sometimes it works too so do whatever you want.

  3. First use sd-v1-5-inpainting.ckpt, and mask out the visible clothing of someone. Add a prompt like "a naked woman." Sometimes it's helpful to set negative promps. I use "clothes, clothing, cloth." Set to fill. Sampling method=Euler, steps=80 (Sometimes 80 is too high, so feel free to try 40 as well), CFG=7, Denoising=0.75

  4. Switch to f222.cpkt. Mask the entire body. Set to original. Sampling method=Euler, steps=80, CFG=7, Denoising=0.3 (Go lower to keep it closer to what's already there, higher to generate a slightly better version. Just don't go too high or you'll get something different all together).

  5. For outpainting (creating parts of the image that don't exist) switch back to sd-v1-5-inpainting.ckpt. You can try Fill or Original for this, but usually Original works best. Sampling method=Euler a, steps=80, CFG=7, denoising=0.8. It's best practice to only outpaint in one direction at a time. As for the prompt, you don't need to include too much. You could just use "A naked woman standing," but sometimes something like "a naked woman squatting" or "a naked woman sitting" does the trick. It's not always necesary, but you may include some background elements. For this one I simply put "a naked woman squatting, legs spread, splits."

  6. Once you've got an outpainted image that you are happy with, use sd-v1-5-inpainting.ckpt with the same settings as earlier to remove or fix up anything you don't like. Then switch over to f222.cpkt to clean up the body a bit and make it blend in wit the rest.

  7. Repeat all steps until done!

I hope this information is helpful to some people. Of course, there are various approaches that could be utilized to address the issue. With the use of Photoshop, you can even make rough adjustments to the pose of individuals, re-import them, and repeat the same steps multiple times. There is also the option to obscure someone's face using a mask and then complete the rest of the image. So many options. Enjoy! Happy Diffuzing.

Тэги: stable diffusionguidefor dummiesnudifymanual
SHA256: 12E78F270915B95098150BF6DF504A0EE4F8B2D05548D299D855E0EE9CB50E30